
Hardware components | ||||||
 |
| × | 1 | |||
 |
| × | 1 | |||
Hand tools and fabrication machines | ||||||
| ||||||
| ||||||
| ||||||
| ||||||
| ||||||
| ||||||
A quick and fun Christmas Card activity that will turn a piece of paper into a musical interface!
Draw a card, and make it play sounds with Electric Paint and the Touch Board.
Materials: To begin you will need:
1 x Touch Board
1 x Electric Paint Pen or Jar
1 x stencil
—
1 x paintbrush
1 x pencil
1 x masking tape
1 x paper
1 x pen
1 x color markers
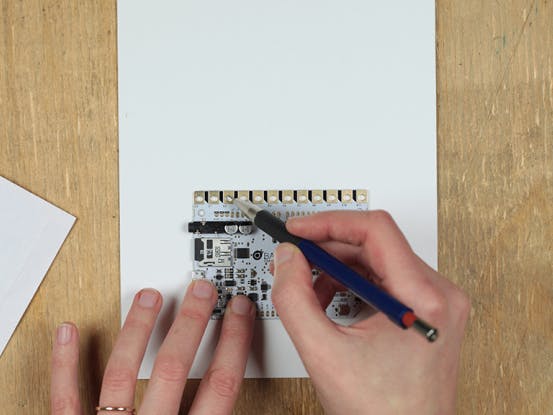
Step 1: Outline
Using a pencil outline the placement for your Touch Board on a piece of 260gsm paper.
Make sure to mark out the circles for the Electrodes.
Links
Step 2: Draw Your Card
Get creative! Use markers, crayons, pencils, or paint to design and illustrate your card.
Links
Step 3: Stencil
Why not use your stencil in your design?
Attach your stencil using a bit of masking tape to draw the lines where the Electric Paint will lead off the electrodes from your Touch Board.
Links
Step 4: Apply Paint
Using a stapling brush, apply Electric Paint onto the stencil where you want the conductive lines to go.
Links
Step 5: Remove + Dry
Once you’re done applying the paint, remove your stencil.
The paint should take 5 – 15 minutes to dry, but if you want to speed up the process you can use a hairdryer.
Links
Step 6: Elaborate!
Get creative with the pattern you make using Electric Paint. Don’t forget that this material is not only functional, but can be used as a graphical element in your design.
In this case, I’ve used it to create the shape of a tree by making lines of varying lengths.
Links
Step 7: Embellish
Why not use a black paint to expand on your design?
The graphics made with conductive paint can’t make contact with each other for the sensors to work, but that doesn’t mean you can’t use normal black ink too! Add detail and texture to your illustration with non-conductive materials to embellish your design.
Links
Step 8: Apply Paint
Once your design is finished you’re ready to apply conductive paint.
We’ve used the Electric Paint Pen because it provides a finer line than we can get with the brush.
In our design, the parallel lines will be connected to the Touch Board, so we’ve coated each of these with Electric Paint.
Links
Step 9: Attach Touch Board
Center the Touch Board to the lines you’ve painted and attach it by applying a small droplet of Electric Paint both beneath and above each electrode.
Let your Card sit for 5 – 10 minutes until it is completely dry.
For more details on this step please view the tutorial below.
Links
Step 10: Play!
Touch the sensors and play your card!
Remember you can upload any tracks you want onto your microSD card. You can even make it play MIDI notes.
To learn how to do either of these check out the tutorials below.
We hope you enjoyed this tutorial and that you are happy with your creation. We’d love to see what you’ve made so email us images at info@bareconductive.com
Comments