
Hardware components | ||||||
 |
| × | 1 | |||
 |
| × | 1 | |||
 |
| × | 1 | |||
Hand tools and fabrication machines | ||||||
| ||||||
| ||||||
| ||||||
| ||||||
| ||||||
| ||||||
Screen printing is a simple method you can use to apply an even and thin layer of Electric Paint onto a flat surface. This is a great way to create multiple copies of the same image or get highly precise graphics. In this tutorial, we show you how to use a vinyl stencil with your screen.
Materials: To begin you will need:
1x 50ml Electric Paint
-
Tape
Paper
Vinyl
1x Squeegee
1x Spatula
1x Screen (T43 mesh)
Step 1: Prepare your vinyl
In this tutorial, we use vinyl as our stencil. The first step is to prepare your vinyl. You can either cut the image you want by hand or create a design on Illustrator or another vector program and cut it out with a laser cutter or a vinyl cutter. (The Touch Board starter kit contains some vinyl stencils too).
Links
Step 2: Apply your vinyl
Carefully apply the vinyl onto your screen. Peel off the bottom layer to expose the sticky side and start attaching the vinyl down onto the frame. Slowly remove the bottom layer while pressing the vinyl down. Be careful not to stretch the vinyl and to avoid any air bubbles forming underneath. You can always flatten these out again once you’ve removed the backing completely.
Links
Step 3: Mask off with tape
Once the vinyl is attached to the frame, make sure to mask the vinyl off with tape. This is especially important if the stencil doesn’t cover the full screen. This will make sure that Electric Paint will not spill over the sides of your graphic when you apply it. This is also a good time to remove cut-outs and expose the shapes that are going to be coloured in with the paint.
Links
Step 4: Secure the paper
If printing onto paper, make sure to attach your paper onto a flat surface. If you’re using a screen printing bench you can skip this step. If not, use some masking tape. Make sure you remove some of the tack form the tape by fluffing it against your jeans to make sure it doesn’t rip the paper.
When you pull the paint through the screen the paint will stick the paper to the frame. We want to secure the paper so that is held down when we lift off the frame. Ensure that the tape has a good grip and that the paper is fully secured.
Links
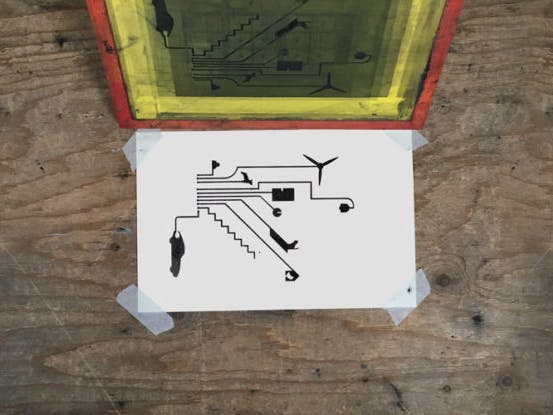
Step 5: Apply the paint
Place the screen with the vinyl carefully over the paper, ensuring that it is well aligned. Then take paint from the jar with a spatula and spread across one end. Make sure that the spread of paint is as long as the edge of your graphic to ensure full coverage, as shown on the top image on the right.
Hold your squeegee at a 45-degree angle and pull the paint across the screen. You will do this twice. The first time is called ‘flooding the screen’ as you’re just trying to get a cover of paint over the graphic. The second pull (in the opposite direction) is when you apply full pressure so that the paint transfers down onto the paper.
Links
Step 6: Take off the frame - results!
You can now carefully lift off the screen. Check beneath the frame and see if the paper is lifting off – sometimes, the tape used to secure the paper loses grip. If the paper is lifting off, hold it down as best as you can to avoid any smudging. If it all went well, you will have a beautiful Electric Paint print.
If you’re doing multiple editions, print all your runs as quickly as possible as the paint can dry on the screen and block the paint from going through. If this happens, don’t panic, you can simply wash off the screen with water and start again.
Now you’re ready to attach your graphic to the Touch Board or Pi Cap and start making sensors!
Comments