

Hardware components | ||||||
| × | 1 | ||||
Software apps and online services | ||||||
| ||||||
| ||||||
A starter board for platform agnostic IoT Developers
IntroductionThis note documents a set of introductory test exercises to interface the MXChip AZ3166 IoT DevKit with Azure under Ubuntu (18.10). The MXChip AZ3166 has many interesting features that make it a perfect evaluation board for IoT development. It surely has at least one feature that any enthusiast can test without any hurdle. Of course, the Azure world is dominated by Windows solutions but as this note illustrates Linux users can jump on the bandwagon too very easily.
Prerequisites
The key items for this exercise are:
• MXChip AZ3166 IoT DevKit
• Ubuntu 18.04 or later
• Azure subscription
Toolsets
The exercise relies on the prior installation of the following packages:
• Azure CLI
• Arduino IDE
there is an issue with Arduino IDE v1.8.7, later or earlier versions are fine
• Visual Studio Code with the following extension:
◦ Arduino
• Node.js
Azure CLI
This section covers the following topics for Azure CLI:
• Installation
• Validation
• Update
Installation
• Install the packages
• Install the Microsoft signing key
• Add the Azure CLI repository
• Update the repository information
• Run Azure CLI with credentials
Install packages
The commands for the installation of the package are:
sudo apt update
sudo apt install curl apt-transport-https lsb-release gpg
Install the Microsoft key
The command for the installation of the Microsoft signing key is:
curl -sL https://packages.microsoft.com/keys/microsoft.asc | \
  gpg --dearmor | \
  sudo tee /etc/apt/trusted.gpg.d/microsoft.asc.gpg > /dev/null
Add Azure CLI repository
The command to add the Azure CLI repository is:
AZ_REPO=$(lsb_release -cs)
echo "deb [arch=amd64] https://packages.microsoft.com/repos/azure-cli/ $AZ_REPO main" | \
  sudo tee /etc/apt/sources.list.d/azure-cli.list
Install Azure CLI packages
The commands to install the Azure CLI package are:
sudo apt-get update
sudo apt-get install azure-cli
Validation
Enter the following command to run the Azure CLI:
az login
Enter the credentials to logon to Azure upon prompt:
user@ubuntu:~$ az login
Note, we have launched a browser for you to login. For old experience with device code, use:
az login --use-device-code
You have logged in. Now let us find all the subscriptions to which you have access...
Upon acceptance of the logon credentials, the system will return summary information in JSON format on Azure subscriptions.
Update
Subsequently, if there is a need to upgrade the Azure CLI package enter the following commands:
sudo apt-get update && sudo apt-get install --only-upgrade -y azure-cli
Arduino IDE
Download the Linux 64-bit tar archive file from the official site to the ~/Downloads folder and run the following commands:
cd ~/Downloads
tar -xf arduino-1.8.9-linux64.tar.xz
sudo mv arduino-1.8.9 /opt
sudo /opt/arduino-1.8.9/install.sh
A shortcut to launch the Arduino IDE appears on the desktop at the conclusion of the installation. There is an operational issue with v1.8.7; it should not be used in the current suite of Azure IoT DevKit exercises.
Visual Studio Code
There are three methods to approach the installation of Visual Studio (VS) Code:
•.deb
•.tar.gz
•.rpm
While using the deb approach may be more automated the tar.gz file may require some extra typing. The VS Code launcher icon appears in the Applications collection after installation.
Configuration
• Launch VS Code
• Enter [Ctrl]+ to change parameter values in settings.json with the specific version number of the Arduino IDE installed in a previous step (v1.8.9 in the example below):
"arduino.path": "/home/<username>/Downloads/arduino-1.8.9"
• Enter [Ctrl]+[Shift]+P (or drill down the menu bar View → Command Palette…)
Arduino extension
• From the list of suggested actions in the drop down list of the Command Palette to select Arduino Board Manager
• Install the support libraries for MXChip – Microsoft Azure IoT Developer Kit
• There may be more than one version of the package; it would be prudent to install the latest version as illustrated below (the other versions, if any, would appear in the drop down list):
Node.js
Enter the following commands to install Node.js:
curl -sL https://deb.nodesource.com/setup_11.x | sudo -E bash -
sudo apt-get install -y nodejs
Confirm the version number of the installation with the following commands:
node -v
npm -v
Ubuntu configuration
The files installed by VS Code to support Arduino extension require the following configuration changes:
• Copy to another folder
• Add user/group for access permissions
Copy default rules
The following operations, as originally outlined by Noel Bundick, copy the rules from the installation folder to the work folder:
sudo cp /home/<user>/.arduino15/packages/AZ3166/tools/openocd/0.10.0/linux/contrib/60-openocd.rules /etc/udev/rules.d/
sudo udevadm control –reload-rules
Add user/group
The following operation creates a group, plugdev, and adds the current user to that group:
sudo usermod -a -G plugdev $(whoami)
sudo usermod -a -G plugdev <other user>
These changes will take effect only after completing a fresh login.
Test ProjectInitialization
The following steps illustrate the basic operations to create the IoT Hub device:
• Disconnect the MXChip from the host computer (if previously connected)
• Launch VS Code
• Connect MXChip to the host computer using the micro USB connection cable
• Open the command palette ([F1] or menu bar View → Command Palette...)
• Enter (or select, if appropriate) Azure IoT Device Workbench: Open Examples…
Type only the first letter of each word or drill down as shown above
• Select IoT DevKit MXChip – Microsoft Azure IoT Developer Kit
• On the status bar at the bottom-right, check:
◦ Board: MXChip AZ3166
◦ Port: /dev/ttyACMn where n is a numeric digit that matches the reference to the STMicroelectronics driver
◦ Baud: the baudrate will be changed later if it is not already set to 115200
• In the Examples – Azure IoT Device Workbench frame, drill down to Get Started group and click Open Sample button
• Select an option to permit the system to create a new example
• In the new project window, open the command palette, [F1] key, drill down to Azure IoT Device Workbench: Provision Azure Services
• From the cascade menu for Select Subscription, select a subscription for this exercises:
• For Select Resource Group, click an existing resource group:
• For Provision process:
◦ Click IoT Hub
◦ Click Select an existing IoT Hub
◦ For Select IoT Hub, click an existing hub from the drop down list:
◦ To continue the Provision process, click IoT Hub Device
• For Provision IoT Hub Device, click Select an existing IoT Hub device
• For Select an IoT Hub device, click an entry for the AZ3166 device (you may have applied a different name during the Azure IoT Hub and Device creation prior to the start of this exercise)
At the conclusion of this phase a confirmation message box will display Provision succeeded and Output pane will have the corresponding statement that IoT Hub provision succeeded.
Configure IoT Hub Device Connection String
Review the image of the MXChip AZ3166 board in the Appendix section of this document for the button positions.
• Change the board to configuration mode by:
◦ Press and hold button A (left margin)
◦ Press the release Reset button (top right margin)
◦ Release button A
• Open the command palette, [F1] key, drill down to Azure IoT Device Workbench: Configure Device Settings…
• Select Config Device Connection string
• Select IoT Hub Device Connection String
• The status bar will pop-up a window confirming Configure Device connection string successfully
Build and upload device code
• Open the command palette, drill down to Azure IoT Device Workbench: Upload Device Code
◦ VS Code will upload to the board
◦ DevKit will reboot and run the code. The Output pane will scroll as the messages are exchange between the MXChip board and Azure:
Monitor run
The status bar provides a summary of the serial port connectivity.
The command palette permits settings to be applied to the serial port.
The Azure IoT Hub Toolkit provides more detailed information on the data transmitted from MXChip to Azure. Specifically, the device to cloud (D2C) message monitoring capability is an useful to look beneath the covers on the traffic:
Tidy-UpAt the conclusion of the exercise it would be prudent to terminate the run. The meter for the messages will continue to tally the count in Azure if the program continues its run. Azure will suspend the Send and Receive operations once the number of messages exceeds the allocated quota.
SummaryThis exercise demonstrated a very simple set of operations for Azure IoT DevKit (MXChip AZ3166 board) using Ubuntu 18.10 as the desktop platform with VS Code as the IDE.
AppendixOpenOCD
The GitHub site for OpenOCD provides steps to download, install and build OpenOCD. In the interests of accuracy (mistakes during cut-and-paste are more frequent on my part than acknowledged), please refer to the corresponding link in the References section for further information.
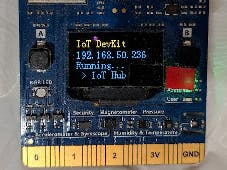
Top View
The following image of the top view of the MXChip AZ3166 provides a reference to the key physical interfaces of the board.
Test Plans
Some of the features of the MXChip that are suitable candidates for nominal tests are:
• RGB LED
• Audio
◦ Earphone socket
◦ Microphone
• OLED display
• Sensors:
◦ Humidity
◦ Magnetometer
◦ Motion
◦ Pressure
◦ Temperature
• Infrared emitter
• Buttons, x2 user
• WiFi module
ReferencesAzure Command-Line Interface (CLI)
https://www.noelbundick.com/posts/using-the-azure-iot-devkit-with-linux/
Installing Node.js via package manager


Comments