


Hardware components | ||||||
| × | 1 | ||||
| × | 1 | ||||
| × | 1 | ||||
 |
| × | 1 | |||
| × | 3 | ||||
| × | 1 | ||||
| × | 1 | ||||
| × | 5 | ||||
| × | 1 | ||||
| × | 1 | ||||
| × | 1 | ||||
Software apps and online services | ||||||
 |
| |||||
Hand tools and fabrication machines | ||||||
| ||||||
 |
| |||||
 |
| |||||
| ||||||
| ||||||
 |
| |||||
| ||||||
 |
| |||||
A local non-profit that teaches technology and science to disadvantaged girls in middle school wanted help designing an electronics project that could:
1. Be completed by >95% of participants in a one day workshop. Around 6 hours max, with breaks for lunch and other small sessions.
2. Incorporate multiple skills like their other workshops do.
3. Be similar to something I do for my job (or that someone I can find to present does for hers) so we can talk about how the project skills translate into the real world.
4. Result in an item the girls would be excited to show off and use after the class.
The DesignI had been doing sewable circuits for a while and a textiles project seemed to fit the parameters. But my own sewn circuit connections were flaky and frustrating to troubleshoot on a good day... and the girls would have a lot less sewing and circuitry experience than I do. But sewing AND circuits sounded completely reasonable. So I put together a LED project with a minimal amount of soldering and a separate flower-like diffuser that could be sewn independently. It's small enough to be worn as a pin or on a headband.
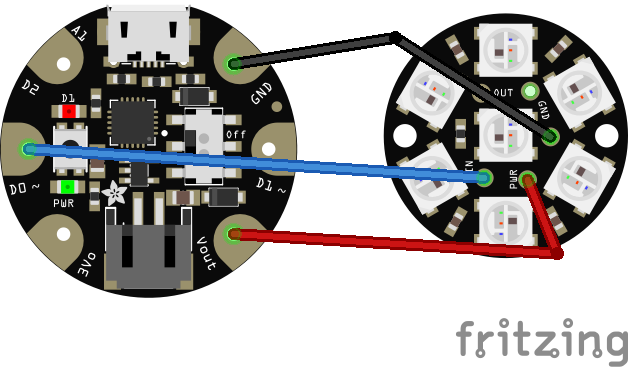
Electronics AssemblyStrip ONE end of each wire.
Place the wires in the Jewel board from the front (the one with the LEDs) and solder on the back. You need a wire in the holes labeled Data Input, GND, and 5V DC.
After waiting a moment to let the solder cool off, bend the wires around the board in between the lights.
Hot glue the round piece of flannel to the back of the Jewel board. This will prevent things on this board from touching the other one and causing electricity to flow where we don't want it!
Put the other end of the Data Input wire in to the front of the hole marked D0 on the Gemma board.
Put the other end of the 5V DC wire in to the front of the hole marked Vout on the Gemma board.
Put the other end of the GND wire in to the front of the hole marked GND on the Gemma board.
Now you can cut wires to a nice length for your board. Then pull them out and strip the ends so that there will be no sheathing near the metal on the board.
Reinsert the wires, double check they are in the correct holes. Solder just like you did the other side!
Flower AssemblyStack your pieces of tulle so that the corners are NOT lined up. This will help give you the petal shapes
Put your square of flannel in the middle, on top of the stack and sew only THREE sides of it using a sewing machine. This will be the pocket for your boards. Don't forget to backstitch at the beginning and end of the sewing!
Poke a needle with a thread knotted at one end through the back of the pocket to the front of the tulle. Flip the fabric stack over and stitch the top piece of tulle in a circle, placing your stitches at varying intervals.
Do the same with each piece of tulle, one at a time. You'll end up with a spiral of thread going through the tulle. Poke the needle through your pocket and tie a knot. Clip off the extra thread.
Now you can glue the pocket onto a headband or sew or glue a pin backing to it.
Plug your Gemma board into your laptop with a USB cable. The two LEDs should be on. If the green one is not on, flip the power switch to turn the board on.
Program your board with the example program attached. It should cycle through a few different patterns in first red, then green, and finally blue. If you need instructions to program your board, Adafruit has you covered in their Learn Guide.
Then, go wild! Pick a new color or colors, decide which pattern or patterns you want or just make it glow solid. It's your pin, don't let me tell you what to do!
Add the BatteryOnce you have your lights glowing how you like them, make it portable! Charge the battery up and then plug it into your board. Flip the switch to ON and tuck both the board and battery into the pocket on your flower. The battery should last for days on end on a single charge! Flip the switch to off when you are done wearing your pin.
- Sewing, soldering, and coding were each separate stations. We had 45 girls and split them up into three groups and rotated them through the stations.
- Each station had 90 minutes to complete their work. Each group stayed together for the entire day to reduce the time the instructors spent giving instructions. There were quiet activities available for those who finished a station early.
- We had an additional 45 minute period at the end of the day for the five or so students that needed some extra time or help to complete their pins. Mostly soldering that needed some fixing, but a couple that just couldn't settle on what their code should do. Everyone went home with a completed project.
- Pre-cut EVERYTHING. The tulle, the flannel scraps, the wires... everything. While the students are probably capable of doing this, it eliminates a lot of time with students waiting in line to do things that aren't skill-building and prevents material waste from mismeasuring or cutting mishaps.
- Kitting up beforehand is helpful, but keep the batteries and chargers in reserve until they have completed their project. This prevents them getting lost in the shuffle when changing stations.
- Thing we learned: All of the girls were completely comfortable wielding a 700°F soldering iron and side cutters, even if it was for the first time. But sewing needles were scary, and sewing machines were downright terrifying to many of them.
- The sewing station doesn't need a machine for each student. The machine sewing portion is much faster than the hand sewing, and even though it needs to be done first, the wait time isn't too bad with even 4-5 students per machine. The bolder students can go first and demonstrate to those who are more apprehensive.
- The soldering station works best if you do have an iron for each student. But one for every two students is doable.
- Tape a piece of non-stick grill mat to the table at each seat at the soldering station, and arrange the tools the same way at each one. If you have them sharing some tools, put those in a separate place off the mats. The mats will protect the tables from the heat of the irons, but more importantly, they are MAGIC for classroom management. Students with a defined work area keep their areas cleaner and do a better job at sharing commons tools and not accidentally using or moving someone else's tools or supplies, all with no extra input from the instructors. They'll often even automatically arrange their tools the same way you had them when they're done! Magic, I tell you!
- The coding station worked best with one computer for every two students. It encouraged them to talk with each other and hash out problems and try new things without sitting around waiting for an instructor for every bump in the road.
- We connected completed pins the assistant instructors made while prepping for the workshop to the laptops at the coding station. Then the girls could see what their code did independently of when they soldered their pins together. They programmed their own Gemmas when they were happy with what the stand-in pin looked like. This reduces the number of USB cables you need to buy, too!
- Put a copy of the original code in the examples folder of a fake Arduino "library" so it can be launched repeatedly by students from the Examples menu and forces them to save their project as a new file instead of overwriting the example code.
- The newer Gemma M0 boards came out after this workshop was designed. Using them with CircuitPython would allow the students to take their code home with them without having their own laptops in class. Many of our students didn't have computers of their own, making CircuitPython extra valuable as it can be edited on any library or school computer. And the Gemma M0 has a NeoPixel on it, so you can eliminate the Jewel board and the soldering if you have a shorter class period or budget limitations!


Comments