


Hardware components | ||||||
| × | 1 | ||||
| × | 1 | ||||
Software apps and online services | ||||||
 |
| |||||
Hand tools and fabrication machines | ||||||
 |
| |||||
 |
| |||||
The external ARGB header on many motherboards (for example, the ASUS ROG H370-I I used) cannot be driven by Corsair’s iCUE software. Corsair’s official Lighting Node Pro solves that—but costs around €50. Legion2’s open-source “Corsair Lighting Protocol” lets any board with an ATmega32U4 micro-controller impersonate a real Lighting Node Pro, so iCUE can control your external LED strips for a few euros.
How it works (the short version)• A genuine Lighting Node Pro identifies itself to the PC as a USB HID device.
• An ATmega32U4 (Leonardo, Micro, Pro Micro, etc.) has the USB engine built in, so we can rewrite its descriptors and fool iCUE.
• Two pins on the micro-controller output the data streams for Channel 1 and Channel 2; the firmware supplied by the Corsair Lighting Protocol project handles the USB and LED timings.
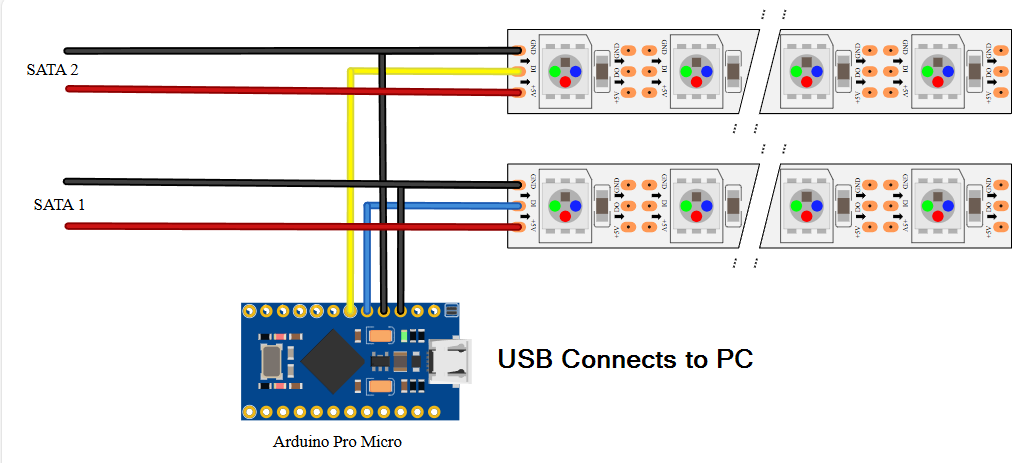
Hardware hookup and power budgeting– Channel 1 data → Pro Micro pin D2
– Optional Channel 2 data → pin D3
– 5 V and GND from USB
orfrom a SATA/Molex line if you run more than about seven LEDs
Current calculation: USB may supply only 100 mA during device enumeration, leaving roughly 70 mA after the micro-controller’s own draw—enough for one WS2812 LED at full white. Even after enumeration, the 500 mA limit means only seven LEDs. My 60-LED strip needs almost 4 A on white, so its 5 V line comes from the PC’s SATA power rail.
Solder 5 V, data and ground, test with a short strip, then mount the board in a 3-D-printed Pro Micro case (Thingiverse ID 2758098). File an opening for the strip cable if necessary, and secure the board inside with hot glue or screws.
• Open Arduino IDE.
• Add this URL to “Additional Board Manager URLs”:
• In Boards Manager, install the “CLP Boards” package.
• Select “CLP Arduino Leonardo” (works for a Pro Micro).
• Under Tools → Device choose “Lighting Node Pro”.
• Load the example sketch “Lighting Node PRO” and upload it to the board.
See it in iCUEInstall Corsair iCUE (v4 or newer). The flashed board appears automatically as “Lighting Node Pro”. Open the Lighting Setup page and enter the number of LEDs on each channel so effects scale correctly.
Example configuration for a 30-LED strip on Channel 1:
• LEDs 1 to 8 – blue gradient breathing (2-second fade-in/out)
• LEDs 9 to 12 – static green
• LEDs 13 to 16 – static red
• LEDs 17 to 24 – rainbow wave
• LEDs 25 to 30 – off (black)
In iCUE, add new effect layers for each block of LEDs, limiting their range by selecting the relevant LEDs in the strip preview. Use a Gradient effect with three control points to produce the breathing blue block (20 % → 100 % → 20 % brightness).
Going further– Drive a second strip or PWM fans from Channel 2.– Change the firmware’s device type to “Commander Pro” to expose fan and temperature channels.– Modify the sketch if you need other LED drivers such as APA102/DotStar.– Chain multiple Pro Micros for more channels—iCUE will list each one separately.
With this inexpensive clone you can light every corner of your build without buying Corsair’s hardware. Have fun building and tweaking!


Comments