

Hardware components | ||||||
 |
| × | 1 | |||
 |
| × | 1 | |||
 |
| × | 1 | |||
 |
| × | 1 | |||
 |
| × | 20 | |||
| × | 5 | ||||
 |
| × | 5 | |||
 |
| × | 1 | |||
 |
| × | 1 | |||
 |
| × | 1 | |||
Software apps and online services | ||||||
 |
| |||||
 |
| |||||
Hand tools and fabrication machines | ||||||
 |
| |||||
 |
| |||||
 |
| |||||
 |
| |||||
INTRODUCTION
As the title suggests, this device is a sensor-based wearable that converts simple hand gestures to text and speech. I decided to make this a project in university.
METHODOLOGY
For this project, the tools and technology that will be used are an Atmega328p microprocessor, Bluetooth (Bluetooth Module), Flex sensors, Accelerometer, Power module, Resistors, and Text-to-speech software (Bluetooth terminal app). The flex sensor measures the bending of fingers according to gesture and outputs changes in resistances corresponding to the amount of bending. The Accelerometer sensor measures the linear movements of the hand on the X, Y, and Z axes and outputs different values of X, Y, and Z corresponding to the movement on these axes.
All the data from sensors are then processed by the Arduino Nano, which involves IF/ELSE, AND, and OR logical combinations of all the sensor outputs in order to match the resultant output with pre-stored values of different signs regarding the alphabets. For this, appropriate ranges are set for each alphabet and the words that can be recognized with a single hand based on the measured data obtained from repeated measurements. The HC-05 Bluetooth module is connected to Arduino NANO. The processed data are then transferred to the Bluetooth module (transmitter) in string format. The Android mobile also has an inbuilt Bluetooth capability. These two Bluetooth devices are then paired, and the string is transmitted to the Android application.
The Android application receives data via Bluetooth in bytes format and then converts them into a string. Finally, the string is converted into a voice using the text-to-speech application of Android mobile. This overall system is mounted over a normal glove for easy handling and recognizes hand gestures accurately.
The main principles behind the design of this system are change in resistance, acceleration due to gravity, and real-time systems.
The relevance of resistance is to how the flex sensor works. The more the flex sensor is bent, the greater the resistance. The conductive ink printed on the sensor acts as a resistor. When the sensor is straight, this resistance is about 25k. The conductive layer is stretched when the sensor is bent, resulting in a reduced cross-section. This reduced cross-section results in increased resistance. At a 90° angle, this resistance is about 100KΩ.
When the sensor is straightened again, the resistance returns to its original value. One can determine how much the sensor is bent by measuring the resistance. The easiest way to read the flex sensor is to connect it with a fixed value resistor (usually 10 or 47 kΩ) to create a voltage divider as shown in figure 5 To do this, one end of the sensor is connected to Power and the other to a pull-down resistor. Then the point between the fixed value pull-down resistor and the flex sensor is connected to the ADC input of an Arduino. This way, one can create a variable voltage output, which can be read by Arduino’s ADC input.
On the glove, 5 flex sensors are fitted for the 5 different fingers. The flex sensors change resistance depending on the amount of bend by the fingers. Pin 1 of the flex sensor is connected to the 3.3v on the Arduino Nano, and then, Pin 2 is connected to a 10k ohms resistor, which acts as a voltage divider. The point between the pull-down resistor and the flex sensor is connected to the analog pin on the Arduino. Figure 6 shows the bend sensing module.
The accelerometer (ADXL 335) in this system is used as a tilt detector. It has an analog output that varies from 1.5 volts to 3.5 volts. ADXL335 is a three-axis analog accelerometer Integrated circuit (IC), which reads X, Y, and Z-axis acceleration as analog voltages. By measuring the amount of acceleration due to gravity, an accelerometer can figure out the angle it is tilted with respect to the earth. By sensing the amount of dynamic acceleration, the accelerometer can find out how fast and in what direction the device is moving. The basic function of this device is to detect the tilting of the hand and send relevant data according to meaningful gestures, to the microcontroller which receives the data and saves them. Figure 7 shows the interfacing of the Arduino nano with the accelerometer to produce the position-sensing module.
The Bluetooth module is responsible for sending output data to the mobile app, enabling text-to-speech conversion, and comprises the HC-05 Bluetooth and the Arduino microcontroller. The microcontroller processes what phrase has been represented and sends that data to the HC-05 module to send the data to the android device which is connected to it through Bluetooth. Figure 8 shows the transmission module.
NOTE: I strongly advise soldering with care as the flex sensor pins are very delicate. You determine how you want the layout to be because mine was a bit messy and I would not advise anyone to do it my way. You may choose to use a perf board or not, just ensure that all the components are connected properly and securely to the glove.
I used a USB cord to the Arduino Nano as my power source, but you may decide to use a battery. Figure out how to use a battery yourself, it is not very difficult. I chose not to use a battery due to insufficient space on the device and inconvenience.
If you are wondering why my prototype has only 3 flex sensors, 3 go damaged during soldering, that is why I advise that you be careful when soldering. The flex sensor on the middle finger also got damaged but I did not notice until I already soldered it.
Ideally, an Inertial Measuring Unit (IMU) is of much better use in this project, but due to a few annoying factors, I could not get one in time.
If you have any other inquiries, please feel free to mention them in the comment section.
When you are done with soldering, the final product should look something like this:
As for the Android app, you may choose to create one for yourself using MIT app inventor 2 or any other tool you are proficient with as an Android developer. If you want the one I created, please mention so in the comments because you will have to talk to me directly. The application looks like this:
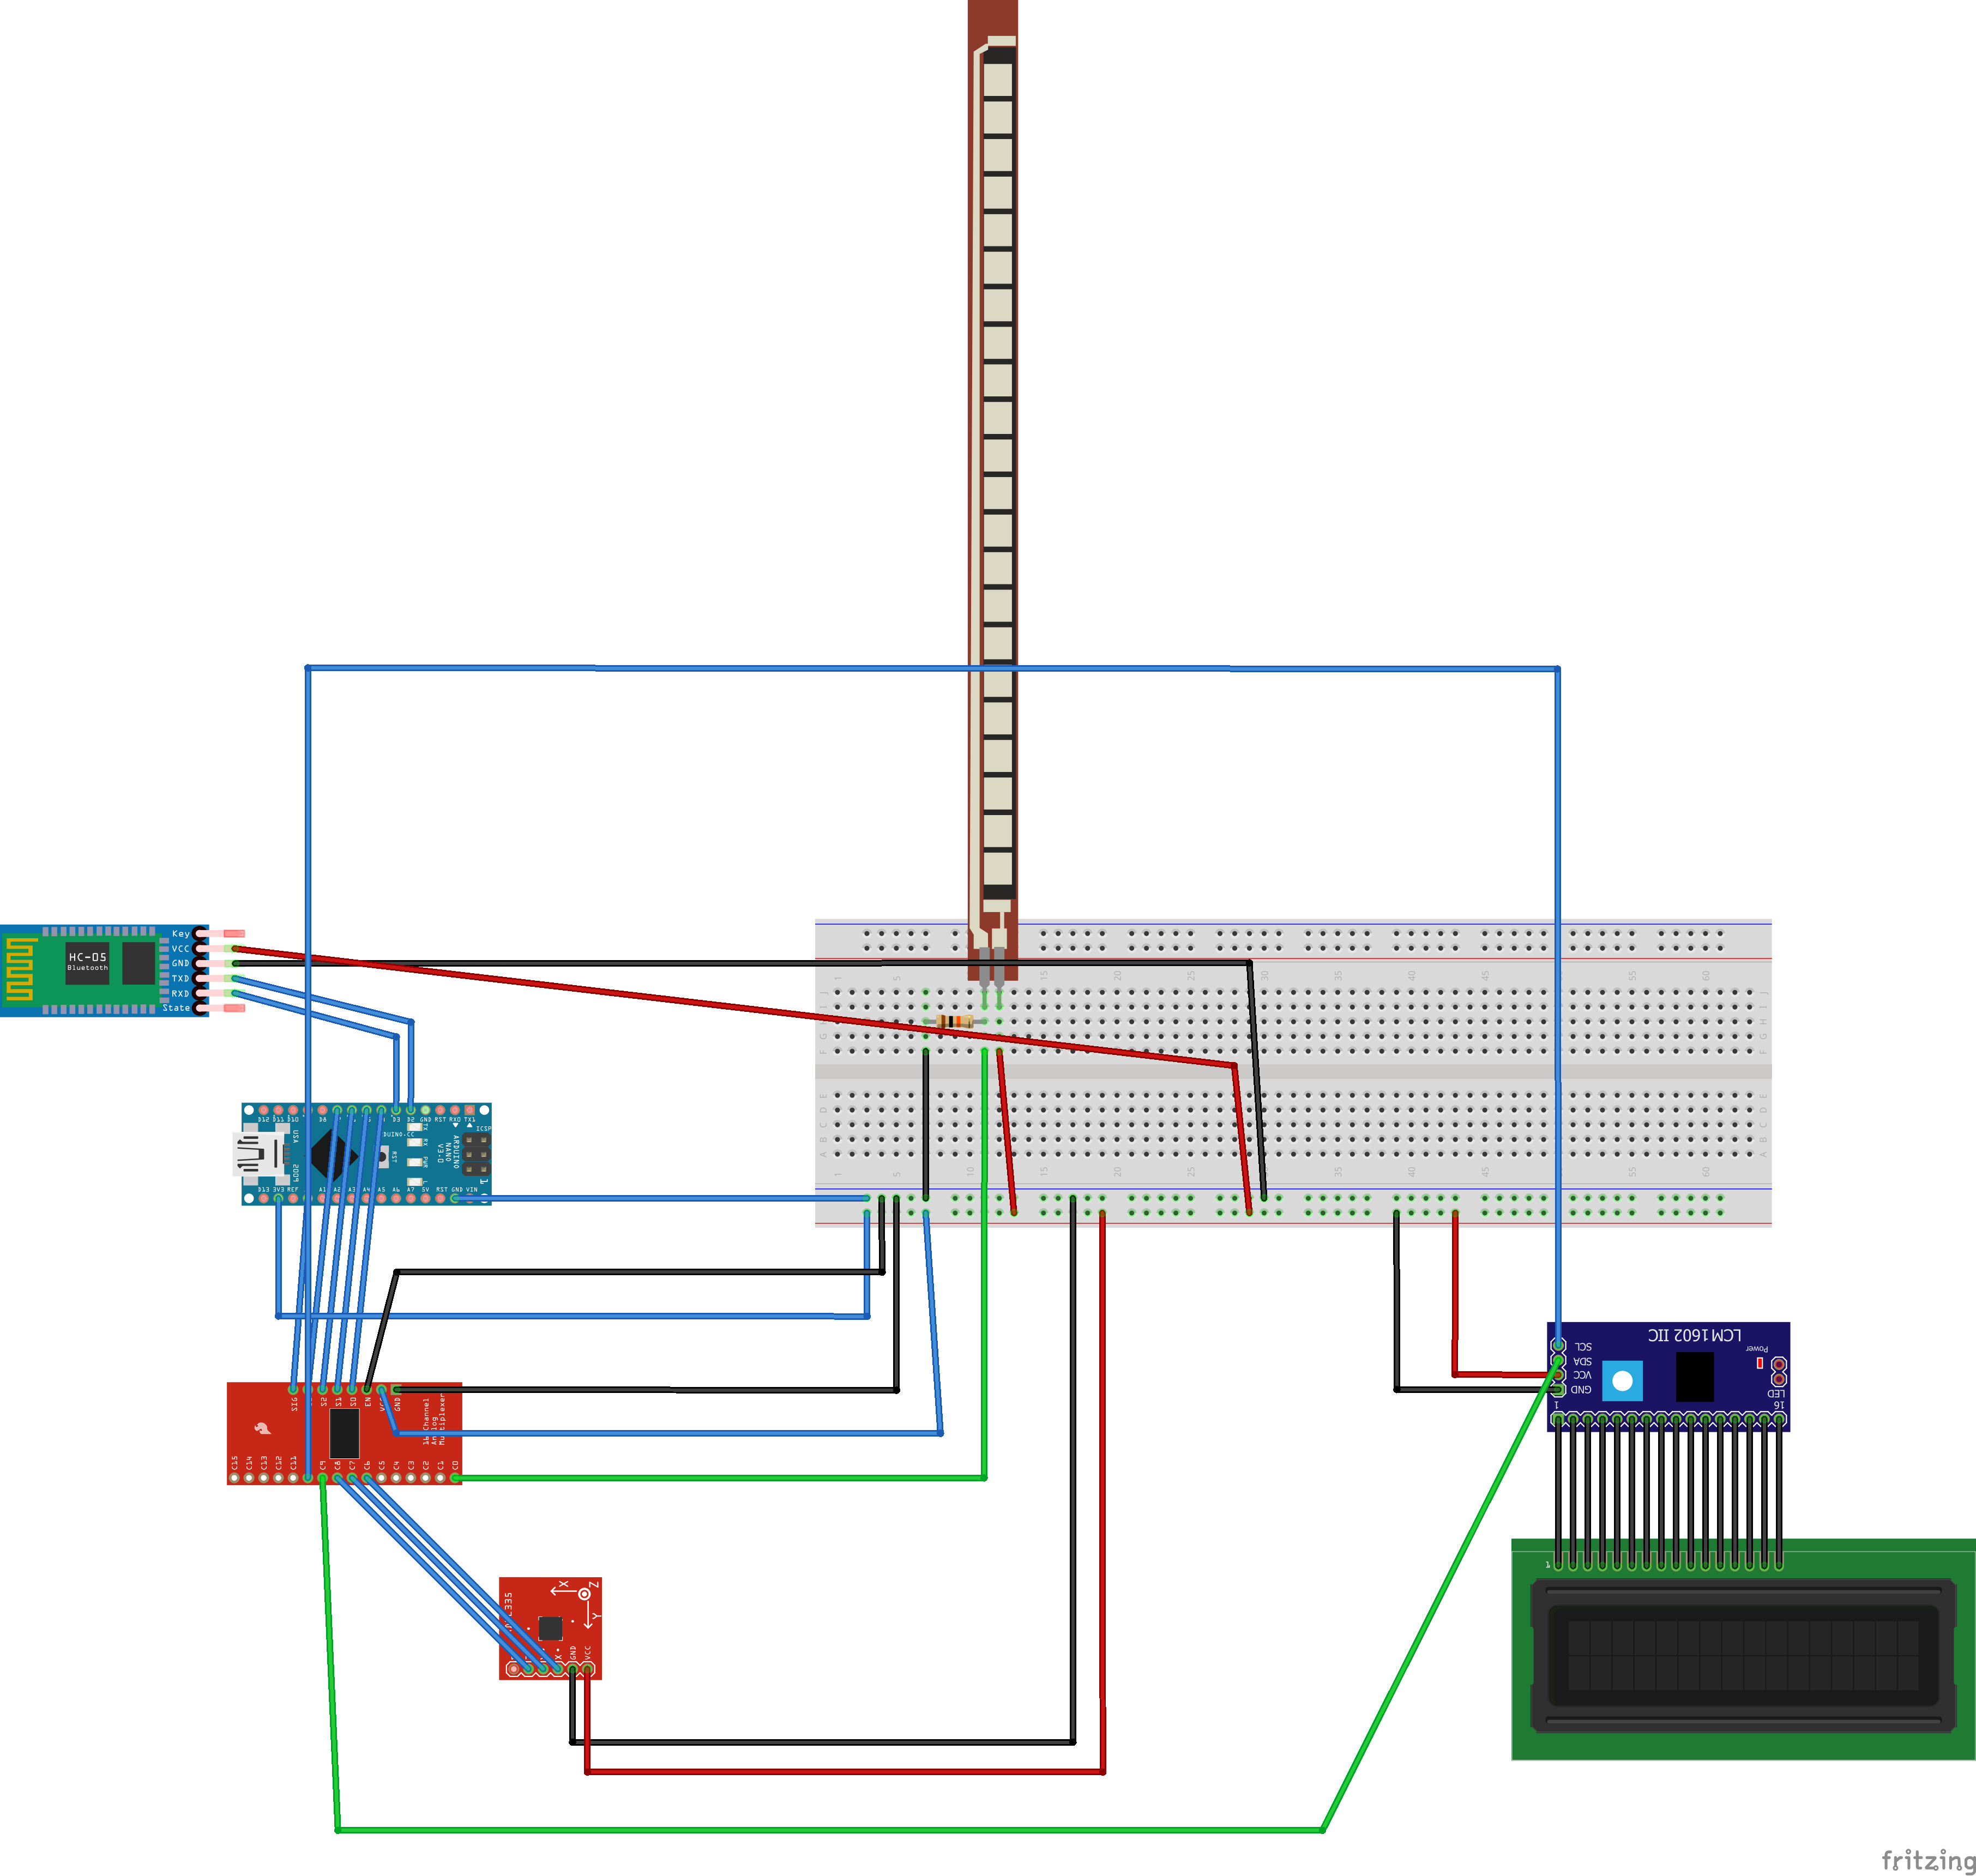
Circuit diagram
Note that the use of an LCD is a choice you should make. Even though I included an LCD in my circuit diagram, I did not incorporate it into my final prototype and ended up using only the Android app I developed.
Finally, I used an Arduino Mega in the circuit diagram but used a Nano in the final prototype


_3u05Tpwasz.png?auto=compress%2Cformat&w=40&h=40&fit=fillmax&bg=fff&dpr=2)


Comments