


Hardware components | ||||||
| × | 1 | ||||
 |
| × | 1 | |||
 |
| × | 1 | |||
 |
| × | 1 | |||
 |
| × | 1 | |||
 |
| × | 1 | |||
RoomMapper is an open-source room measurement system that uses RPLidar and Raspberry Pi to create accurate 2D floor plans and room dimensions automatically. This project is designed for contractors, interior designers, real estate agents, and DIY enthusiasts who need quick and precise room measurements.
- 360° Rotational Scanning: Uses RPLidar sensor to scan the entire room perimeter and collect real-time distance data (point cloud)
- Floor Plan Generation: Converts raw point data into 2D floor plans showing room shape
- Automatic Dimension Calculation: Calculates length, width, and total area based on generated maps
- Data Storage & Display: Saves floor plans and dimensions as images or data files on Raspberry Pi
- Simple User Interface
- Quick floor plan creation for property valuation
- Accurate space measurement for construction materials
- Furniture layout and interior design planning
- DIY robotics and indoor navigation projects
This project consists of the following main components:
Sensing Part (RPLidar):
- RPLidar operates on LiDAR principle (Light Detection and Ranging)
- Emits invisible laser beam (Class 1) and rotates rapidly to measure time-of-flight
- Calculates distance to obstacles in all directions (360°), generating point cloud data
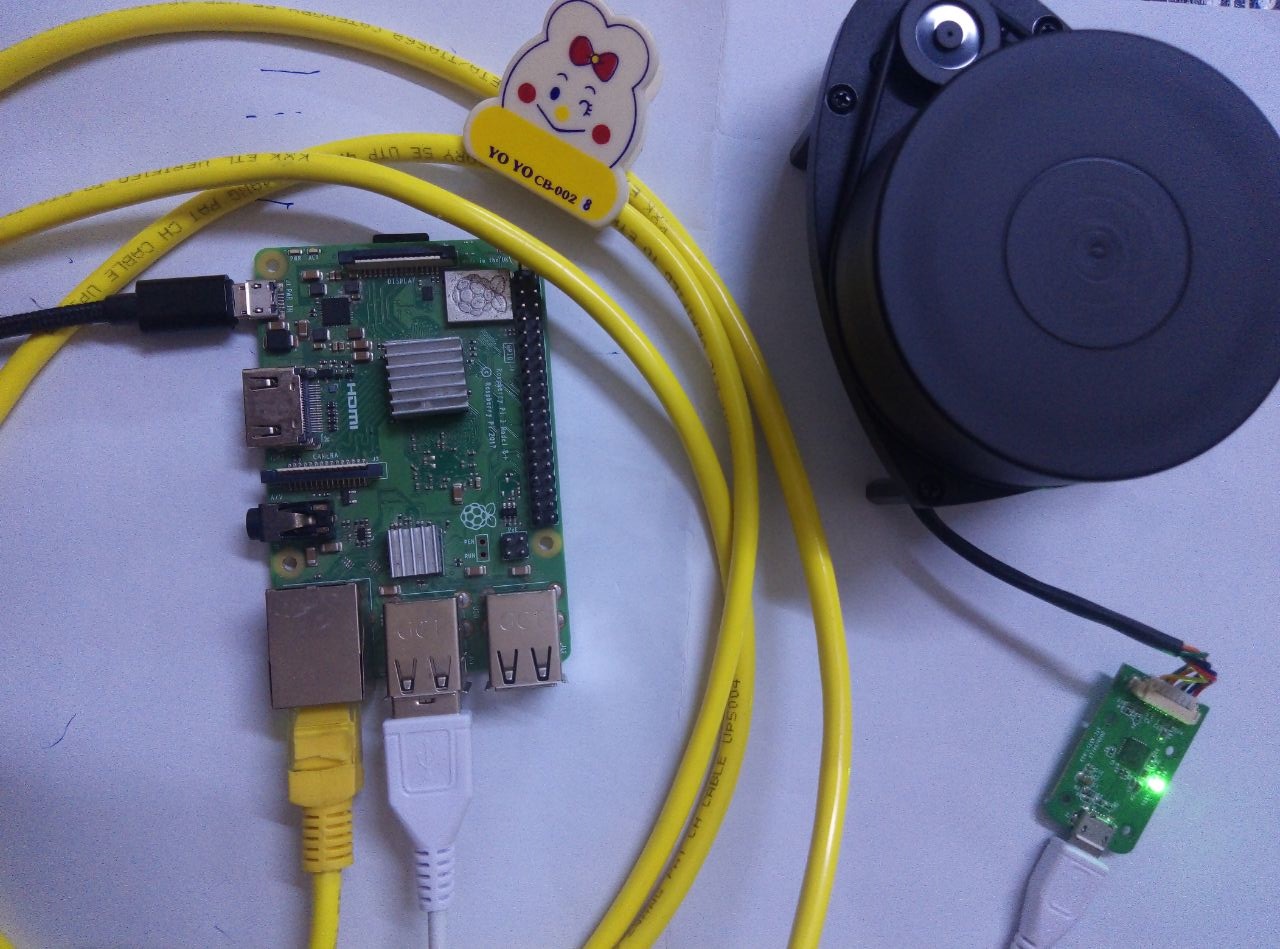
Main Processing Unit (Raspberry Pi):
- Controls RPLidar via USB commands
- Collects real-time point data stream
- Processes raw data: noise filtering, coordinate conversion (polar to Cartesian)
- Implements mapping algorithms (outlier filtering, point clustering)
- Calculates dimensions between parallel walls
Power Supply:
Stable power source for both RPLidar and Raspberry Pi
Recommended: High-capacity battery for portable operation
User Interface (Optional): LCD display
Software codeThis Python application creates a real-time room mapping and measurement tool using an RPLidar sensor. It visualizes the scanned environment and calculates room dimensions in real-time.
🏗️ Core Components
1. Main RoomMapper Class
class RoomMapper:
def __init__(self):
Purpose: Main class that manages the entire mapping process
Responsibility: Coordinates between hardware and software components
2. Variables and Settings
Display Settings:
self.screen_size = (1024, 768)    # Screen size
self.center_x, self.center_y      # Screen center
self.scale = 0.2                  # Drawing scale
self.point_size = 3               # Point size
Data Storage:
self.point_cloud = []      # Collected point cloud data
self.room_data = None      # Calculated room measurements
self.buffer_lock = threading.Lock()  # Thread-safe lock
🔧 Initialization Functions
1. System Initialization - initialize_system()
def initialize_system(self):Purpose: Initialize all system components
Sequence:
- Initialize Pygame for display
- Connect to LiDAR sensor
- Load fonts
- Start scanning process
2. LiDAR Connection - connect_lidar()
def connect_lidar(self):Purpose: Detect and connect to LiDAR sensor
Steps:
- Automatic port discovery
- Attempt connection to /dev/ttyUSB0 (default for RPLidar)
- Get device information (model, firmware, health status)
- Start LiDAR motor
📡 Data Collection System
1. Background Scanning Thread - lidar_scan_worker()
def lidar_scan_worker(self):Purpose: Continuously collect data from LiDAR in background
How it works:
- Use lidar.iter_scans() to get scan data
- Filter invalid measurements (low quality, out-of-range distances)
- Convert polar coordinates to Cartesian
- Store points in point_cloud
2. Data Processing - process_real_data()
def process_real_data(self):Purpose: Analyze point cloud to calculate room measurements
Calculations:
- Width & Height: From coordinate boundaries
- Area: Length × Width (in square meters)
- Room Center: Average of coordinates
- Confidence Level: Based on data quantity and quality
🎨 Display and Rendering System
1. Main Drawing - draw_frame()
def draw_frame(self):Purpose: Assemble and organize all drawing elements
Components:
- Screen background
- Main radar display
- Control and information panels
- Screen update
2. Display - draw_radar_display()
def draw_radar_display(self):Components:
- Grid: Reference distance lines
- Points: Real LiDAR data points
- Room Boundary: Calculated rectangle
- Robot: Sensor position representation
3. Point Cloud - draw_real_point_cloud()
def draw_real_point_cloud(self):Point Coloring:
- 🔵 Light Blue: Close points (< 2 meters)
- 🟢 Green: Medium points (2-6 meters)
- 🟡 Yellow: Far points (> 6 meters)
4. Information Panels
Control Panel - draw_control_panel()
- System title
- Scanning status (active/stopped)
- Real-time statistics
Measurements Panel - draw_measurements()
- Room dimensions (length, width, area)
- Data quality and confidence level
- Data source (Real LiDAR)
🎮 Control System
1. Event Handling - handle_events()
def handle_events(self):Supported Keys:
- Z: Zoom in display
- X: Zoom out display
- R: Reset scan data
- P: Process data and calculate measurements
- ESC: Exit program
2. Reset Function - reset_scan()
def reset_scan(self):Purpose: Clear all data and start new scan
Actions:
- Clear point cloud
- Reset room measurements
- Reset counters
⚙️ Lifecycle Management
1. Start Mapping - start_mapping()
def start_mapping(self):Sequence:
- Start data collection thread
- Enter main loop
- Process data periodically (every 3 seconds)
- Continuous drawing (60 frames/second)
2. Stop Mapping - stop_mapping()
def stop_mapping(self):Actions:
- Stop scanning thread
- Stop LiDAR motor
- Disconnect from device
3. Cleanup - cleanup()
def cleanup(self):Purpose: Release all resources
Includes: Stopping LiDAR and closing Pygame
📊 System Outputs
1. Graphical Output
- Live visualization of LiDAR data
- Real-time room measurements
- Reference grid for distances
2. Console Output
📊 Scan 10: 245 points
📏 Real Measurements: 4.25m x 3.80m, Area: 16.15m²
3. Calculated Data
{
'width_m': 4.25,       # Room width in meters
'height_m': 3.80,      # Room height in meters
'area_m2': 16.15,      # Area in square meters
'confidence': 85,      # Confidence level %
'point_count': 1245,   # Number of data points
'data_source': 'REAL_LIDAR'  # Data source
}
Announcements
- Placement Matters: Position RPLidar near room center at optimal height (30-50cm) for best results
- Surface Limitations: Dark/black surfaces may absorb laser light, reducing detection accuracy
- Reflective Surfaces: Glass and shiny surfaces may cause false reflections
- Power Requirements: Use high-quality, stable power supply to prevent crashes during scanning
- Safety: Avoid direct eye exposure to laser, though it's Class 1 low-power
- Connect RPLidar USB cable to Raspberry Pi
Software Setup on Raspberry Pi:
Uses pyserial to talk directly to the LiDAR and custom parser for LiDAR data packets.
Or:
git clone https://github.com/SkoltechRobotics/rplidar
cd rplidar
sudo python3 setup.py install
Operation:
- Run: python3 code.py
Enjoy your LIDAR mapping! 🗺️


Comments