


Hardware components | ||||||
 |
| × | 1 | |||
 |
| × | 1 | |||
 |
| × | 1 | |||
| × | 1 | ||||
Software apps and online services | ||||||
| ||||||
 |
| |||||
This project demonstrates how Grablo can transform complex voice control system development into simple, intuitive building. We're creating a voice-controlled servo motor system that rotates to precise angles just by speaking numbers - no buttons, no knobs, just your voice.
Using on-device AI speech recognition with Voice Activity Detection (VAD), the system automatically filters out silence and background noise, capturing only actual speech commands without false triggers.
Why did we decide to make it?Building voice-controlled hardware traditionally requires complex programming: implementing speech recognition engines, managing audio input streams, handling text parsing and validation, integrating servo motor libraries, debugging timing issues, and coordinating all these components. With Grablo, you simply think "rotate servo to the angle I speak" and arrange visual blocks to make it happen.
What You'll BuildA complete voice-controlled servo system featuring:
- AI-powered on-device speech recognition with automatic voice activity detection
- Real-time servo motor control responding to spoken angles (0-180 degrees)
- Optional LCD display showing recognized speech text
- Dashboard widget for visual feedback
- Install software:Download and install Grablo software on your Raspberry Pi
- Set up hardware: Wire servo motor and LCD display (optional) according to circuit diagram
- Connect microphone: Plug in USB microphone or pair Bluetooth microphone
- Get this project:Project Link
- Connect controller: In your project, go to "Connect Controller" and enter IP address
- Hit RUN: Start controlling servo motor with your voice!
💡Want to build it yourself? Skip to Build Process and follow the detailed tutorial
Build ProcessLogicControl 1: Continuous Speech RecognitionCreate a logic and add a control that continuously listens for voice commands
- Condition (Always): Always running to capture voice at any time
- Action (Speech-to-Text):
- Use AI-powered on-device speech recognition with built-in model
- Command: Listen - captures only actual speech and ignores everything else
Create a control that converts recognized speech into servo motor rotation
- Condition (Watch Action): Triggers when speech recognition completes
- Select the "Listen" action
- Status: Complete - Action 1 (Speech-to-Text): Get recognized text
- Command: Get Text
- Store result in variable:Voice_Text - Action 2 (Set Variable): Convert text to number
- Store converted number in variable:Servo_Angle - Action 3 (I/O Device Control): Rotate servo motor
- Device: Raspberry Pi Servo Motor Library
- Servo type: SG90 (0-180 degrees)
- Command: Set Position
- Position value:Servo_Anglevariable - Action 4 (Optional - I/O Device Control): Clear LCD display
- Device: I2C LCD (16x2)
- Command: Clear - Action 5 (Optional - I/O Device Control): Show text on LCD
- Device: I2C LCD (16x2)
- Command: Print
- Text value:Voice_Textvariable
Create a new dashboard with a label widget displaying:
- Voice Text Widget: Shows the recognized speech
Congratulations! You've just built a complete voice-controlled servo motor system using only 2 simple controls and zero lines of code. This is the power of visual programming with Grablo - what traditionally requires complex speech recognition and motor control programming is now accomplished with intuitive drag-and-drop blocks.
Expected ResultsWhen you run your project:
- Say "45" → Servo rotates to 45 degrees
- Say "90" → Servo rotates to 90 degrees
- Say "180" → Servo rotates to 180 degrees
- Non-numeric speech (like "hi there") is displayed but servo doesn't move
- LCD shows recognized text in real-time
- Dashboard displays voice commands as they're recognized
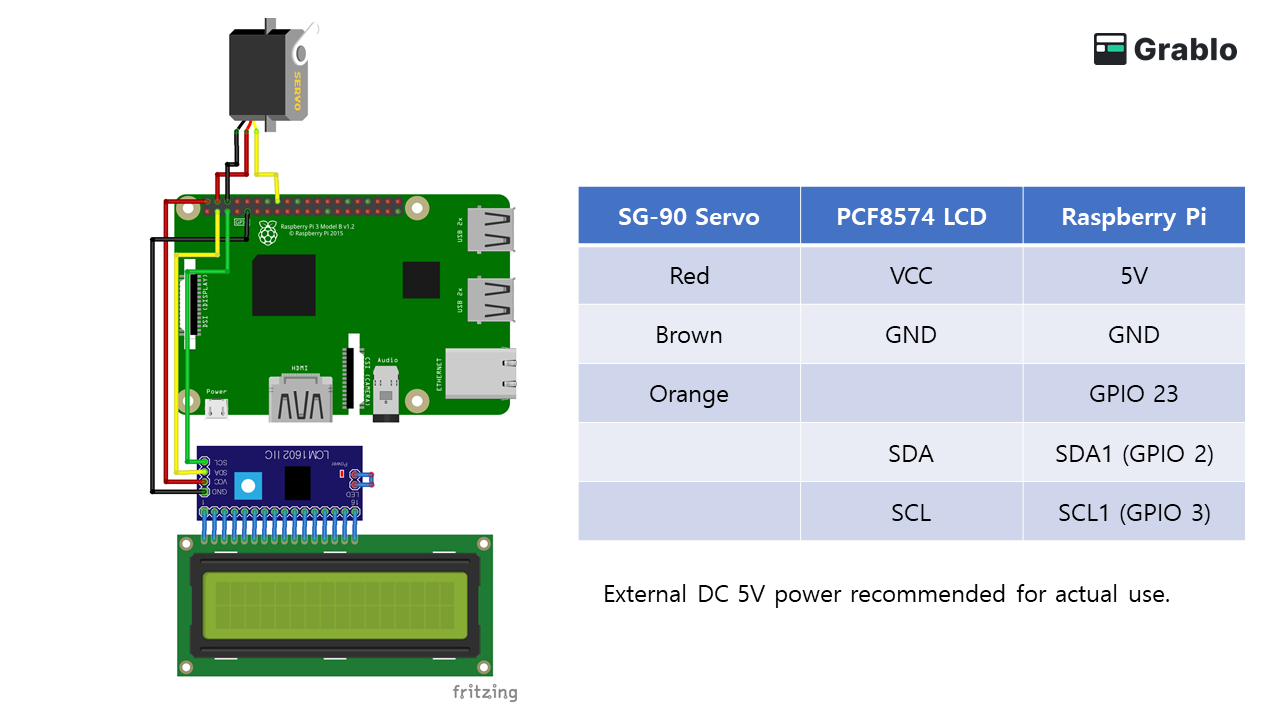
Servo Motor (SG90):
- Red wire → 5V power (external DC power supply recommended)
- Brown/Black wire → GND
- Orange/Yellow wire → GPIO pin (e.g., GPIO 23)
Optional - I2C LCD Display:
- VCC → 5V
- GND → GND
- SDA → GPIO 2 (SDA)
- SCL → GPIO 3 (SCL)
Microphone:
- Connect USB microphone to any USB port on Raspberry Pi
- OR use USB audio adapter with 3.5mm microphone
- OR connect Bluetooth microphone/headset wirelessly
⚠️ Important Notes:
- Raspberry Pi's 3.5mm jack is audio output only - no mic input support
- Use external 5V DC power supply for stable servo operation
- Single servo + small LCD can run on Pi power, but external power recommended
Watch the complete 7-minute build process:
What's Next?Expand your project using more blocks:
- Multiple servos: Control pan-tilt system with "pan 45 tilt 90" voice commands
- Natural language commands: Parse phrases like "turn left" or "face forward"
- Preset positions: Say "home position" to return servo to 0 degrees
- Voice feedback: Add text-to-speech to confirm commands
- Voice-controlled robot arm: Expand to 4-6 servos for full robotic arm control
- No voice recognition: Check microphone connection in Raspberry Pi audio settings
- Servo not moving: Verify GPIO pin number, wiring connections, and power supply
- Incorrect angles: Adjust servo pulse width values in device settings based on datasheet
- LCD not displaying: Check I2C address and wiring (use
i2cdetect -y 1command) - Recognition errors: Try speaking more clearly, reduce background noise, or download better speech model
- Non-numeric speech error: This is expected behavior - servo only moves for valid numbers
- Official Website:https://grablo.co
- Web Application:https://app.grablo.co
- Documentation:https://doc.grablo.co
- Support Email:support@grablo.co


Comments