


Hardware components | ||||||
 |
| × | 2 | |||
 |
| × | 1 | |||
 |
| × | 1 | |||
Software apps and online services | ||||||
| ||||||
Build robotic eyes that track your face automatically. This AI-powered system combines real-time face detection with dual servo motors to create natural tracking behavior, all through simple visual programming - no coding required.
Why did we decide to make it?Building face-tracking systems traditionally requires complex programming: implementing computer vision libraries (OpenCV), managing camera streams, handling AI model inference, calculating coordinate transformations, integrating servo motor control libraries, implementing smoothing filters, and coordinating all these components. With Grablo, you simply think "make servos follow my face" and arrange visual blocks to make it happen.
What You'll BuildA complete AI-powered face-tracking system featuring:
- Real-time face detection using on-device AI processing
- Dual servo motor control that mimics eye movement
- Automatic coordinate-to-angle conversion for smooth tracking
- Dashboard with live camera feed and telemetry
- Tracks the largest face when multiple people are present
See Demo
Quick Start- Install software:Download and install Grablo software on your Raspberry Pi
- Set up hardware: Wire dual servo motors according to wiring diagram
- Connect camera: Attach Raspberry Pi Camera Module or USB camera
- Get this project:Project Link
- Connect controller: In your project, go to "Connect Controller" and enter IP address
- Hit RUN: Watch the servos track your face in real-time!
💡Want to build it yourself? Skip to Build Process and follow the detailed tutorial
Build ProcessLogicControl 1: Start Camera and Face DetectionCreate a logic and add a control that starts the camera and continuously detects faces
- Condition (Once): Runs only once when project starts
- Action (AI Camera): Initialize camera with face detection
- AI Analysis 1 (Face Detection): Detect if face exists
- AI Analysis 2 (Face Detection): Get face center coordinates
Create a control that rotates servo motors based on detected face position
- Condition (Compare): Only execute when face is detected
- Action 1 (Set Variable): Calculate servo rotation angle
- Action 2 (Custom Action - Optional): Apply smoothing filter for jitter reduction
- Action 3 (I/O Device Control): Rotate first servo motor
- Action 4 (I/O Device Control): Rotate second servo motor
Create a new dashboard with widgets displaying:
- Web Streaming (Camera Widget): Live video feed showing real-time tracking
- Face Detection (LED Widget): Boolean status of face presence
- Face X-Coordinate (Label Widget): Horizontal position of detected face
- Servo Angle (Label Widget): Current calculated servo position
Congratulations! You've just built a complete AI-powered face-tracking servo motor system using only 2 simple controls and zero lines of code. This is the power of visual programming with Grablo - what traditionally requires complex computer vision libraries, AI model integration, and motor control programming is now accomplished with intuitive drag-and-drop blocks.
Expected ResultsWhen you run your project:
- Face detected: Servo motors rotate to follow your face horizontally
- Move left: Servos track left (like eyes following movement)
- Move right: Servos track right smoothly
- Multiple faces: System tracks the largest face automatically
- No face: Servos hold last position
- Smooth motion: Filtering eliminates jitter and creates natural movement
- Dashboard: Displays live camera feed with real-time tracking data
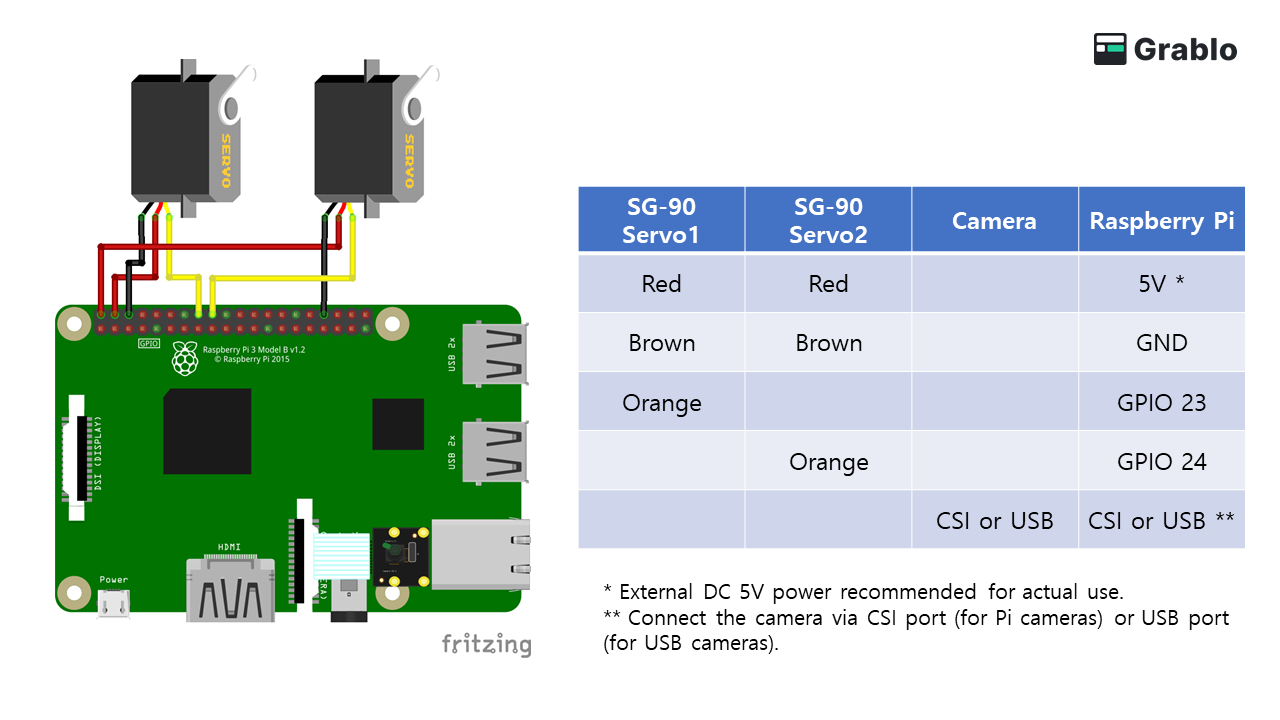
Servo 1 (Left Eye):
- Red wire → 5V power
- Brown wire → GND
- Orange wire → GPIO 23 (or your chosen pin)
Servo 2 (Right Eye):
- Red wire → 5V power
- Brown wire → GND
- Orange wire → GPIO 24 (or your chosen pin)
Camera Module:
- Raspberry Pi Camera: Connect to CSI camera port
- OR USB Camera: Connect to any USB port
- Power supply: While testing works with Pi's 5V, use external 5V DC power supply (2A minimum) for stable operation with dual servos
- Camera compatibility: Supports Raspberry Pi Camera Module V1/V2/V3 and most USB cameras
- Resolution: Higher resolution improves detection accuracy but requires more processing power
- Servo range: Adjust angle range (45-135°) based on your mechanical setup and camera field of view
- GPIO pins: Can use any available GPIO pins - just update pin numbers in device settings
Watch the complete build process:
What's Next?Expand your project using more blocks:
- Full pan-tilt control: Add face Y-coordinate detection to control the second servo for vertical tracking (true 2D face following)
- Object tracking: Change AI Analysis Type from "Face Detection" to "Object Detection" to track balls, hands, or specific colored objects
- LED indicators: Add LED that lights up when face is detected or changes color based on tracking status
- Motion-triggered snapshots: Automatically save camera snapshots when face is detected - useful for home security or visitor logging
Servos not moving:
- Verify GPIO pin numbers match your wiring
- Check servo power supply (minimum 1A for dual servos)
- Confirm servo connections (orange to signal, red to 5V, brown to GND)
Face not detected:
- Increase lighting in the room
- Move closer to camera (1-3 meters optimal)
- Check camera orientation settings (try with/without horizontal flip)
Wrong tracking direction:
- Adjust Linear Scale output range (try 135 to 45 instead of 45 to 135)
- Toggle camera horizontal flip setting
- Verify camera mounting orientation
Camera not detected:
- For Pi Camera: Enable camera in
raspi-config - For USB Camera: Check connection with
ls /dev/video*command - Try different camera index (0, 1, 2...)
- Official Website:https://grablo.co
- Web Application:https://app.grablo.co
- Documentation:https://doc.grablo.co
- Support Email:support@grablo.co


Comments