
Hardware components | ||||||
| × | 1 | ||||
 |
| × | 1 | |||
 |
| × | 1 | |||
| × | 1 | ||||
| × | 1 | ||||
Software apps and online services | ||||||
 |
| |||||
 |
| |||||
This tutorial will demonstrate how to add the EZO D.O circuit and probe to the WiFi Hydroponics Kit from Atlas Scientific.
It is assumed that the user has the wifi hydroponics kit working and is now ready to add dissolved oxygen.
WARNINGS:
- Atlas Scientific does not make consumer electronics. This equipment is intended for electrical engineers. If you are not familiar with electrical engineering or embedded systems programming, this product may not be for you.
- This device (WiFi Hydroponics Meter) was developed and tested using a Windows computer. It was not tested on Mac, Atlas Scientific does not know if these instructions are compatible with a Mac system.
Go to your channel in ThingSpeak.
Select Channel Settings and click on the checkbox to enable field 4
Fill in the box for field 4. For reference, we entered DO (mg/L)
Scroll to the bottom of the page and click Save Channel
Step 2: Set D.O circuit to I2CThe simplest way to set the D.O circuit to I2C mode is with the I2C Toggler.
1. Select EZO™ circuit type
2. Insert your EZO™ circuit or EZO™ device
3. Plug I2C toggler into USB port/cable
4. Press and hold the button for about 1 second
5. Release after color change: Blue = I2C, Green = UART
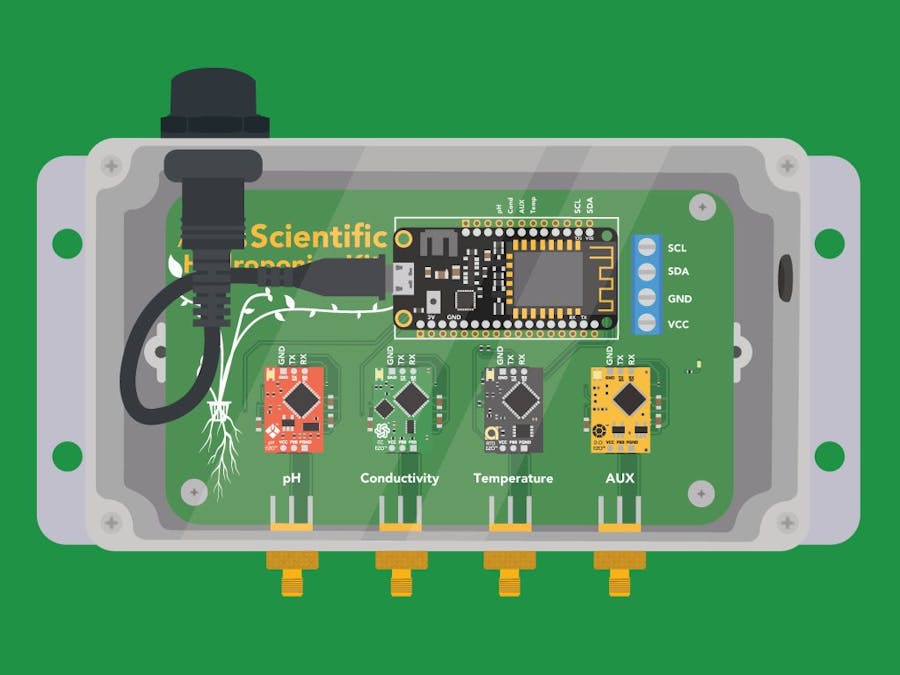
Step 3: Add D.O circuit and probe to meterAfter you have put the circuit in I2C mode, insert it into the AUX port of the hydroponics meter and connect the probe to the corresponding SMA connector.
Step 4: Flash the meter with the correct codeIn the Arduino IDE go to File> Examples> EZO_I2C_lib-master> Examples> IOT_kits>hydroponics_kit_with_DO
Add your Wi-Fi name, Wi-Fi password, ThingSpeak Channel ID, and ThingSpeak Write API Key to the code.
Set your IDE to the correct target CPU: Tools > Board > Adafruit Esp32Feather
Set the correct port where the CPU is connected. For example, it is connected to COM107: Tools > Port > COM107
Compile and upload the code.
Step 5: Calibrate D.O probeAtlas Scientific created a list of calibration commands that are built into the library. Type help in the serial monitor to see the list of commands.
Send the command poll. This will let you see the readings once per second, and it will stop uploading to ThingSpeak while you calibrate.
High point calibration
Remove the Dissolved Oxygen probe’s cap and let the probe sit, exposed to air until the readings stabilize. (small movement from one reading to the next is normal).
Once the readings have stabilized, issue the command do:cal
Low point calibration
Resend the poll command.
After you have calibrated the EZO™ Dissolved Oxygen circuit using the "do:cal" command; remove the top of the Zero Dissolved Oxygen calibration solution pouch. Insert the probe and stir it around to remove any trapped air (which could cause readings to go high). Let the probe sit in Zero D.O. calibration solution until readings stabilize. (small movement from one reading to the next is normal).
Once the readings have stabilized, issue the command do:cal,0
To resume taking a reading every 15 seconds and uploading it to ThingSpeak issue the datalog command.


Comments