

Hardware components | ||||||
 |
| × | 1 | |||
 |
| × | 1 | |||
| × | 1 | ||||
 |
| × | 1 | |||
 |
| × | 1 | |||
 |
| × | 1 | |||
| × | 1 | ||||
 |
| × | 1 | |||
 |
| × | 1 | |||
| × | 1 | ||||
 |
| × | 1 | |||
 |
| × | 1 | |||
 |
| × | 1 | |||
Software apps and online services | ||||||
 |
| |||||
 |
| |||||
Hand tools and fabrication machines | ||||||
 |
| |||||
Objective:
The project's core objective is to create a low-power motion activated switch using KEMET's pyro sensor module SS-430 to realize a variety of Smart Home, Health & Wearable Applications.
KEMET's Pyroelectric sensor:
The KEMET's SS-430 sensor module makes use of its ceramic's 'Pyroelectic effect' by absorbing the infrared rays naturally emitted from the human body. It has significant energy savings compared to traditional IR solutions which carry a transmitter/receiver pair for detection (which means the transmitter has to be ON all the time).
As part of this project, the following 4 application areas have been identified and implemented.
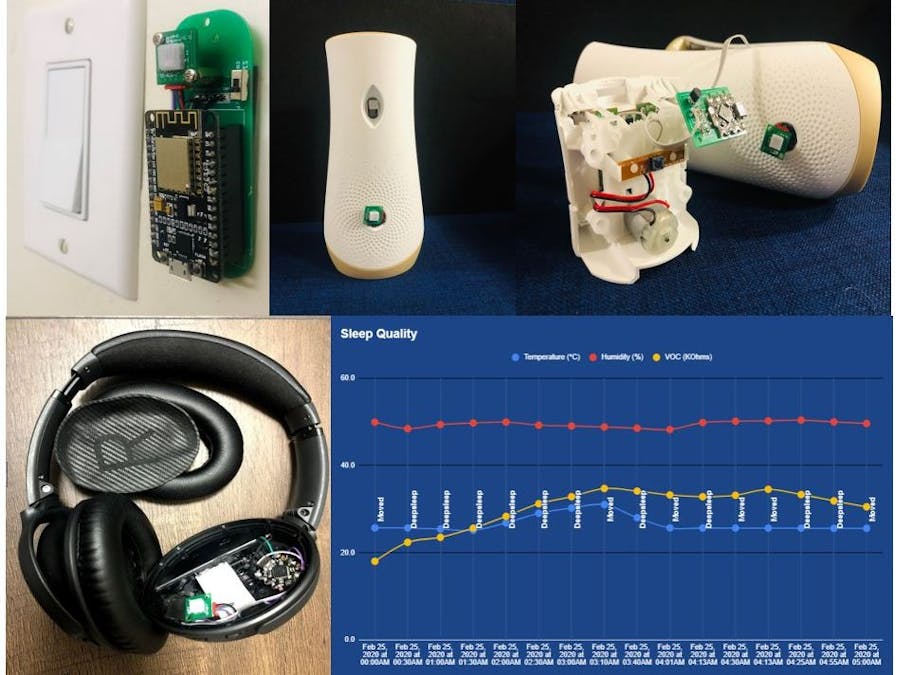
- Smart Headphones - Simply wear the headphone to turn it ON! Headphone will power off automatically after use. Replace the power switch !
- Smart Cabin Lighting - Selective lighting down to cabin level in open office/home space.
- Sleep Monitor - Monitor the quality of your sleep without using any inconvenient wearable tech like smartwatch during sleep.
- Smart Air Freshener - Save battery / aerosol spray content by triggering your restroom air freshener only after restroom use. - (Replace timer based trigger)
Demo Videos
Smart Headphones
The problem I have with my wireless headphone is the Switch! I forget to turn it off after every use - thereby draining the battery out and putting myself into disappointment during the next use.
What if I simply wear the headphone and the device powers ON automatically and powers OFF after use/removing the headphone ? Thereby save the battery!
To do this, I simply cut open the battery '-ve' connection to headphone PCB ground and added a Transistor/FET based low side switch (as shown below). This switch is controlled by the Arduino Beetle MCU interfaced with KEMET's SS-430 sensor module. Please refer to schematics for more details on the PCB developed.
The small form factor of the KEMET sensor module SS-430 allowed me to integrate the device directly inside the headphone ear lobe itself as shown in pictures below!
Wiring in one headphone is shown above. Wiring in second Headphone is shown below.
Working:
- When you wear the headphone, the IR rays from earlobe is detected by the KEMET sensor module & the MCU turns on the FET/Transistor -effectively closing headphone circuit ON.
- While wearing the headphone, since the sensor in the headphone's ear lobe detects no change in IR signature (the power state of the headphone is still maintained in ON state). In the video, you can see that even if I do head motions while wearing the headphone, there are no false triggers to turn off the headphone.
- When you remove the headphone a second IR change in the environment is detected by the Sensor and the MCU turns the FET/Transistor OFF -effectively opening the headphone circuit.
Notes:
1. The PCB board developed contains Arduino Beetle MCU,Sensor, FET/Transistor. 2. PCB board derives power from Headphone battery directly. 3. The Beetle MCU is used only for demo purpose. It is not needed if the above logic can be implemented through the MCU/MPU controller of the Headphone itself!
Smart Cabin Lighting
In order to have a separate sectional lighting to my desk, where I wanted to turn ON all the devices in my desk (Light, Couple of Monitors, Soldering Iron, Google Home) at once when I approach my desk space and likewise, shut the entire desk off when I leave the cabin space, I have carried out the following project.
Concept:
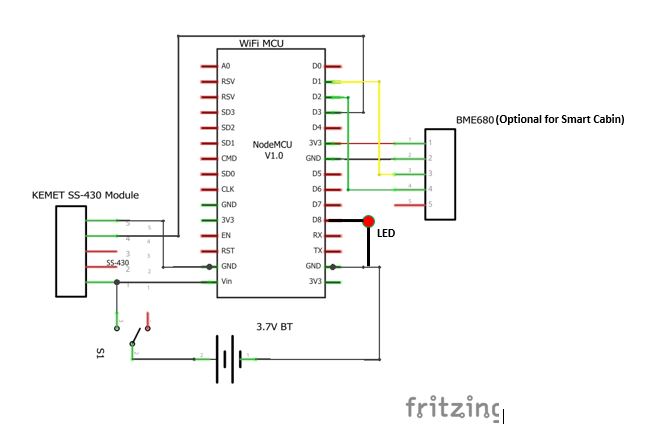
I have used KEMET PyroSensor with NodeMCU for this project to create a small form factor switch panel that has WIFI capabilites.
I have utilized IFTTT to communicate back and forth between the sensor switch and the TP Kasa Link smart plug. (See Prerequisite section for more details)
Upon motion detection by KEMET sensor, the NODEMCU initiates a HTTP web request to IFTTT server to toggle the current power state of the smart plug (ON). The smart plug connects to a power strip that holds all the devices. After a certain timeout for 'no-motion' detection a second web request issued to toggle the power state of the smart plug again (OFF)
Pre-requisite: Setting up TP-LINK Kasa Plug with IFTTT
Note: Skip this step if you have already configured the service.
It is very easy to link TP-LINK Kasa plug to IFTTT Maker service. Simply create an account in IFTTT and navigate to TP-Link Kasa page.
Click '+' icon and select 'Webhook' service
For 'trigger' use the default 'Receive a web request' option
Enter event trigger name as 'Desk'
Now click '+' in Then section
Choose TP-Link Kasa as action service
Choose an action - I chose Toggle action.
Select your device in the drop down and click create action. Click Finish.
Web Request URL:
To test if applet is functional, select 'My services' and click 'Webhooks'.
Select 'Documentation'
Replace {event} with "Desk" or your trigger event name to obtain the complete URL. You can also click "Test it" to see the applet in action.
Now the IFTTT - TP-Link Kasa smart Plug backend is complete. All we have to do now is to initiate web request calls from NodeMCU. I am going to use Arduino IDE for this purpose.
Program description:
At the start of the State Machine, the NodeMCU is in deep sleep mode. This is effected by the following command.
WiFi.forceSleepBegin();// turn off ESP8266 RF to save power
WiFi.forceSleepBegin();// turn off ESP8266 RF to save power
WiFi.forceSleepBegin();// turn off ESP8266 RF to save powerThe KEMET's pyro sensor module SS-430 after detecting human presence/motion turns ON the RF circuit in ESP8266 based NodeMCU .
WiFi.forceSleepWake();
WiFi.forceSleepWake();
WiFi.forceSleepWake();The NodeMCU then connects to the WiFi using the Network's SSID and password (Replace the strings per your network settings).
connect_wifi("SSID","Pass");
connect_wifi("SSID","Pass");
connect_wifi("SSID","Pass");After connected to WiFi, Node MCU initiates a HTTP request to the Maker webhook service of IFTTT with the following URL. (Please replace the webhook key masked below with yours).
https://maker.ifttt.com/trigger/desk/with/key/xxxxxxxxxxxxxxxxxxxx
https://maker.ifttt.com/trigger/desk/with/key/xxxxxxxxxxxxxxxxxxxx
https://maker.ifttt.com/trigger/desk/with/key/xxxxxxxxxxxxxxxxxxxxFinally the NodeMCU enters sleep mode again.
WiFi.forceSleepBegin();// turn off ESP8266 RF to save power
WiFi.forceSleepBegin();// turn off ESP8266 RF to save power
WiFi.forceSleepBegin();// turn off ESP8266 RF to save powerTimeout: Once the device detects a motion, a timer counter initiates & it constantly resets itself as long as there is a motion. Note that a timeout is added in the example code as argument to detect a 'no-motion' state.
detect_motion(int triggers, int timeout, int status)
detect_motion(int triggers, int timeout, int status)
detect_motion(int triggers, int timeout, int status)Smart Cabin Lighting: Demo
Sleep Monitor
I have a Smart Watch. But I cannot take it bed to monitor sleep quality. Just that, it is very inconvenient to sleep with the constant realization that something is wrapped in my hand!
But how do we detect at what points in time we had disturbance in sleep (movements) WITHOUT any body worn device.
The highly sensitive KEMET's SS-430 PyroSensor module can be readily utilized for this purpose. The sensor detected every minor motion - we can just assemble this by our bedside as shown below!
Concept:
The framework of operation is similar to Smart Cabin. An environment sensor (BME680 - capable of measuring temperature, humidity, total VOC (Volatile Organic Compound gases)) is also added to the PCB as shown.
Thus when sleep disturbance/ movement is detected by KEMET sensor, the environment sensor is immediately read through I2C by the NodeMCU and finally a POST web request is made to IFTTT with the arguments being - Temperature, Humidity, Total VOC.
The IFTTT server once after receiving the POST web request with the arguments logs them into the Google Sheets along with timestamp using the service 'Google Sheets' in the 'that' portion of the 'IF this then that' protocol. Refer to the Prerequisite section in the 'Smart Cabin' application section for more details.
Please note that two applets have to be created with two event names & both services should point to the same spreadsheet. The event names I have chosen are 'Moved' -denoting sleep disturbance and 'Deepsleep' to detect sleeping state. Here my spreadsheet name is 'Movements'
Real-time Analysis:
Inserting a chart into the 'Movements' spreadsheet allows to monitor the sleep quality in Real-time!
As shown in figure, we can make intuitive analysis on what changed in the environment that caused sleep disturbance/movement at a specific time. Say for example Temperature increase? (as marked in red circle below)
Smart Air Freshener
This project shows the application of 'small form factor' KEMET Pyrosensor to restroom devices like air freshener.
Generally automatic air fresheners have an inbuilt adjustable timer settings ( say minutes to hours) through which the device triggers ON periodically sending a puff of aromatic air.
But what if, if we are away from home (say in vacation for long time) and forgot to switch the device OFF before leaving? - we drain out both battery and aerosol spray!
To avoid this, in this project I have integrated the Small Form Factor KEMET Pyro Sensor inside a timer based air freshener module (as shown below).
This is similar to the smart headphones application above. But the transistor/FET instead of acting like a low side power switch, now acts as a control line to the Air Freshener's button terminal input. (In regular Air Freshener, pulling Button Trigger input terminal low, triggers ON the air freshener. This functionality is now replaced by the FET/Transistor.
Once KEMET's PyroSensor detects 'no-motion' condition shortly after previously detected motion condition, the transistor/FET is triggered- effectively pulling the 'Button Trigger Input' terminal in the air freshener pcb LOW briefly - thereby triggering the air freshener to send out a single puff of aromatic air.

Comments