


Hardware components | ||||||
 |
| × | 1 | |||
 |
| × | 2 | |||
| × | 1 | ||||
 |
| × | 1 | |||
 |
| × | 1 | |||
Software apps and online services | ||||||
 |
| |||||
 |
| |||||
Story:-I did this project to learn image processing using Raspberry PI and open CV. To make this project more interesting I used two SG90 Servo motors and mount camera on it. One motor used to move horizontally and second motor used to move vertically.
Step 01:- Working of Project- Image captured by RPI Camera and processed in python using openCV.
- Captured image is converted from RGB to HSV.
- Apply mask for Specific color (in my final code I used RED color & special code is used to find accurate masking value which is also attached hearwith).
- Finding Contours for all red objects in frame.
- Finally sorting and selecting first Contours will give bogest red object in frame.
- Draw rectangle on object and find horizontal & vertical centre of rectangle.
- Check difference between Frame horizontal centre and object rectangel horizontal centre.
- If difference is greater then set value then start moving Horizontal servo to minimize difference.
- Same way we can move vertical axis and finally object tracking is working for 180 degree.(Half sphear)
Step 02:- Wiring DiagramWiring Diagram
Raspberry PI and PCM9685 connection detail
- Raspberry PI Pin 1(3.3V) >> PCM9685 Pin VCC
- Raspberry PI Pin 3(SDA) >> PCM9685 Pin SDA
- Raspberry PI Pin 1(SCL) >> PCM9685 Pin SCL
- Raspberry PI Pin 1(Ground) >> PCM9685 Pin Ground
- V+ and OE pin of PCM9685 is not used.
- Servo 01 is connected to Channel0 of PCM9685. This servo is used for vertical axis control
- Servo 02 is connected to Channel2 of PCM9685. This servo is used for vertical axis controlThis servo is used for Horizontal axis control. and camera is mounted on this camera.
Step 03:- SetupRaspbarry PI (Flesh Raspbian Streach):-
- Download Raspbian Streach and flesh it on 32 GB memory card.
- URL:-https://downloads.raspberrypi.org/raspbian_full_latest.
- After download Raspbian image, unzip it and store on desktop (or suitable place).
- To write image on SD card, download Eatcher.
- URL: https://www.balena.io/etcher/
- Connect HDMI to VGA cable in to RPI and LCD monitor.
- Connect USB Keyboard and Mouse and power up PI using power adaptor(2.5 amp.)
- Check out youtube tutorial video from 15:10 to 16:42 for Raspberry pi setup process Video URL:-
Step 04:-Install Open CV on PI
- This is most tedious job for me.
- I spend 2 full night for this so dont get penic during this setup and make cup of coffee or beer.
- I have followed below mentioned written guide for Open CV installation & suggest you to follw the same as it is very easy and very vell written.
- https://www.pyimagesearch.com/2017/09/04/raspbian-stretch-install-opencv-3-python-on-your-raspberry-pi/
Step 05:-Checking PI to PCM9685 i2c interfacing.
- Open terminal & enter below commands to install I2C testing utility.
- sudo apt-get install python-smbus this will install requird packages on pi.
- sudo apt-get install i2c-tools this will install requird packages on pi.
- sudo i2cdetect -y 1 this command will check I2C bus & respond with successfully connected slave device address as shoen below.
PCM9685 I2C address shown if communication is established between PI.
- Reference Document:- https://learn.adafruit.com/adafruit-16-channel-servo-driver-with-raspberry-pi?view=all
Step 06:-Install Adafruit-circuitpython-servokit Library
adafruit-circuitpython-servokitLibrary used to control SG90 Servo motors.- We can operate 16 motors using PCM9685.
- As OpenCV library installed on Virtual environment, we have to install servo control library in Virtual environment othervise it will not work with OpenCV.
- Open Terminal & enter source ~/.profile and press enter. by this we entered in virtual environment.
- Enter pip3 install adafruit-circuitpython-servokit and press enter.Do not use SUDO before pip3.
- Reference Document:- https://learn.adafruit.com/adafruit-16-channel-servo-driver-with-raspberry-pi?view=all
Step 07:-Check Servo Motors.
- Connect both motor with PCM9685 as shown in wiring diagram.
Wiring Diagram
- Open terminal and type
python3& press enter. from adafruit_servokit import ServoKit# this will Import librarykit = ServoKit(channels=16)#Defining variable object "kit"kit.kit.servo[0].angle = 90Set 1st motor position at 90 Degree.kit.servo[1].angle = 90Set 2st motor position at 90 Degree.- By changing value "90" we can move servo motor postion from 0 to 180.
- Set both motor positoin to 90 and disconnect motor as 90 is center positon of full range.
Step 08:- Setup& Checking Camera.
- Insert camera belt cable in to PI camera connector. ensure belt direction. Try to keep blue tape side part of cable at Black locking clip side of camera connector.
PI and Camera connector Detail
- Open terminal and enter Sudo raspi-config & press enter. this will open raspberry pi configuration window.
- Select 5th option which is "Interfacing Option" & then select 1st opetion which is camera and enabe camera.
- Open termianl and enter belwo command
raspistill -o cam.jpg This will capture image named "cam" & save it as.jpg format.
Captured file will save in /home/pi directory & image is upside down.
Referance Document:- https://www.raspberrypi.org/documentation/usage/camera/README.md.
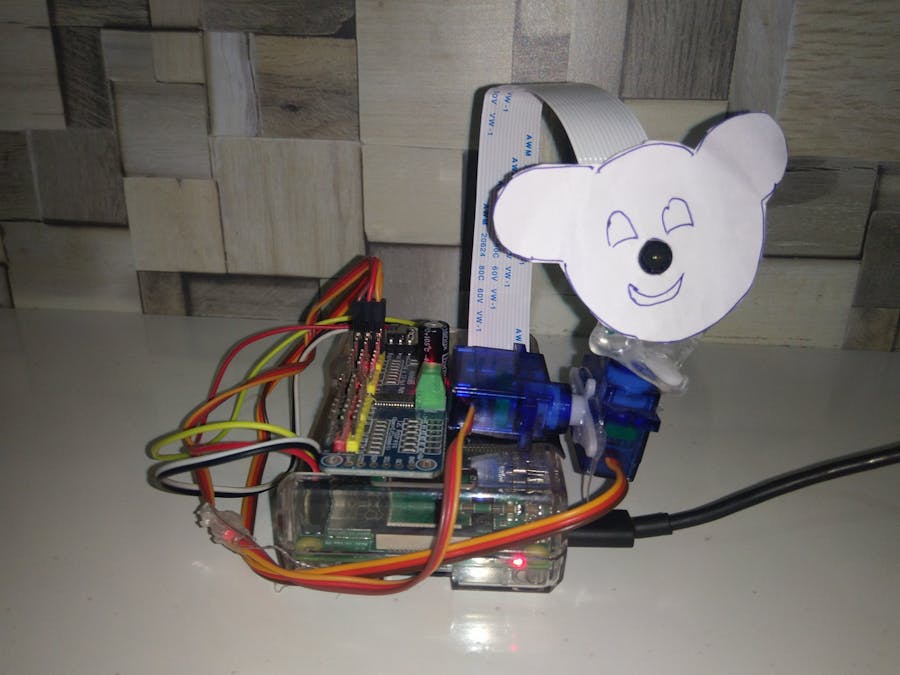
Step 09:- Mounting of Servo and Camera.
- Set both moto position at 90 deg.
- Mount both servo and mount camera on Second servo.
Mounting of Motors
Step 09:-Running Final Code.
- Now we can run final code which can track Red object in frame. (Final code is Red_Track01.py) which I have uploded.
- Befor run the code switch in to virtual environment by applying below mentioned command
- Sourec ~/.profile and enter.
- next command is workon CV and press enter.
- to run final code :- "path of your file location"/python3 Red_Track01.py
- Code execution will stop by pressing Esc key.


Comments