Ashad Ahmed
Published © GPL3+

Two Digits (00-99) Up and Down Counter

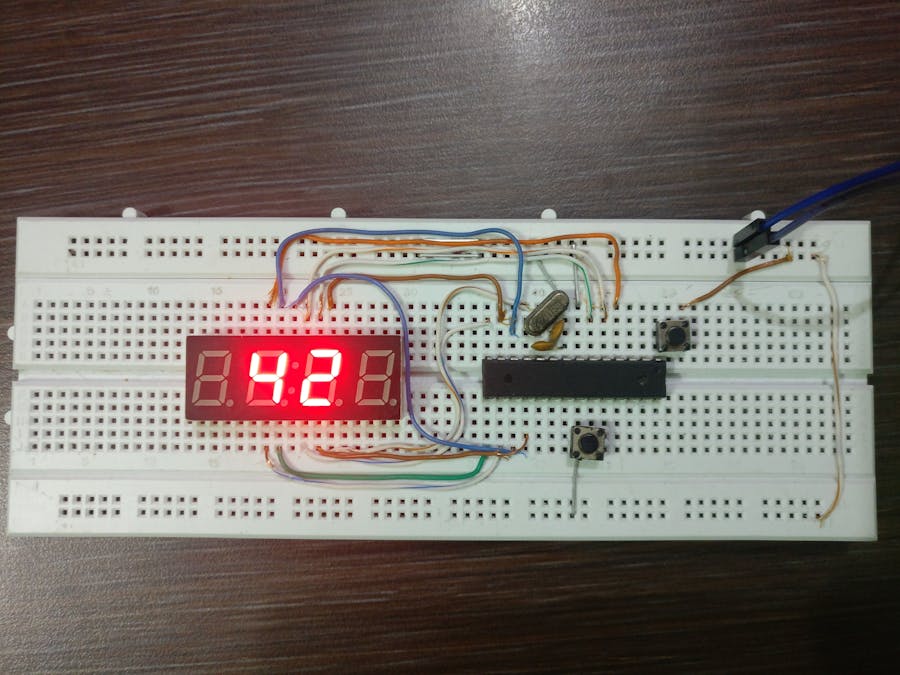
The final product of this tutorial is a two digit up-down counter using ATmega328 microcontroller.

IntermediateFull instructions provided2 hours4,604
Two Digits (00-99) Up and Down Counter

Things used in this project

Hardware components

Capacitor 220 µF
Capacitor 220 µF
×2
Breadboard (generic)
×1
16 MHz Crystal
16 MHz Crystal
×1
Jumper wires (generic)
×1

Software apps and online services

Arduino IDE
Arduino IDE

Story

Read more

Schematics

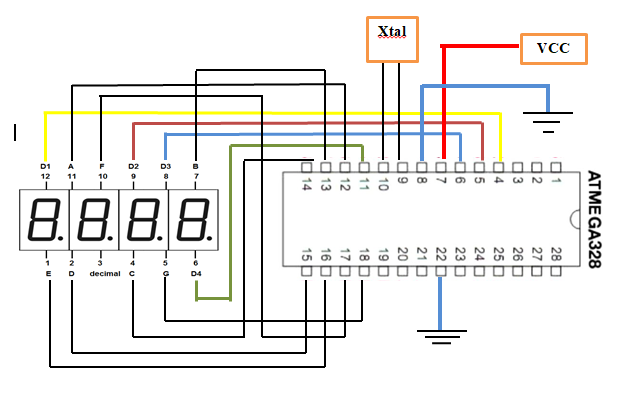
Schematic Design

Code

Arduino Code

Arduino
Two Digit Up-Down Counter using Atmega328 Microcontroller
int a = 6, b = 7, c = 8, d = 9, e = 10, f = 11, g = 12, dp = 13; //Display pins
int d1 = 5, d2 = 4, d3 = 3, d4 = 2; //Common pins
int time = 50; //speed of the counter in ms
int buttonPin = 14;
int val = 0;
void setup() {
  int i = 1;
  for(; i<13; i++)
    pinMode(i, OUTPUT);
  pinMode(buttonPin, INPUT_PULLUP) }
void loop() {
  val = digitalRead(buttonPin);
  offd(d1);
  offd(d2);
  offd(d3);
  offd(d4);
   int i, j;
if ( val == HIGH ){ //The counter
  for(i = 0; i<1000; i++) {
    for(j = 0; j <= (time/20); j++)  {
       ond(d2);
      num(i/10 - 10*(i/100));
      delay(5);
      offd(d2);
       ond(d3);
      num(i/100 - 10*(i/1000));
      delay(5);
      offd(d3); }  } }
if ( val == LOW )
  {   //The counter
  for(i = 1000; i>=0; i--) 
  {  for(j = 0; j <= (time/20); j++) {
      ond(d2);
      num(i/10 - 10*(i/100));
      delay(5);
      offd(d2);
      ond(d3);
      num(i/100 - 10*(i/1000));
      delay(5);
      offd(d3);  } } } }
void on(int i) {
  digitalWrite(i, HIGH);}
void off(int i){
 digitalWrite(i, LOW); }
void ond(int i) {
  digitalWrite(i, LOW);}
void offd(int i){
 digitalWrite(i, HIGH); }
void num(int n) {
 if(n < 0)
  n = 0; 
 switch(n) {
   case 0:
     	on(a);
     	on(b);
     	on(c);
    	 on(d);
     	on(e);
     	on(f);
     	off(g);
     	break;
   case 1:
     	off(a);
    	 on(b);
    	 on(c);
     	off(d);
     	off(e);
     	off(f);
     	off(g);
     	break;
   case 2:
     	on(a);
     	on(b);
     	off(c);
     	on(d);
     	on(e);
     	off(f);
     	on(g);
     	break;
   case 3:
      on(a);
      on(b);
      on(c);
      on(d);
      off(e);
      off(f);
      on(g);
      break;
   case 4:
      off(a);
      on(b);
      on(c);
      off(d);
      off(e);
      on(f);
      on(g);
      break;
   case 5:
      on(a);
      off(b);
      on(c);
      on(d);
      off(e);
      on(f);
      on(g);
     	break;
   case 6:
    	on(a);
     	off(b);
    	on(c);
    	on(d);
     	on(e);
    	on(f);
     	on(g);
     	break;
   case 7:
     	on(a);
     	on(b);
     	on(c);
     	off(d);
     	off(e);
     	off(f);
     	off(g);
     	break;
   case 8:
     	on(a);
     	on(b);
     	on(c);
     	on(d);
     	on(e);
     	on(f);
     	on(g);
     	break;
   case 9:
     	on(a);
     	on(b);
     	on(c);
     	on(d);
     	off(e);
     	on(f);
     	on(g);
     	break;}

Credits

Ashad Ahmed

Ashad Ahmed

4 projects • 11 followers
Electronics and communication engineering student at Amity University Noida, India. I love working on self guided electronic projects.

Comments