

Hardware components | ||||||
 |
| × | 1 | |||
| × | 1 | ||||
| × | 1 | ||||
| × | 1 | ||||
| × | 1 | ||||
Software apps and online services | ||||||
| ||||||
| ||||||
Hand tools and fabrication machines | ||||||
| ||||||
| ||||||
Basically, it’s tracking aircraft that are in flight, from your PC or smartphone. It takes plane spotting to the next (geeky) level.
If you want a more in depth answer, there are a heap of resources that describe it in much greater detail (check out the FlightRadar24 guide to start)
Why?Short answer .. why not?
A while ago I took my kids to the Perth Airport Public Viewing Platform to watch some planes take off and land and we all had a good time. They’ve been bugging me to go back, and now that the weather is getting nicer, we will do so.
I have played with a couple of different apps, on my phone, that show flights but didn’t bother too much as they had ads in the bottom of the screen, which annoys me. (What? I’m old, I’m allowed to get annoyed at small things).
Then one day I was lamenting to one of my work colleagues about a Raspberry Pi I had that was sitting in my drawer doing nothing. He mentioned that you could attach a digital tuner to a RPi and use it to pick up the Aircraft’s transponder signals to identify and locate the aircraft. As you could imagine, this piqued my interest :).
What?So, here lies the reason behind my post (and what gave birth to the idea of this website).
Let me share my guide on how to configure a Raspberry Pi to track aircraft.
Lets start with a list of things you need:- Raspberry Pi (can also use a PC with Windows or Linux)
- SD Card to suit RPi
- USB DVB-T (bought on eBay for about $11 delivered “ROHS Digital USB TV Stick FM+DAB DVB-T RTL2832U+R820T Support SDR Tuner Receiver”)
- 3m 75ohm co-ax plus PAL connector (about $3.50 from Bunnings)
- Side cutters, electrical tape, tape measure
- Multimeter for testing the antenna.
- While setting it up I used a powered USB hub as the poor RPi was struggling to power keyboard, mouse and USB DVB-T.
- Download PiAware on Raspbian Linux 2.1-3 ZIP (916MB) and save the file on your computer.
- Double-click on the downloaded piaware-sd-card-2.1-3.img.zip file to unzip the compressed file.
- Download Win32DiskImager utility ZIP (17MB).
- Run the Win32DiskImager utility. You might need to run the utility as Administrator (if so, right-click on the file, and select “Run as administrator”).
- Select your downloaded piaware-sd-card-2.1-3.img file.
- Select the drive letter of the SD card in the device box. Be careful to select the correct drive.
- Click write and wait for it to complete. This might take a few minutes.
- When this is done, eject and remove the SD card.
While the DVB-T does come with a small antenna, it’s not suited to 1090 Mhz range that we need. A simple antenna to make is a CoCo, which is short for Coaxial Collinear antenna, and there are some great instructions here, but let me give you the gist of it.
- Cut 8 pieces of co-ax into 15.5cm each.
- Cut the outer cover, shield and inner cover back 2cm on each side of each piece.
- Take a 1cm square piece of tape and impale it with one of the inner copper wires of one piece of co-ax.
- Get the next piece of co-ax and impale the tape from the other direction.
- Line up each piece of copper wire so it inserts between the plastic outer and the shield of the other piece of co-ax.
- Slide the two together, taking care not to go on an angle, until they are both touching the tape.
- Set the multimeter to continuity test and check that there are no shorts. You should get continuity between the inner wire and shield for the even number of pieces (ie end to end) but not inner to outer on one end. For an odd number of pieces it should have continuity between core to core, shield to shield but not core to shield.
- Rinse and repeat until the 8 pieces are connected, then attach the length of co-ax you need and terminate the other end with the PAL connector. Again, testing the continuity and if you are like me,pull it all apart to find the short.
- Slide the SD card (with PiAware installed) into your Raspberry Pi
- Plug in the antenna cable into the USB DVB-T.
- Plug all other cables (USB power, Ethernet network, USB DVB-T, mouse, keyboard, monitor) into your Raspberry Pi. (Once the RPi is working you only need the USB DVB-T, Network and Power)
- You should observe a solid red LED and a blinking green LED on the Raspberry Pi as well as yellow and green LEDs next to the Ethernet jack.
Now you can log in to the RPi using pi/flightaware.
You should wait about four or five minutes for your PiAware to start and then you can associate your FlightAware account with your PiAware device to receive all the benefits. Once your device is running, please:
- Claim your PiAware client on FlightAware.com – this is pretty cool cos once you start feeding data to FlightAware they will give you an enterprise account worth USD$89.95/mo!!
FlightAware will begin processing your data immediately and displaying your statistics within 30 minutes. The FlightAware stats page will also tell you the local IP of your device and provide a link for direct connection.
Lastly add a feed to FlightRadar24This was my original goal, cos if you feed data to FlightRadar24 they also give you a Premium account that allows you to download and use the Premium app (only $2.99 a month but hey, it’s better than nothing).
One of the users on FR24’s forums posted a good guide but again I will lay out the details.
Log on to the RPi and type the following:
~ $ wget http://www.marcusgunther.eu/pi/fr24feed_1.0.11-3_armhf.deb~ $ sudo dpkg -i fr24feed_1.0.11-3_armhf.deb
For first time setup:
~ $ sudo fr24feed –signup
If you already have a sharing key:
~ $ sudo fr24feed –reconfigure –fr24key=(your key)
Answer the configuration questions as follows:
4.1 – Receiver selection: 3 – ModeS Beast (USB/Network)
4.2 – Please select connection type: 1 – Network connection
4.3A – Please enter your receiver’s IP address/hostname: RPi IP address or localhost
4.3B – Please enter your receiver’s data port number: 30005
5.1 – Would you like to enable RAW data feed on port 30334 (yes/no): no
5.2 – Would you like to enable Basestation data feed on port 30003 (yes/no): no
6A – Please select desired logfile mode: 0 (or other as desired)
6B – Please enter desired logfile path (/var/log): (accept default)
Then run:
~ $ sudo service fr24feed restart~ $ more /var/log/fr24feed.log
In the log you should see entries like this:
[feed][i]sent x AC in 1 packet
If you see AC sent then you know it is working
Register on FR24 and you will find a link to claim your FR24 feed and get your Premium account.
Congrats, you can now join the nerdy ranks of Plane Spotters. If you have problems, questions or comments then hit me up and I’ll see if I can help.
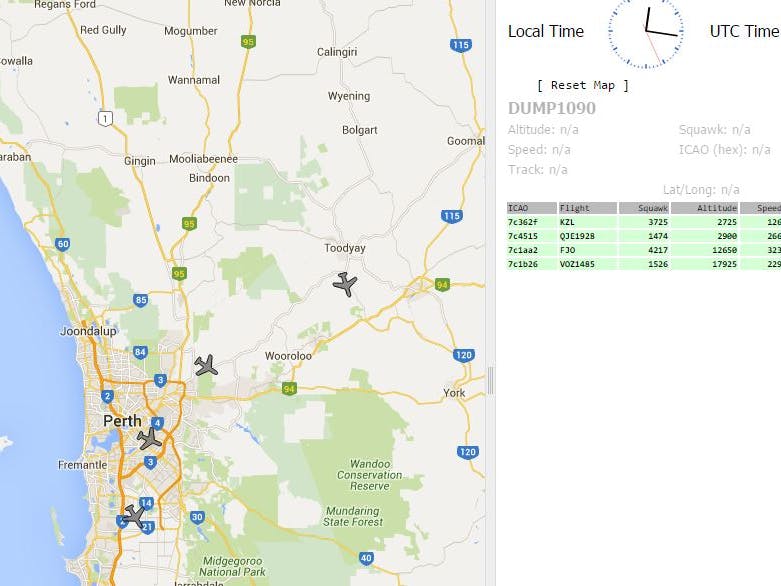
Here are a few images:


Comments