

Hardware components | ||||||
 |
| × | 1 | |||
 |
| × | 1 | |||
 |
| × | 1 | |||
 |
| × | 1 | |||
| × | 1 | ||||
 |
| × | 1 | |||
 |
| × | 1 | |||
Software apps and online services | ||||||
 |
| |||||
Hand tools and fabrication machines | ||||||
| ||||||
| ||||||
There are millions of public dustbin out there that people use and are emptied in a few days by the public authorities. Now the problem is not all dustbins are filled at the same rate and the dump vehicle waste time checking each and every dustbin. This leads to more fuel usage, labour and cost.
SOLUTIONIOT of dustbin can solve this issue by tracking the amount of garbage inside the bins and thus can be easily geotagged and the dump vehicle can plan its path around the city in a more optimised way to save time and fuel cost. The dump vehicle can decide which dustbins to clear first and whom to clear next time. This can be a smart city project.
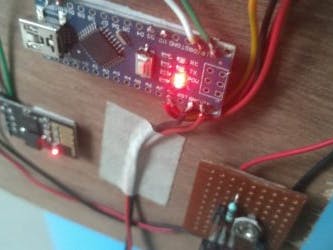
The project involved an Arduino Nano with ESP8266 to talk to the internet and an Ultrasonic sensor to measure the depth of the garbage in the dustbin.
The system updates the server every 3 seconds and the user can track the quantity of garbage in the bins.
ELECTRONICS AND PARTS- Arduino Nano
- ESP8266
- HC-SR04 Ultrasonic Sensor
- 9v Battery
- 3.3v Regulator
- Wires
- Plastic Bin
- Wood / similar material for mounting the sensor
From the gallery below you could easily see it is an easy construction with a mounting for the Ultrasonic Sensor and the Arduino and ESP8266. A small 9v battery could also be seen stuck to one side of the bin. Though this project looks so easy to implement and deploy but in real life when this is made into a product and need to be deployed we have to take care of 100s of quality standards and performance metrics. In real life, this should be the most power efficient so that battery power lasts longer. In some places, there will not be any wi-fi available and thus alternate connectivity should also be made available. Accuracy and reliability is also an important parameter to consider.
The ESP8266 connects with a preprogrammed Wi-Fi SSID and starts polling the Ultrasonic Sensor, measures the depth and uploads it to the cloud.
I haven’t implemented any boundary conditions and fault tolerances in the code. This code is just good for POC and not for a product.
GALLERYCODE Download Code From >> https://github.com/arnabdasbwn/ESP8266-Arduino-Smart-Dustbin
#include <NewPing.h>
#define TRIGGER_PIN 12 // Arduino pin tied to trigger pin on the ultrasonic sensor.
#define ECHO_PIN 11 // Arduino pin tied to echo pin on the ultrasonic sensor.
#define MAX_DISTANCE 50 // Maximum distance we want to ping for (in centimeters). Maximum sensor distance is rated at 400-500cm.
NewPing sonar(TRIGGER_PIN, ECHO_PIN, MAX_DISTANCE); // NewPing setup of pins and maximum distance.
//*-- IoT Information
#define SSID "CrazyEngineer"
#define PASS "www.ArnabKumarDas.com"
#define IP "184.106.153.149" // ThingSpeak IP Address: 184.106.153.149
// GET /update?key=[THINGSPEAK_KEY]&field1=[data 1]&field2=[data 2]...;
String GET = "GET /update?key=VYJGZSHIYR7SMTX9"; // You have to get your key from the website
int prev = 0;
void setup() {
Serial.begin( _baudrate );
sendDebug("AT");
delay(5000);
if (Serial.find("OK"))
{
debug.println("RECEIVED: OK\nData ready to sent!");
connectWiFi();
}
}
void loop()
{
int dat = sonar.ping_cm();
if (dat < 0 || dat > 37)
dat = prev;
String depth = String((37 - dat)); // turn integer to string
debug.print( "DEPTH = " );
debug.println(depth);
updateTS(depth);
delay(1000);
}
//----- update the Thingspeak string with 3 values
void updateTS( String T)
{
// ESP8266 Client
String cmd = "AT+CIPSTART=\"TCP\",\"";// Setup TCP connection
cmd += IP;
cmd += "\",80";
sendDebug(cmd);
delay(2000);
if ( Serial.find( "Error" ) )
{
debug.print( "RECEIVED: Error\nExit1" );
return;
}
cmd = GET + "&field1=" + T + "\r\n";
Serial.print( "AT+CIPSEND=" );
Serial.println( cmd.length() );
if (Serial.find( ">" ) )
{
debug.print(">");
debug.print(cmd);
Serial.print(cmd);
}
else
{
sendDebug( "AT+CIPCLOSE" );//close TCP connection
}
if ( Serial.find("OK") )
{
debug.println( "RECEIVED: OK" );
}
else
{
debug.println( "RECEIVED: Error\nExit2" );
}
}
void sendDebug(String cmd)
{
debug.print("SEND: ");
debug.println(cmd);
Serial.println(cmd);
}
boolean connectWiFi()
{
Serial.println("AT+CWMODE=1");//WiFi STA mode - if '3' it is both client and AP
delay(2000);
//Connect to Router with AT+CWJAP="SSID","Password";
// Check if connected with AT+CWJAP?
String cmd = "AT+CWJAP=\""; // Join accespoint
cmd += SSID;
cmd += "\",\"";
cmd += PASS;
cmd += "\"";
sendDebug(cmd);
delay(5000);
if (Serial.find("OK"))
{
debug.println("RECEIVED: OK");
return true;
}
else
{
debug.println("RECEIVED: Error");
return false;
}
cmd = "AT+CIPMUX=0";// Set Single connection
sendDebug( cmd );
if ( Serial.find( "Error") )
{
debug.print( "RECEIVED: Error" );
return false;
}
}
LINKS Git >> https://github.com/arnabdasbwn
Follow me on Instagram >> https://www.instagram.com/arnabdasbwn/
Follow me on Twitter >> https://twitter.com/ArnabDasBwn
Subscribe to my YouTube Channel >> https://www.youtube.com/c/ArnabDasBwn


_3u05Tpwasz.png?auto=compress%2Cformat&w=40&h=40&fit=fillmax&bg=fff&dpr=2)
Comments