Hi! We are Arduino NSK Community from deep frozen Siberia. To warm up ourselves a little we decided to make a beautiful shining&blinking Christmas stars. This project can be done on winter workshops to bring the holiday mood to makers.
Basically, the design of our Christmas star consists of three plywood plates: back, middle and front. Back plate is for holding the Arduino Nano board; middle plate is for holding LEDs heads; front plate is for beauty. Also there are some interconnecting parts. Narrow parts are for interconnecting middle and back plates. Wide parts are for interconnectiong front and back plates. There are dxf drawings attached for laser cutter. Feel free to use it!
At the very first, we've cut the parts from plywood, then covered it with wood stain, to reveal their texture and make them look more "wooden".
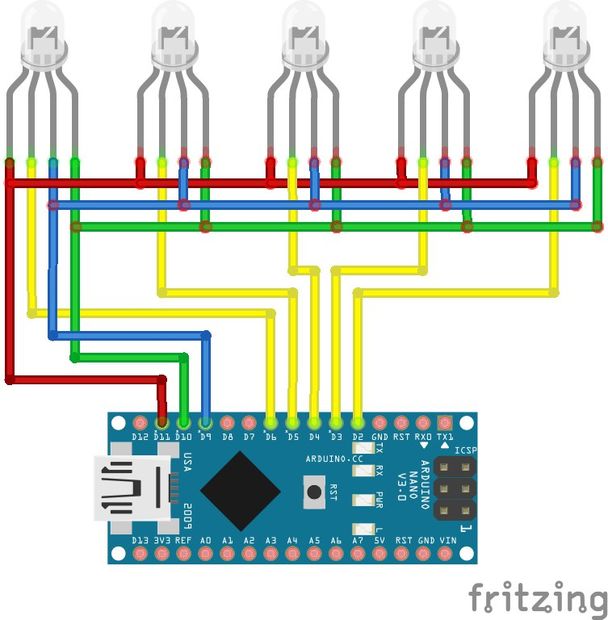
Then assembly started: at first, we've inserted angle pinheaders into the small holes in the back plate and attach Arduino Nano to them, then soldered on the face side of a board. Second, we took five LEDs and cut yellow wire (Common Anode) from each of them. This is for controlling on\off state of each LED separately. We soldered all the LEDs' wires to Arduino pins as depicted on scheme. Third, we've inserted LEDs heads into holes of middle plate (they fit very tightly). Then we've glued narrow interconnecting parts to the middle plate and the back plate. Fourth, we've glue wide interconnestors to front and back plate.
And the construction is done! The last thing to do was to uplode code to the Arduino. I wrote some demo code, which you can check on the Github repo page. The visual composition of demo consists of six different modes of light changing. You can add (almoust) any number of your own modes and run them on the star.


_3u05Tpwasz.png?auto=compress%2Cformat&w=40&h=40&fit=fillmax&bg=fff&dpr=2)
Comments