


Hardware components | ||||||
_ztBMuBhMHo.jpg?auto=compress%2Cformat&w=48&h=48&fit=fill&bg=ffffff) |
| × | 1 | |||
 |
| × | 1 | |||
 |
| × | 1 | |||
 |
| × | 1 | |||
 |
| × | 1 | |||
 |
| × | 1 | |||
 |
| × | 1 | |||
Software apps and online services | ||||||
 |
| |||||
Hand tools and fabrication machines | ||||||
 |
| |||||
You can find all the necessary information and content, including the codes, circuit diagrams, libraries, and construction stages of this project, which measures temperature and humidity values with Arduino, in our article below.
Air temperature is one of the things we wonder about and research the most in our daily life. It is important because we plan according to the weather of the day and choose our clothes and accessories.
You can easily make your weather station at home. I say weather station because this project is very open to development. If you want, you can make your project wireless, connect it to the internet and send you a message or you can use it in different components with an advanced screen.
If you want, let's start our project by getting to know the materials right away.
Let's start
Step1:
Let's prepare our LCD screen. This stage will mostly be for those who will use the LCD screen for the first time or who have the screen solderless. If you don't have one of these, skip this step. First of all, our LCD screen consists of 16+2 total 18 pins, so we set 18 headers and solder it so that the short part passes through the pins and the long part remains on the bottom. The soldering process is very important and during this time, be careful that no solder touches each other. If your soldering is finished, you can proceed to step 2.
Step2:
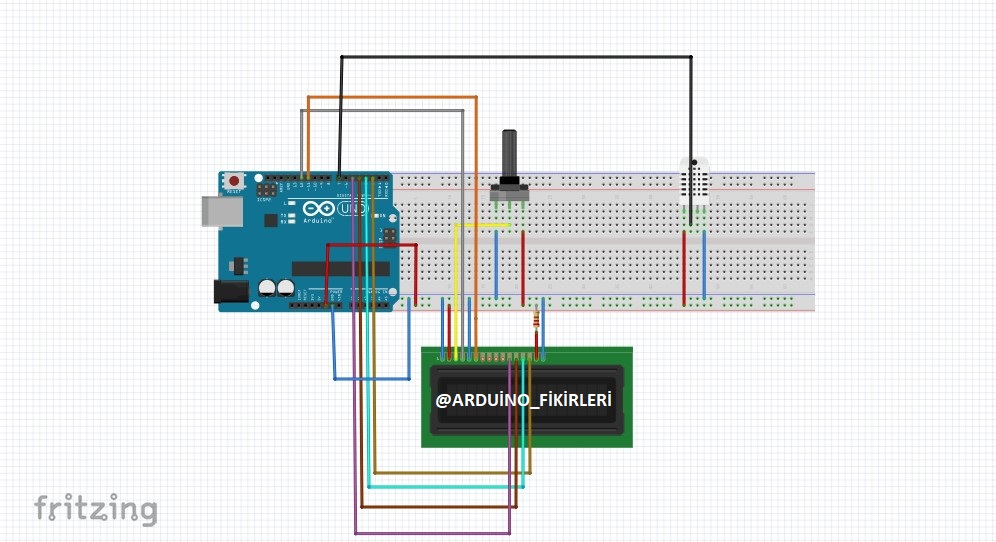
Now that our materials are ready, let's set up according to the circuit diagram.
Step3:
Let's install the following libraries in our Arduino IDE application. For this, download the libraries and add the zip files you downloaded to your computer from the add library section in the draft section. Then let's enter the codes into our application. Do not forget to choose the appropriate model and ports.
Our weather station is ready.
If you wish, you can make the whole project more effective with a 3D printing or box.
We have come to the end of another article, thank you for taking the time to read. You can contact us for your questions.


Comments