This idea was born with a friend of mine who I did robotics with in high school. He is a few years older than I am, and when he was an undergraduate he had dreamt up the idea of an automatic bartending robot. He had taken a different approach, focusing on a full motion robotic arm, which is far more difficult to implement than the solution I have chosen for the same problem. As a college student, there is no better combination than mixing all of your passions(Robotics, building things, and booze), and becoming a better engineer while you're at it.
The build started with various brainstorming sessions looking at what solutions existed already, and what exactly the robot should look like. Existing solutions fall into two categories:
1. Machines that cost a few hundred dollars, and essentially put measured amounts of a few ingredients in a glass
Cheaper existing solution
2. Machines that are multiaxis arms, cost around 100k, and essentially emulate all motions of a bartender.
Expensive existing solution
As these were the two categories that already exist, the goal was set to be a middle ground. Create a robot whose retail cost would theoretically be 2-3k, which would have a much more flushed out feature set than the cheaper models, but be better fit for household use and cost significantly less than the robotic arm models.
In order to achieve a better feature set than the existing cheap models, the main component that is missing is the shaking of a drink with ice. This is an essential step which cools off the drink rapidly for better taste, and does not exist in the cheaper category. It quickly became quite clear why that was the case however, because shaking a drink and ice hard and fast enough too cool the drink down quickly is not an easy thing to do.
Eventually a solution was decided on using a linear slide and a pair of springs. The liquid in the shaker is attached to the slide, which is pulled to the end by a motor then released, allowing it to slide back and forth using the power of the springs. Then once the sliding stops, the motor once again pulls the shaker to the end of the slide and releases it. This occurs a few times until the drink has reached a good temperature.
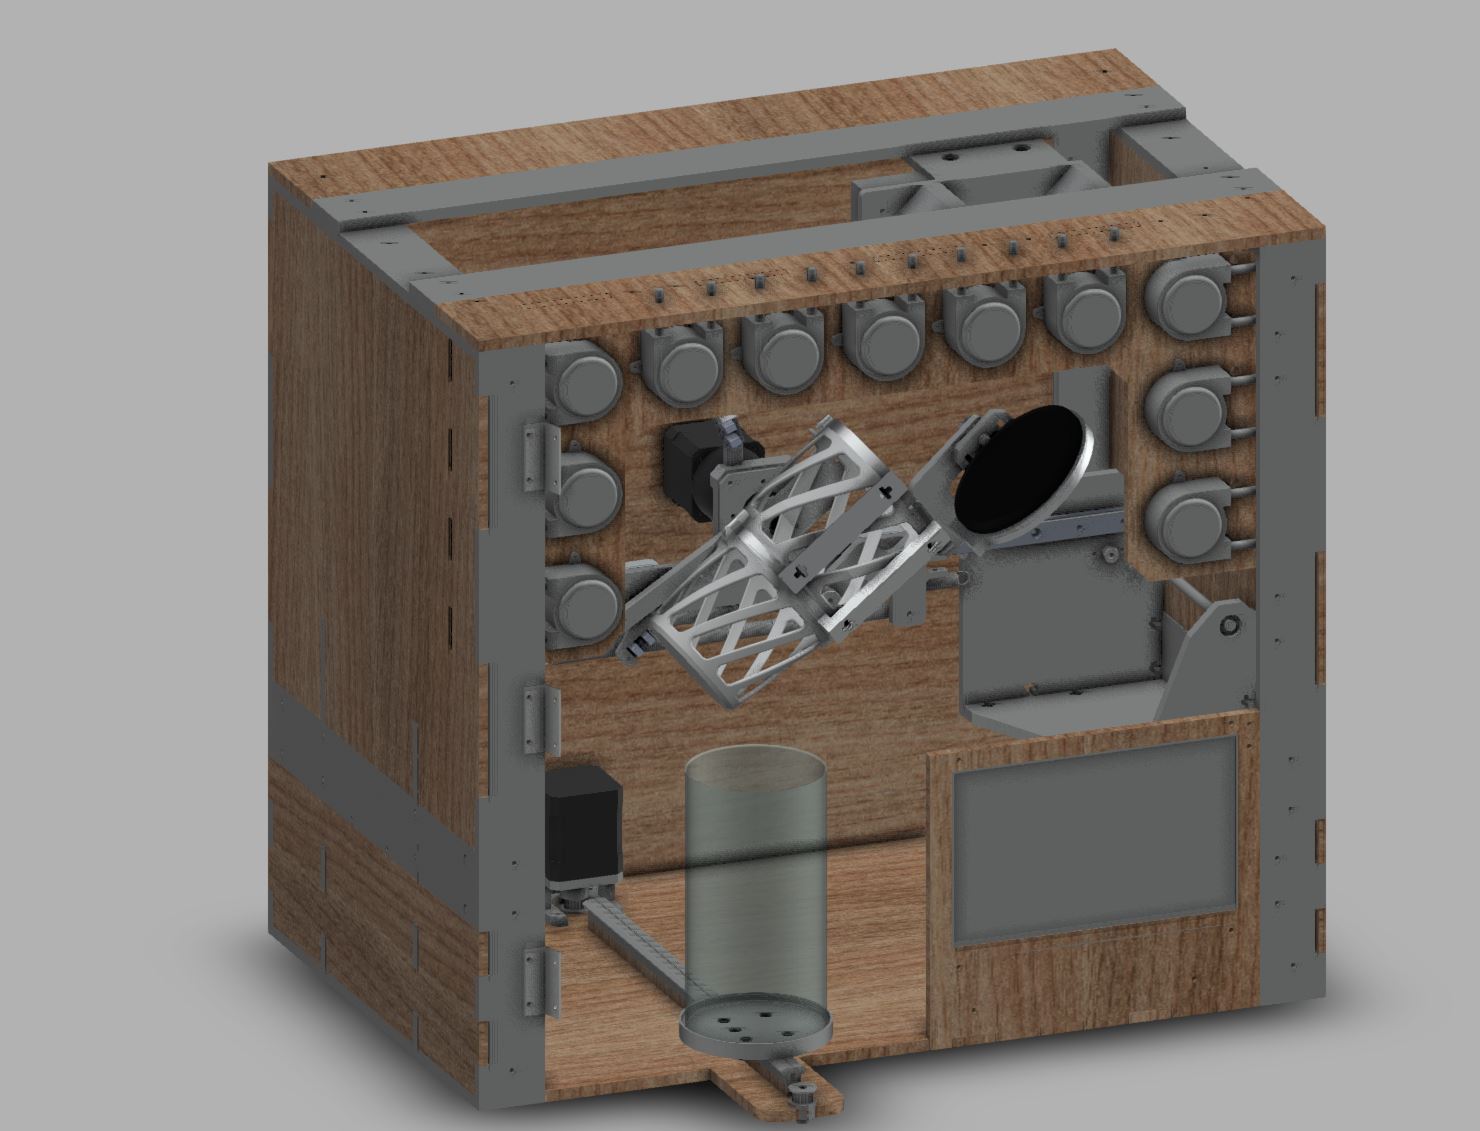
Peristaltic pumps are used to take the liquid from the bottles and pour it into the shaker, and the design allows for up to 11 ingredients to be loaded into the machine at once. Ice is held in a funnel at the top of the machine, and doses of ice slide down using a ramp into the shaker when required.
Another challenge was getting a lid on the shaker once the ingredients were in it. This lid had to be watertight, and hold against the intense forces of the liquid and ice slamming against in when it is shaking. In order to have the lid lock closed and not open with pressure, as well as to reduce the total number of motors on the robot, a four bar linkage arm is used to open and close the lid with the rotation of the shaker. Due to the orientation of the linkage, when it is closed it has "infinite" closing force, as the aluminum arms would have to break in order to open the lid with force from the inside.
In order to make the cleaning process simple, a normal drink shaker cup is used, and it is held in a sleeve which it can slide in and out of. The lid seal is 3D printed out of TPU, a flexible material, and is also easily removeable from its holder in the shaker lid. This allows the two components which get contaminated to be removed and machine washed after a night of use.
Two optical endstops are used to calibrate the location of the stepper motor that rotates the shaker, giving the program enough information to reset the position correctly no matter where the shaker was on startup. Multiple are needed because the shaker itself and the closing arm can be in different positions relative to one another, and both locations must be known to ensure proper function.
The user controls are all done via a touchscreen display on the front of the unit. This display can be used to tell the machine which drinks are in which pump slots when setting up the machine, and it also has lists and menus for all of the possible drinks that can be made with the loaded ingredients. The system is controlled using a raspberry pi 4 as the brain.
How do you build it? The short answer is its complicated. With prototyping, it has taken hundreds of hours of machining, printing, assembling, and so on to arrive at a functional prototype. The CAD for the robot, which houses nearly every relevant part in the project, is available to view and download for anyone ambitious enough to try and build one for themselves. Likewise the code for running the system is available in the linked Github repository.
The build began by designing a basic version of the shaking mechanism to test as a proof of concept. In the spring of 2021 I built the prototype shown below, and ran it with a battery on the motor.
Lots of time after that was spent building different prototypes for modules. The section that I knew would be the most difficult was the combination of a holder for the shaker which also could allow it to seal, and lock such that when ice and liquid hits the lid it doesn't open or leak.
I settled on a custom mold that is a combination of 3D printed parts and aluminum parts to easily hold the shaker in the exact same position every time, and allow it to be easily removed for washing. The lid is held on with a simple hinge, and has a slot cut out of it in order to allow whatever form the seal may take to slot in and out of it.
Now that holding the contraption was solved, the next area to address was sealing it. This portion is by far what has taken me the longest, and I have made dozens of different prototype attempts to make it work correctly. The solution uses a 3d printed part which holds a gasket, such as those used on Yeti tumbler lids.
The most complex component from a mechanical engineering standpoint is the locking system. A four bar linkage was used in order to simultaneously take advantage of the preexisting rotation of the shaker to open and close the lid, while also having essentially infinite closing force when closed. The ice and water hitting the lid would need to break the aluminum bar in order to open the lid.
Two different optical sensors are required so that on startup, the machine can always determine exactly where both the shaker position is, and where the lid is.
The slide which takes the glass in and out is controlled by a stepper motor and is belt driven, with an end stop used to find its position on startup as well.
In order to oscillate the spring mechanism and shake the drink, two gears are used, with one of the gears being shaved down such that it pulls the shaker to one side, then releases it. As the rotation of the motor continues, it grabs the shaker again and restarts the oscillation.
The liquid is dosed into the shaker using an array of peristaltic pumps. The ice is held in a hopper above the machine, and dosed using a simple motor and door mechanism. This is something that will be improved in the future.
The robot is controlled by a touchscreen on the front which will be used to set which drinks are used by which pumps, and to tell you all of the possible recipes which can be made given the current ingredients.
Those are all of the core components of the machine. Currently the main functional program is a test bench which allows the user to manually control each individual component of the machine.
And finally for the sum of current progress, below is a video attached of the full drink making process controlled manually by the test bench. The process will be much better and faster when automated, but this serves as a good proof of concept before the automation code is ready.
And here is a quick video showing the test stand program autoloading on startup
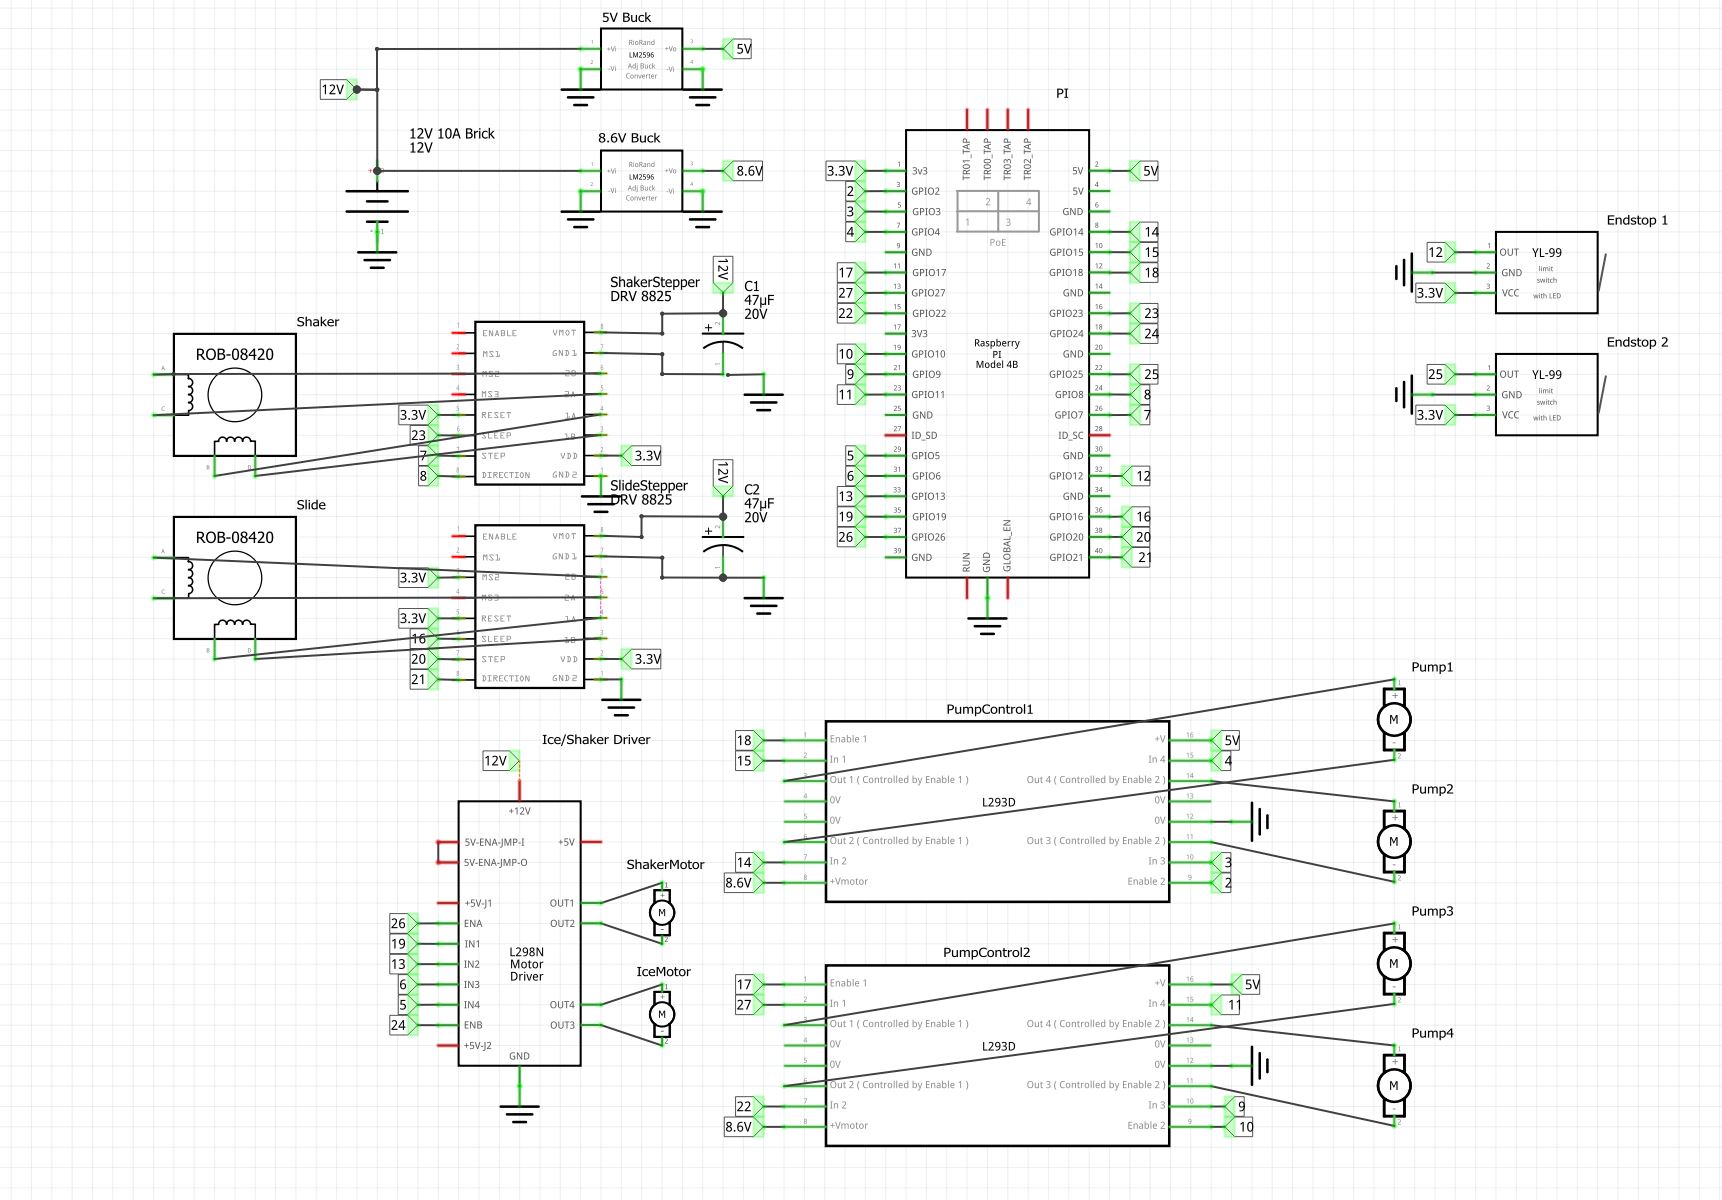
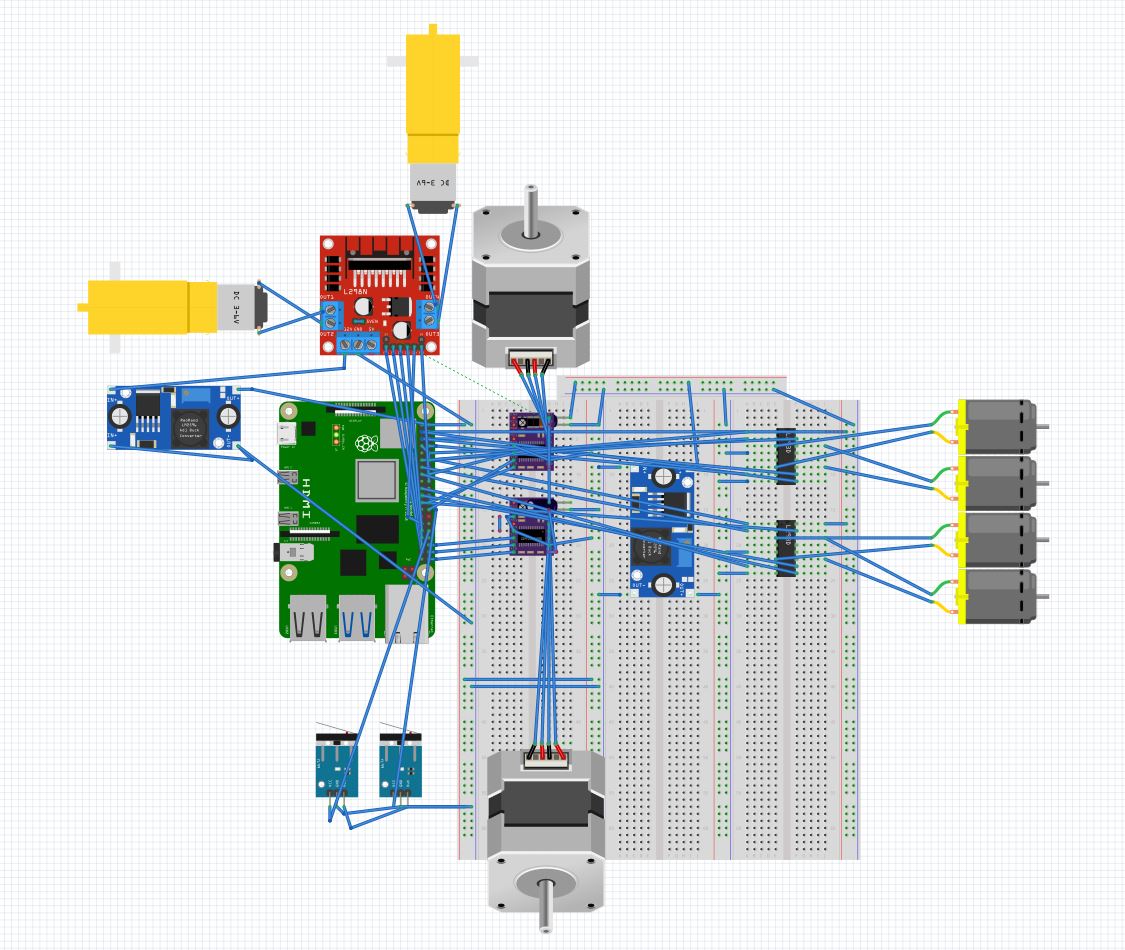
With the test stand (pre PCB design and fabrication) the circuit I currently have set up looks like the picture below.
Works Cited
- Erik Welsh, a professor at Rice University was enormously helpful in teaching concepts and giving examples for projects like this
- This github repository which gave me a good interface to use with the MCP23017 GPIO expander
-The following YouTube videos helped guide my creation of the project
-


Comments