This project was created for a instrumentation class at the University of North Carolina at Charlotte. The objective with this project was to design and implement an IOT project to solve a problem or provide a service. We had to use 2 particle photons that had to have Bi-Directional, 2-way communication between them. After researching different ideas, we decided to build a IOT controlled RC car with the 2 particle photons. The first photon would actually control the car with the help of the BLynk app. The second photon would get signals from the first photon and trigger turn signals, that are located on the RC car.
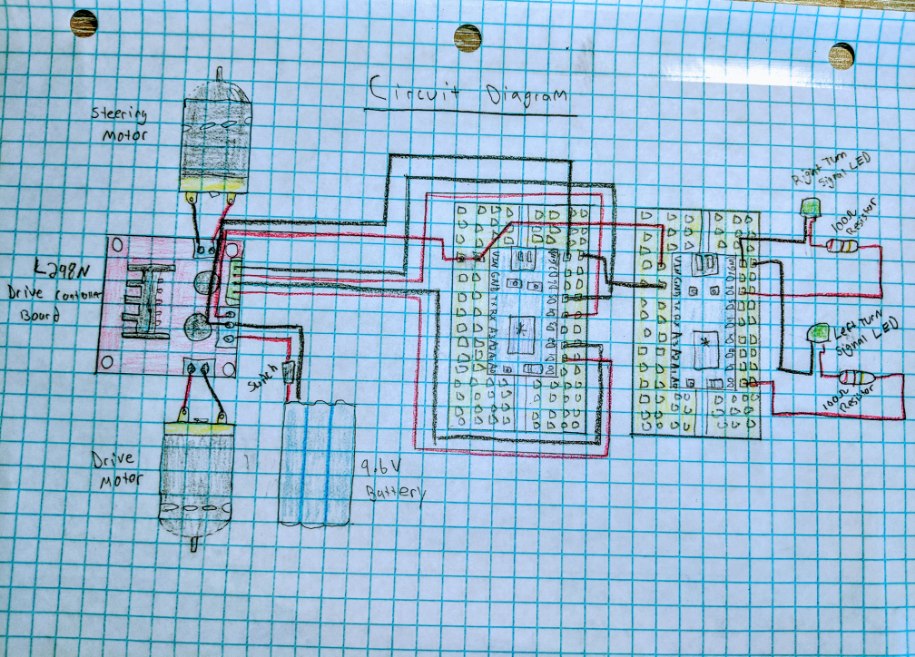
To start the project we had to buy a cheap but tough RC car and a DC stepper motor controller. For the RC car we ordered a 1/18 scale, 2.4G radio remote control car that was four wheel drive and had a top speed of 25km/h. The DC motor controller we ended up going with was a L298N. This Motor controller had a Dual-channel H-bridge driver working mode, which creates a higher working efficiency. Also, the L298N can drive one 2-phase stepper motor, one 4-phase stepper motor or two DC motors. After all the parts come in, we then started to take apart the car.
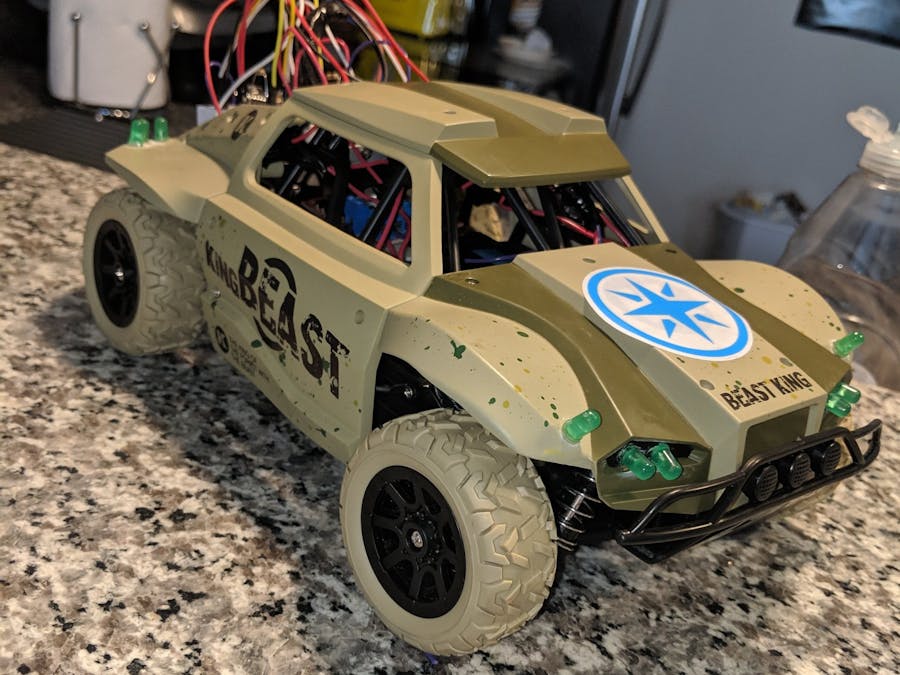
RC car used for this project
L298N Motor Drive Controller Board Module
RC car after removed the body and plastic cover
Under the plastic cover was 2 DC motors, one smaller one for steering, and one larger, for forward and reverse. The car was full time four wheel drive. The car was originally controlled by a small board with an antenna. Two wires (Ground and Power) per motor went into the board, as well as a power and ground from the battery. The car ran off of a 9.6V Ni-Cd battery with an ON/OFF switch cutting off power to the board, which you can see below.
After inspecting the heart of the car and seeing what makes it work wires were run from the power switch, the steering motor, and the drive motor. Then drilled 6 holes in the plastic case with a 3/16" drill bit and labeled the holes. This would help me keep up with which wires went where. After the wires were run threw the holes, the plastic case was screwed back on.
The L298N was placed on top of the plastic case beside the drive motor using double sided tape. Then the drive motor wires went to output 1 of the motor controller, and the steering motor went to output 2. Also, the switched power wires were run to the 12V input on the front of the motor controller. A power wire and ground wire was also run to the photon from the motor controller. Then 4 female/male wires were ran from the control pins on the motor controller to the first photon. IN1 goes to D1 on the photon and IN2 goes to D2. Then IN3 goes to D4 and IN4 goes to D5 on the photon.
After all that was finished, it was time to set up the Blynk app to be able to control the car. After you download the app and make a account it gives you a authentication token. Then you can start creating the app by placing 4 buttons. the first button is gonna control the car going forward, the output will be D1. The second button will be used for reverse, the output will be D2. The third button will be used for turning right, the output will be D4. The last button will be used for turning left, the output will be D5.
App Screen that shows the Four Buttons that Control the Car
Now that car will run and work properly again, it was time to add the other photon. The 2 photons had to have bi directional communication. This was accomplished using the Publish and Subscribe function. Ultimately this is a message that one Photon publishes to the Particle Cloud and then the other Photon listens for this message and when heard, does the task.
The second photon was placed right behind the first one, on the same breadboard. The first step was to drill 3 holes at each corner of the car. Then add super glue to the bottom of the all the LED's and place them in the holes. The LED's have 2 legs at the bottom and the longer one is the positive and the shorter one is the ground. Then soldered wires on each LED leg. These 6 wires were drawn together at each corner and soldered to one single wire. Therefore, each side of the car will only have 4 positive and 4 negative wires that will controls the turn signals, for simple wiring.
These 4 sets of wires were ran to the second Photon. The positive left side wires were run to Pin D0 and the Positive Right Side wires were run to Pin D6. All the Negative wires were run to the ground Pin on the second Photon. There were 100 Ohm resistor placed in front of the D0 and D6 Pins to protect the LED's. The only wires connecting the 2 photons is a ground and a power wire.
The two codes that were flashed on the 2 photons are below in the codes section.
The last part of this project was to graph real time graphs. We ended up graphing a right turn signal versus time. Our graph is kind of pointless since we don't have no real data to collect for this particular project.
Here is a video showing the car working properly. The reason why I was holding it was because the battery was getting weak and wasn't allowing the second photon to connect to the internet. Therefore, had to hard wire the internet to the photons.


Comments