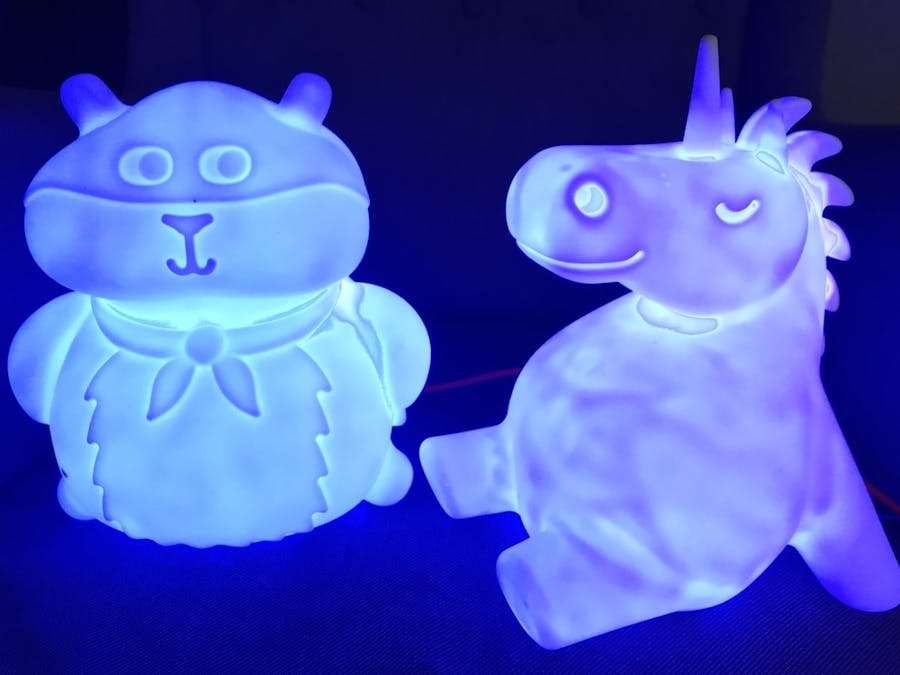
A couple of years ago I made my oldest kid a nightlight for his bedroom. It was a simple project using a Raspberry Pi Zero, a Pimoroni Unicorn HAT and some code in Python. I set it up to change colours at specific times of day to help him know when it was bed time and what time it was ok to get out of bed in the mornings (the little monkey had a horrible habit at waking up at 5am on a Saturday morning!). I originally coded up a simple Python Script to control the lights from scratch but then Tanya at Pimoroni wrote up a really nice guide using the Schedule library that I adapted for my own needs.
This method of building a programmable nightlight is pretty straight forward. You grab a Raspberry Pi Zero W, slap on a Unicorn HAT, pop in a little SD card and throw up some simple Python code. Very little electronics knowledge is needed because everything is practically plug and play! All that remains to figure out is an enclosure. I find the Tiger/Flying Tiger chain of stores to be a great source for fun, hackable light enclosures.
The main downside is cost. A Raspberry Pi Zero WH will set you back around £15, The Unicorn Phat is £10 and you’re looking at another £7 for an SD card (depending on size). Finally for power, the The official Pi Foundation power supply is £8. This comes to a total of about £40. It would be cheaper to use a standard Pi Zero but unfortunately the Pi doesn’t have a real time clock so you’re dependent on an internet connection in order to get the current time using NTP (Network Time Protocol).
Scaling up and reducing costsIn recent years I’ve had a couple more kids and more kids means more night lights. Making three lights using the old method would cost a small fortune so I decided to figure out a more scalable solution that would cost significantly less.
Materials- Raspberry Pi 3B+ with an always on network connection (although a Zero W would do the job too!)
- Cheap ESP8266 from Aliexpress (£2)
- WS2812B LED strip - 60 LEDs per meter. £3
- USB charger and Micro USB cable £2
- Enclosure - whatever you like!
So here’s the plan: I have a Pi 3B+ in my office thats always on. I will use that to gather the time and beam it to the lamps wirelessly. The lamps themselves will be controlled with the amazingly cheap ESP8266 (Arduino IDE compatible Wifi enabled microcontroller!).
For lights, I bought WS2812B RGB LED strips, a 1 meter strip includes 60 LEDs. 15 LEDs supplies more than enough light for our needs so that’s 4 lamps from one strip! For power, I use a standard USB phone charger and micro USB cable (I had these lying around but you can buy the charger and cable for about £2 depending on the length of the cable). So all in, you can build each lamp for less than £5!
You don’t even have to put the logic on a Pi - if you have a web server anywhere online that supports scripting, you could host your backend code there. I used Python, but you could absolutely do this with PHP, Ruby, heck even Perl if you’re that way inclined.
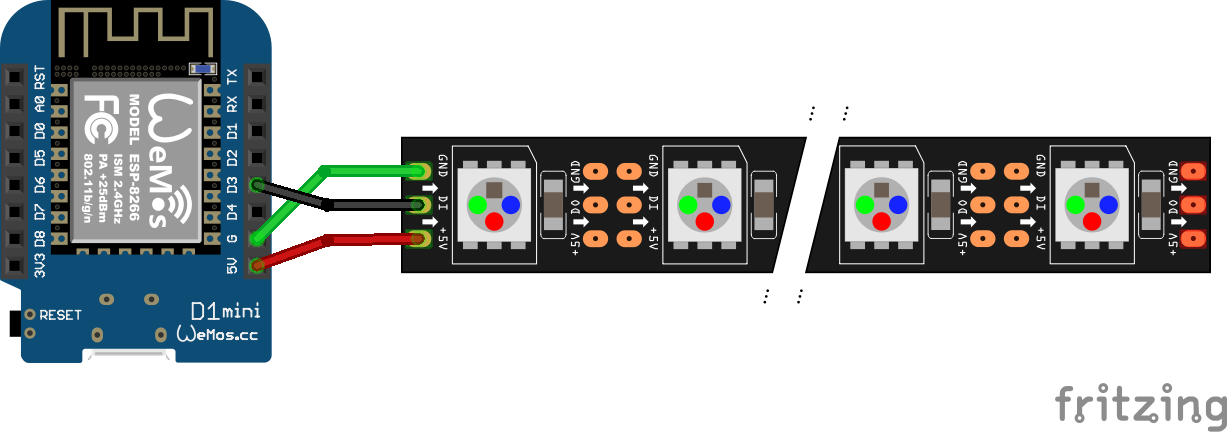
Building the lightsTime for some soldering! Trim the LED strips into appropriate lengths (15 works well), cutting along the cut marks and solder on some stiff hookup wire making sure to attatch them to the data-in side of the strip. Attatch the positive wire to the 5v pin on the ESP8266, the ground to ground and the data pin to D3 (you can change this but you’ll also need to update the code). I then gently loop over the strip and hotglue it to itself to create a “bulb” of sorts. Rinse and repeat for each lamp. I also add a little hot glue around the wires for strain relief. Upload the code and stick it in the enclosure of your choosing.
Initially I was using strips of 25 LEDs per lamp but I found the power draw was often too much for the ESP8266 and was causing random dropouts on the wifi connection so I reduced the number down to 16 which was still more than enough.
The Raspberry PiIf you haven’t done this already, get a Raspberry Pi up and running with the latest version of Raspian and install Flask using PIP.
The code is pretty simple, it fires up a simple web server using the Flask library, gets the time and then converts the time into a decimal for easy handling (for example 07:30 becomes 7.5). It then uses some simple logic to define the colours and brightness and then concatenates them into a simple string that it outputs as a very basic text document.
In your home directory, create a file called app.py and add the following code:
from flask import Flask, request
import datetime
app = Flask(__name__)
@app.route('/')
def index():
	# get the time
	a = datetime.datetime.now().time()
	# convert time to a float
	mytime = a.hour+a.minute/60.0
	# default to off
	color = "0,0,0,0"
	if(mytime > 7):
		r = 0
		g = 255
		b = 0
		a = 255
	if(mytime > 9):
		r = 255
		g = 255
		b = 255
		a = 255
	color = str(r) + "," + str(g) + "," + str(b) + "," + str(a)
	return color
if __name__ == '__main__':
    app.run(debug=True, host='0.0.0.0', port=999)
This is a simple example that starts off with all LEDs set to off, turns green at 7am and then white at 9am. You can add additional logic if you want more steps in your lights (in mine I have them start off red at 5am and slowly fade through orange, to yellow to white to simulate a sunrise, then I have additional logic that sets them to my kids favourite colours during the day).
You can fire up the web server by simply typing sudo python app.py on the command line and then you can visit the server in your browser using it’s hostname or IP to see if it’s working. Assuming the name of your Pi on the network is “mypi” you should be able to see your Pi at ://mypi.local:999 and the output in your browser should be something like 255,0,0,255.
You can now disable the web server using ctrl+c
Next we need it to boot up automatically when the Pi is switched on. That’s easy, just type crontab -e on the command line and then scroll to the bottom and add the following line:
@reboot /home/pi/app.py
Then just to be sure, reboot the Pi (sudo reboot) and then test the URL in the browser again. If all is well, you can move onto putting the software onto the ESP8266!
What happens on the ESP8266 is pretty simple. It connects to the network then performs an http get request to a web page where it expects to see four values separated by commas in plain text; a red, green and blue value to generate an RGB colour and a brightness value. It chops this string into individual numbers and then pushes them out to the LED strip using the FastLED library. It’ll repeat this every 60 seconds or so (this is adjustable depending on how close to real time you need your lights to be).
Simply copy this code into the Arduino IDE and modify the constant definitions at the top of the file to suit your needs. You’ll need to add your wifi details and the address to the web server that’s serving up the colours and you’ll need to install the FastLED and ESP8266 Libraries in the Arduino IDE. Once you’re happy compile and publish the code to the ESP8266
#include <ESP8266WiFi.h>
#include <ESP8266HTTPClient.h>
#include <FastLED.h>
FASTLED_USING_NAMESPACE
#define DATA_PIN    3
#define LED_TYPE    WS2812
#define COLOR_ORDER GRB
#define NUM_LEDS    15
#define WIFI_SSID   "your wifi network name here!"
#define WIFI_PWD    "Your wifi password"
#define HOST_NAME   "NightLight01"
#define DATA_SRC    "URL for the location of your little API"
#define BRIGHTNESS          90
#define FRAMES_PER_SECOND  120
CRGB leds[NUM_LEDS];
// function to explode strings
String getValue(String data, char separator, int index) {
  int found = 0;
  int strIndex[] = {0, -1};
  int maxIndex = data.length()-1;
  for(int i=0; i<=maxIndex && found<=index; i++){
    if(data.charAt(i)==separator || i==maxIndex){
        found++;
        strIndex[0] = strIndex[1]+1;
        strIndex[1] = (i == maxIndex) ? i+1 : i;
    }
  }
  return found>index ? data.substring(strIndex[0], strIndex[1]) : "";
}
void setup() {
  Serial.begin(230400);
  // tell FastLED about the LED strip configuration
  FastLED.addLeds<LED_TYPE,DATA_PIN,COLOR_ORDER>(leds, NUM_LEDS).setCorrection(TypicalLEDStrip);
  // set master brightness control
  FastLED.setBrightness(BRIGHTNESS);
  WiFi.begin(WIFI_SSID, WIFI_PWD);
  WiFi.hostname(HOST_NAME);
  while (WiFi.status() != WL_CONNECTED) {
    delay(100);
    Serial.println("Connecting.");
  }
}
void loop() {
  delay(1000);
  if (WiFi.status() == WL_CONNECTED) { //Check WiFi connection status
    HTTPClient http;		// Declare an object of class HTTPClient
    http.begin(DATA_SRC);	// Specify request destination
    int httpCode = http.GET();  // Send the request
    if (httpCode > 0) {
      String payload = http.getString();
      Serial.println(payload);
      int r = getValue(payload, ',', 0).toInt();
      int g = getValue(payload, ',', 1).toInt();
      int b = getValue(payload, ',', 2).toInt();
      int a = getValue(payload, ',', 3).toInt();
      FastLED.setBrightness(a);
      for (int i=0; i <= NUM_LEDS; i++) {
        leds[i].setRGB(r,g,b);
      }
      FastLED.show();
    }
    http.end();   //Close connection
  }
  // pause for 60 seconds
  delay(1000*60);
}
If all went to plan, you should now have a networked night light up and running that changes colour depending on the time of day. Of course, there’s no need to limit yourself. Your Python script can decide its colours in all kinds of ways, you could randomly generate colours, set them based on the weather or even pull data from a public API like Cheerlights and let Twitter decide the colour of your lights! There’s also no need to wrap them in a kids nightlight - you could install the lights in a fancy floor lamp, plant pots, on headboards or even behind the TV. Once you have the basic pieces described here, the rest is all up to your imagination.
Thanks for taking the time to read this. I would love to see what you made. If you do make anything based on this, please share your projects, suggestions and questions with me on Twitter (@awarburton).
Finally - thanks to Jaap and Mike for helping proof-read and tweak my horrible writing! ♥


Comments