

Hardware components | ||||||
 |
| × | 1 | |||
| × | 1 | ||||
 |
| × | 1 | |||
 |
| × | 1 | |||
Software apps and online services | ||||||
| ||||||
It's kinda "old" project that I used to surprise my wife for her birthday on last March. I've published the video and source code soon after that, yet just had a chance to write about it now. So, here it is.
First, let's see what it can do from this video:
Note: to listen my explanation in video, please turn volume up to maximum. Sorry about that :)
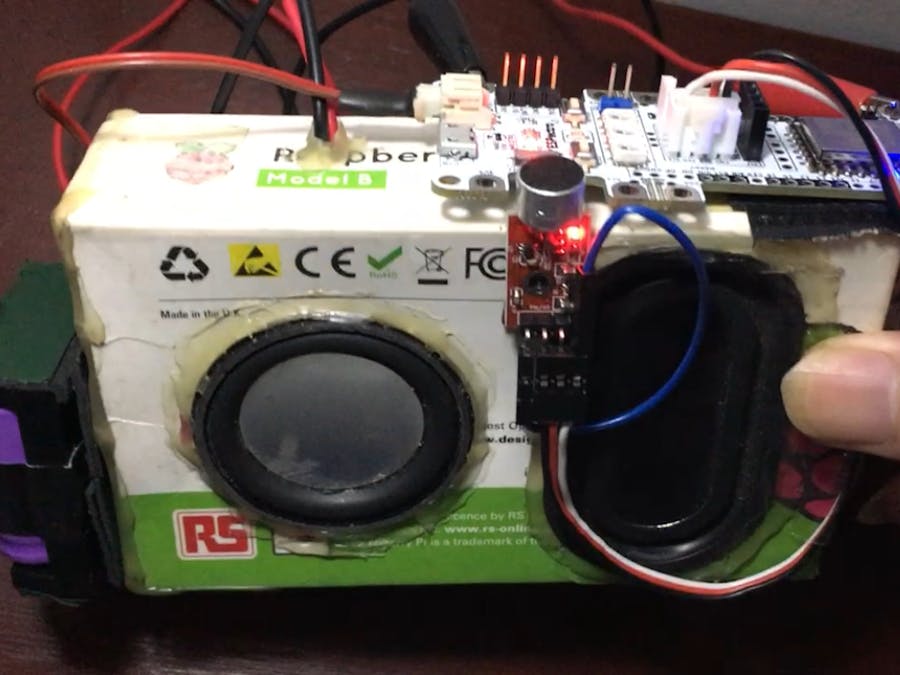
As summary of the video, the board plays "Happy Birthday" tune and lights up the 3 RGB LEDs (NeoPixels) upon the firmware starting. Then I blow into the connected microphone module in order to simulate candle light blowing that of course will turn off the RGB LEDs and stop the tune.
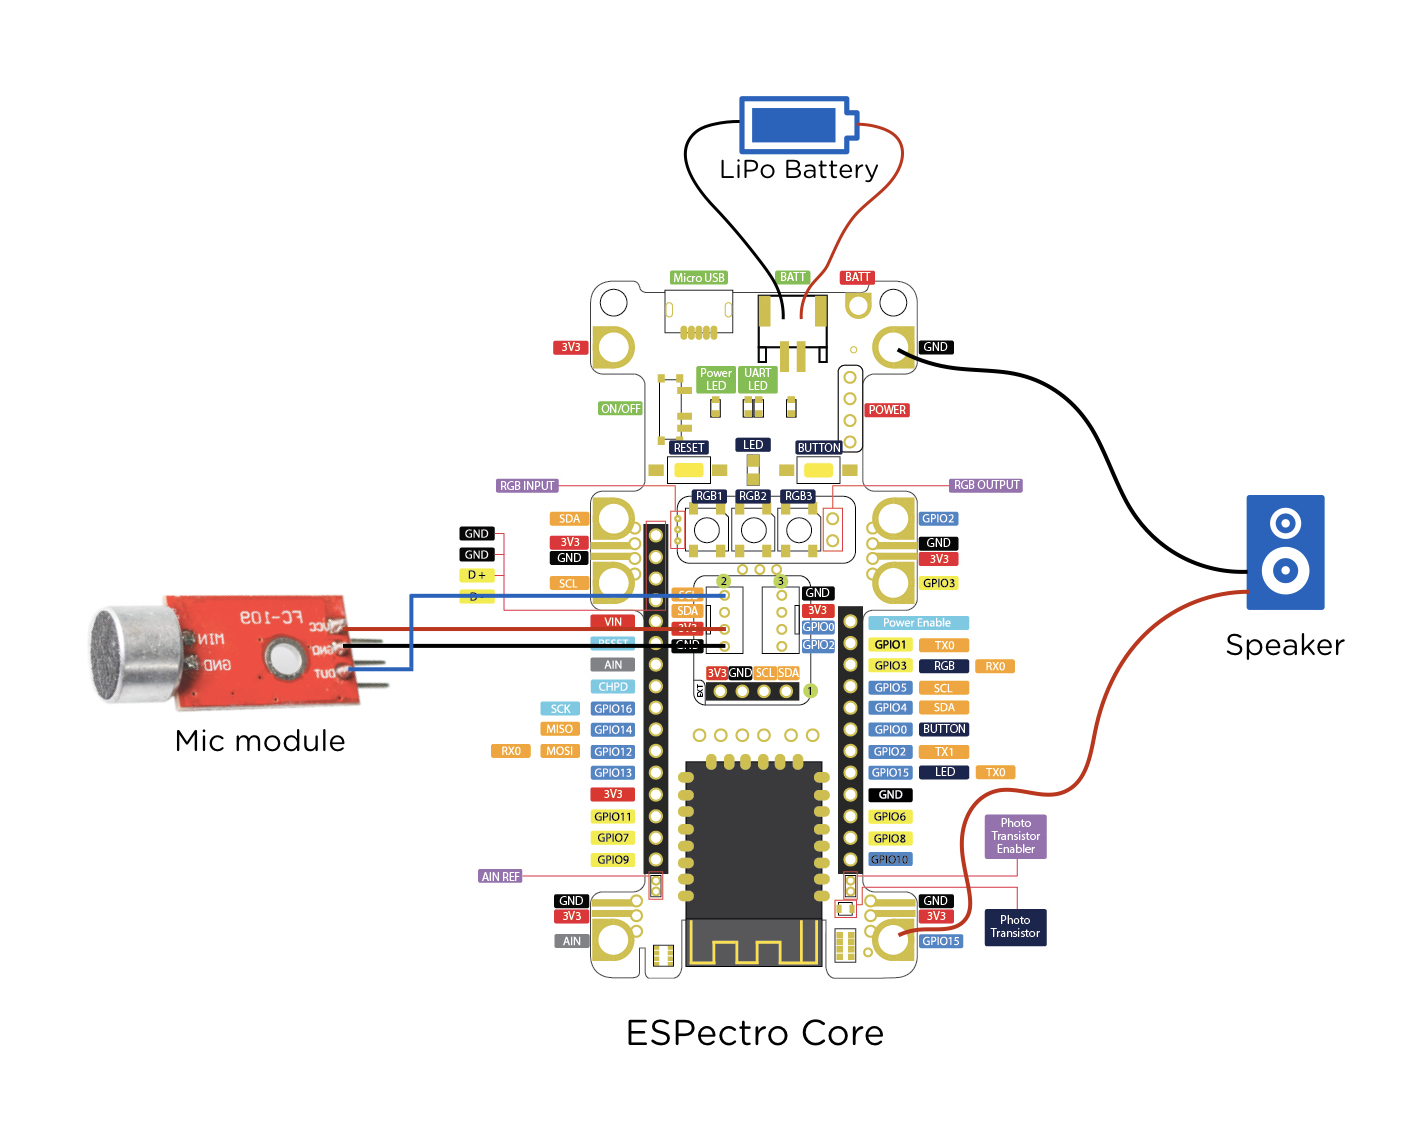
BoardFor this project, I use ESPectro Core v3 development board which the MCU is based on ESP8266. So basically you can use any ESP8266-based dev board, as long as you know what you're doing.
Full disclosure: ESPectro Core is made by my company, DycodeX. Sold on the Makestro Shop.
Make It YourselfTake a look at the schematics, you'll find how I connect everything. As summary:
- Speaker: positive pad connected to GPIO15, negative pad to ground.
- Microphone module: OUT pin is connected to GPIO5 (SCL), VCC to 3.3 volt, GND to ground.
- Battery: connected to battery connector. Please make sure the polarity of the battery matches the "+" (positive) sign on the board. Not all battery connectors have the same polarity. Usually, red cable from the battery means "+" (positive).
Flashing Firmware
You can find the firmware's source code on attachment that's a repository on Github. In order to upload firmware to the board, first you need to install PlatformIO. There are a lot of videos/articles to guide you how to do that, but it's a good thing to start with official documentation like this. Please note that I don't use the official PlatformIO IDE, but using the PlatformIO Core instead which is basically CLI. PlatformIO will take care all dependencies (boards definition, toolchain, libraries) in order to compile the source code and eventually flash the binary to the board.
Once PlatformIO is ready, open the Terminal (or Command Prompt), and type followings:
git clone https://github.com/dycodex/ESPectro-HappyBirthday.git
cd ESPectro-HappyBirthday
pio run -t upload
Note: "pio" is shortcut to "platformio" command. You need to have Git installed on your machine in order to "git clone".
You should have uploaded the firmware by now. Enjoy!
Source CodeThe main source code file is HappyBirthday.cpp. Some important parts are:
#define SPEAKER_GPIO_NO 15
#define MIC_IN_GPIO_NO  5
That is where you define GPIO number of connected speaker and microphone out.
int melody[]= {196,196,220,196,262,247,196,196,220,196,294,262,196,196,392,330,262,247,220,349,349,330,262,294,262};
int noteDurations[] = {8,8,4,4,4,2,8,8,4,4,4,2,8,8,4,4,4,4,3,8,8,4,4,4,2};
That's the array of note frequencies of the "Happy Birthday" tune. Following array is the durations of each note. Not sure what the unit is, though. You can fine tune those arrays in order to change how the tune should be played.
Please note that since I use ESPectro Core board, to ease my life I use its official library made by me. So that I can easily turn on/off the on-board NeoPixels and handle the on-board button press.
ESPectro_Button button;
ESPectro_Neopixel_Default neopixel;
That's the declaration of the button and NeoPixel objects. For playing the tune, I use this code:
void playMusic(int thisNote) {
   int noteDuration = 1000/noteDurations[thisNote];
   tone(SPEAKER_GPIO_NO, melody[thisNote], noteDuration * 1.5);
   int pauseBetweenNotes = noteDuration * 2; //2 = a factor you should tune
   delay(pauseBetweenNotes);
   noTone(SPEAKER_GPIO_NO);
}
Honestly, I copy that code from somewhere, but sorry I forgot the link. Please note, there's a factor "2" that I use to slow down the playback. You can try another value to suit your need.
To handle "candle light" blowing via microphone, it's as easier as handling interrupt on GPIO5 (where the microphone OUT is connected to):
void interrupted() {
   blowed = true; //blowed flag will be respected in "loop" method
}
void setup() {
    //....
    pinMode(MIC_IN_GPIO_NO, INPUT);
    attachInterrupt(MIC_IN_GPIO_NO, interrupted, RISING);
    //...
}
The rest of the code should be self-explanatory.
That's it. Enjoy!


Comments