

Hardware components | ||||||
| × | 1 | ||||
| × | 1 | ||||
 |
| × | 1 | |||
| × | 1 | ||||
| × | 1 | ||||
 |
| × | 1 | |||
Software apps and online services | ||||||
 |
| |||||
 |
| |||||
The Stinker Blinker allows everyone to know when someone is stinkin' up the bathroom! It utilizes a Particle Photon, magnet, and magnetic sensor to detect when the door is closed. When the door is opened or closed, a message is sent via Webhooks to an Octoblu flow, which toggles the Belkin Wemo Switch, connected to the siren:
In order to create your own Stinker Blinker, there are three things that require configuration: the Octoblu flow, the Particle Photon, and the physical hardware setup.
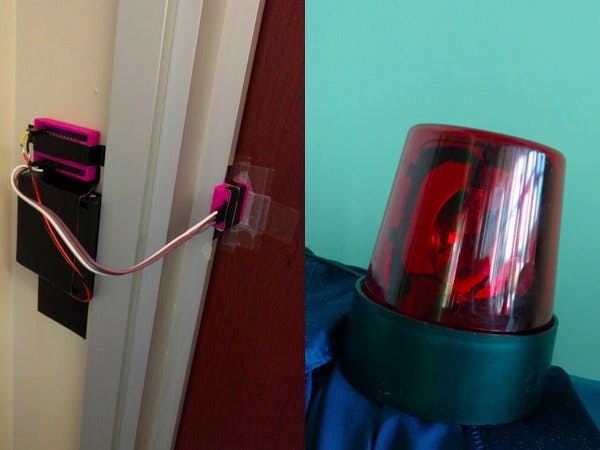
UPDATE: I 3D printed cases for the Photon and magnetic sensor. Also picked up a simple battery pack. The whole bathroom detector package sits a lot smaller on the wall now:
1. Import the Stinker Blinker flow:
2. Connect your Belkin Wemo Switch to your WiFi network by downloading the Wemo app and following the instructions.
3. Once you have your Wemo Switch on your WiFi network, go to connector-factory.octoblu.com and create a new "Wemo Switch" Thing.
4. Follow the setup instructions to connect your Wemo Switch to your Octoblu account.
5. Navigate back to the Stinker Blinker flow, click on each of the Wemo Switches and make sure that the Wemo Name matches the name of your Wemo in your Wemo app:
6. Click on the green play button at the top right of the screen to run your flow!
Now that your flow is running, you will need to create a Webhook for your Particle Photon to send messages to the Trigger in your flow.
Particle Photon Setup1. If you have not done so already, please follow the instructions provided by Particle to get your Photon connected to your WiFi network.
2. In order to register a Webhook for your Photon, you will first need to download Particle CLI.
3. Once you have Particle CLI downloaded, you will need to create a new file called hook.json
:
{
   "event": "magnet_change",
   "url": "YOUR_TRIGGER_HTTP_POST_URL",
   "requestType": "POST",
   "json": {
       "data": "{{PARTICLE_EVENT_VALUE}}"
   },
   "mydevices": true
}
You will need to only replace "YOUR_TRIGGER_HTTP_POST_URL
", which can be found by scrolling down on your Trigger's Thing Inspector:
4. Now that you have your hook.json
created, you need to register that Webhook to your Particle account:
particle webhook create hook.json
5. With the Webhook registered, go to build.particle.io and flash the following code to your Photon:
int led = D7;
int sensor = D6;
int magnet;
int lastRead;
void setup() {
   pinMode(led, OUTPUT);
   pinMode(sensor, INPUT);
   magnet = digitalRead(sensor);
   lastRead = magnet;
}
void loop() {
   magnet = digitalRead(sensor);
   if(magnet != lastRead) {
       if(magnet == 0) {
           digitalWrite(led, HIGH);
       }
       if(magnet == 1) {
           digitalWrite(led, LOW);
       }
       lastRead = magnet;
       Particle.publish("magnet_change", String(magnet));
   }
}
Once your Photon is done flashing, it's all ready to go! For more information on how to use the Particle Photon with Octoblu, check out this guide. This write-up utilizes the information at the bottom of the aforementioned guide.
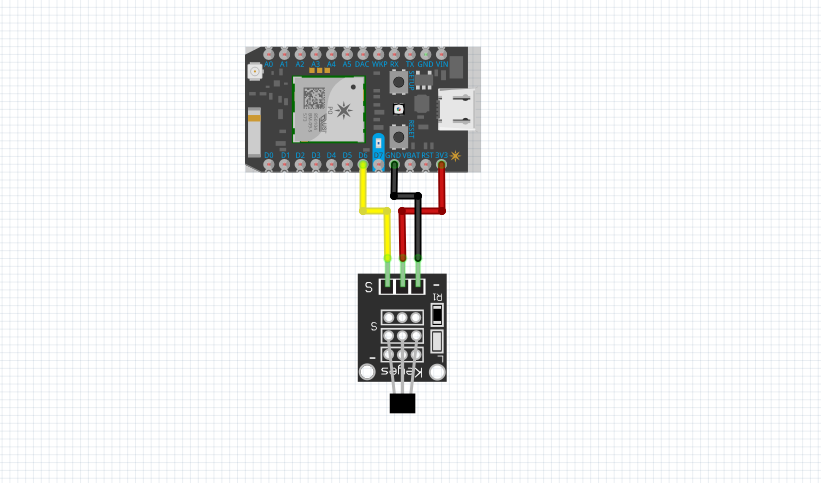
Physical Setup1. To connect the magnetic sensor to your Photon, please refer to this schematic:
2. Now that you have your Photon flashed, powered, and connected to your sensor, you can mount it to the wall:
3. You can now mount the magnetic sensor near the door:
4. Mount the magnet on the door:
5. Review your setup, ensuring that the on board LED is only on when the door is closed. This may take some slight adjustments to get just right:
6. Ensure that your Belkin Wemo Switch is plugged in where you want it:
7. Plug your siren into your Wemo Switch and place that where you want it:
And with that, you have a fully functioning Stinker Blinker powered by Octoblu! For more projects, tutorials, and guides, check out Octoblu on Hackster.


Comments