

Hardware components | ||||||
 |
| × | 1 | |||
Software apps and online services | ||||||
 |
| |||||
What's this?
"The OpenSensor Cloud Platform and the WunderBar enable you to easily develop applications for the physical world. Sense your environment, imagine new products and build incredible smart apps (relayr.io)." By utilizing an array of sensors from Relayr's WunderBar and Octoblu's IoT platform, it was easy to create a simple baby monitor that texts you updates about your baby.
You will need
-- Octoblu account
-- Relayr WunderBar
WunderBar Setup
Getting Your WunderBar Online
1. To set up your WunderBar, download the Relayr app on your smartphone and follow the instructions.
2. Once you have it set up, login to the Relayr dashboard (https://developer.relayr.io/) to ensure that all the sensors you want are connected and recording data.
3. Now you need to go to app.octoblu.com and login.
Setting Up Your WunderBar in Octoblu
**Do these steps for each sensor you wish to add**
1. Search for Relayr in the search bar on Octoblu's design page.
2. Setup is required. Click SETUP.
3. Install Gateblu (https://gateblu.octoblu.com/). You will need to have a Gateblu open on your computer to connect your devices to Octoblu.
4. Navigate back to the Add a Relayr page in Octoblu and click on "Add Gateblu" under "To Gateblu:".
5. Click on "Already Downloaded" under the large Gateblu Icon.
6. Open Gateblu on your computer.
7. Go back to Octoblu. You should be able to see your Gateblu's UUID by clicking the dropdown. (You may need to wait for this option to appear)
8. Click "Add".
9. In order to get your WunderBar working with Octoblu, you will need three keys. These can be found on your Relayr developer dashboard (https://developer.relayr.io/).
10. In order to get your APP ID and TOKEN, go to the "Api Keys" tab. You will first need to click on "Generate Token". You will need these two keys for each of your sensors. They will all have the same APP ID and TOKEN, the Device ID will be different for each, however.
11. Paste your APP ID in the app_id in the WunderBar setup page in Octoblu. Likewise, paste your TOKEN in the app_token on the same page.
12. In order to get your last key, specific to each sensor, you will need to go back to the "Devices" tab in your Relayr dashboard.
13. For each sensor, you will need to click on the little cog icon and copy its Device ID. (do this for the Sound, Gyro/Accelerometer, and Temperature/Humidity sensors)
14. Go back to the Add a Relayr page in Octoblu and put your Device ID in dev_id. **Name your Relayr devices as the individual WunderBar sensors to avoid later confusion**
15. Now go back to the design page and search for your WunderBar sensors by the name you just gave them. Add all three of them to the flow.
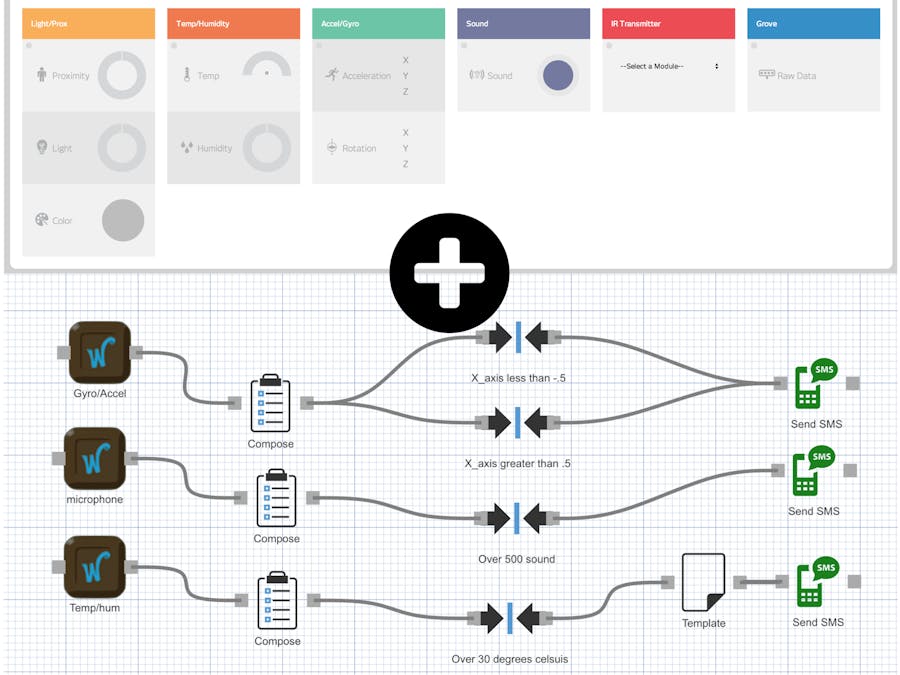
Creating your flow
Adding "Compose" Nodes
The "Compose" node makes it easier to call the variables you want. Instead of having to type {{msg.payload.data.readings[0].value}} you will now be able to call that same thing by simply typing {{msg.variable}}.
1. In Octoblu's design page, you will need to search for the "Compose" node.
2. Add three of these to your flow.
3. Wire a "Compose" node to each of the sensors. (One compose per sensor)
4. In your "Compose" node that is connected to your Gyro/Accelerometer WunderBar sensor, you will want to put "{{msg.payload.data.readings[1].value.x}}" as the Value and "x" as the Key.
5. In your "Compose" node that is connected to your Sound WunderBar sensor, you will want to put "{{msg.payload.data.readings[0].value}}" as the Value and "sound" as the Key.
6. In your "Compose" node that is connected to your Temperature WunderBar sensor, you will want to put "{{msg.payload.data.readings[0].value}}" as the Value and "temp" as the Key.
Adding "Range" Nodes
The "Range" node will be able to execute actions based off of whether or not the sensors are within a specified range. This is used instead of the "Greater Than" node because we only want it to execute once. If your baby is crying, it is assumed that he will be crying for more than an instant, and you do not want to get 50+ texts, you only want 1.
1. In Octoblu's design page, you will need to search for and add 4 "Range" nodes to your flow.
2. Make sure that you have 1 "Range" node connected to each Compose node, except for the Gyro/Accelerometer Compose node, which will need 2 Range nodes.
3. Edit your first "Range" node connected to the Gyro/Accel Compose node. You should call it something like "X_axis less than -0.5".
4. Pass {{msg.x}} as the Value, -1 as the Min, and -0.5 as the Max.
5. Edit your second "Range" node connected to the Gyro/Accel Compose node. You should call it something like "X_axis greater than -0.5".
6. Pass {{msg.x}} as the Value, 0.5 as the Min, and 1 as the Max.
7. Edit the "Range" node connected to your Sound Compose node. You should call it something like "Over 500 Sound".
8. Pass {{msg.sound}} as the Value, 500 as the Min, and 10000 as the Max.
9. Edit the "Range" node connected to your Temperature Compose node. You should call it something like "Over 30 Degree Celsius".
10. Pass {{msg.temp}} as the Value, 30 as the Min, and 100 as the Max.
Adding "Template" Nodes
The "Template" node is great for when you want to send a message that contains both custom text and sensor data. Most nodes, including the "Send SMS" node, which we will use next, do not support having both sensor data and custom text passed in. The "Template" node is how we will work around this.
1. Now you will need to search for and add a "Template" node to your flow.
2. This "Template" node will need to be wired to your "Over 30 Degrees Celsius" "Range" node.
3. Now edit your "Template" node.
4. For the Key, type "data". We will use this Key to call this template later.
5. In the body of the "Template" node, type "Your baby's room is {{msg.temp}} degrees celsius".
Adding "Send SMS" Nodes
The "Send SMS" node can be substituted for any other node you want to use to send a message, however, it one of the simplest to use. Texting yourself updates on your child, weather, or even if someone likes one of your tweets can be a very powerful tool.
1. Now search and add 3 "Send SMS" nodes to your flow.
2. Wire both of your "X_axis" "Range" nodes to 1 "Send SMS" node. (look at the gallery above for a visual representation)
3. Wire your "Over 500 Sound" "Range" node to 1 "Send SMS" node.
4. Wire your "Template" node to 1 "Send SMS" node.
5. For the "Send SMS" node connected to your "X_axis" "Range" nodes, you will need to put in your phone number, with a 1 in front if you are in the United States. (eg: 19999999999)
6. In the same node, also make sure that you make the message says something like "Your baby is up!".
7. For the "Send SMS" node connected to your "Over 500 Sound" "Range" node, input your phone number the same way you did for the first "Send SMS" node.
8. Now add a message, such as "Your baby is crying!".
9. For the "Send SMS" node connected to your "Template" node, input your phone number the same way you did for the first two "Send SMS" nodes.
10. Now the message in this one is a bit different. We want it to use the template we created so, let's make the message "{{msg.data}}".
You're all set!
Now press the green play button to deploy and run your flow. Watch as your sensors pulse and test them using the debug node.
Feel free to experiment with other sensors and other nodes. Maybe you want to create a flow that tweets the temperature of your living room or one that turns on a siren when your child trips an IR beam on the way to your pool. When you use Relay's WunderBar with Octoblu, the possibilities are endless.


Comments