


Software apps and online services | ||||||
 |
| |||||
Chances are, you found this page while googling "Error retrieving access token: InvalidSessionId, No refresh tokens store for this session" while installing Alexa on your Pi. Good news, the fix is easy.
Amazon's Alexa development team has shared a great guide on how to set up Alexa on a Raspberry Pi. Unfortunately, they've got a bug in their install script: when it checks what operating system you're using, it doesn't recognize Stretch, and won't install on it. They're aware of the issue, and the next release will resolve this, but in the meantime, this is how to fix it.
GitHub users WeCreate180 and noemu posted how to do so in a GitHub issue report, so I'm posting it to Hackster to give it that much more visibility.
Getting StartedTo get started, follow the Alexa team's guide to installing Alexa on a Raspberry Pi on GitHub. It's 11 very well communicated steps:
- Install Raspbian on an SD card and boot up your Pi
- Register for an Amazon Developer account
- Register your device
- Clone the app onto the device
- Modify the install script to include your credentials. This is the step where we need to correct the bug.
- Run the install script
- Run commands that start up Alexa for the first time. If you follow their instructions exactly, this is where you'll encounter an error:
Error retrieving access token: InvalidSessionId, No refresh tokens store for this session
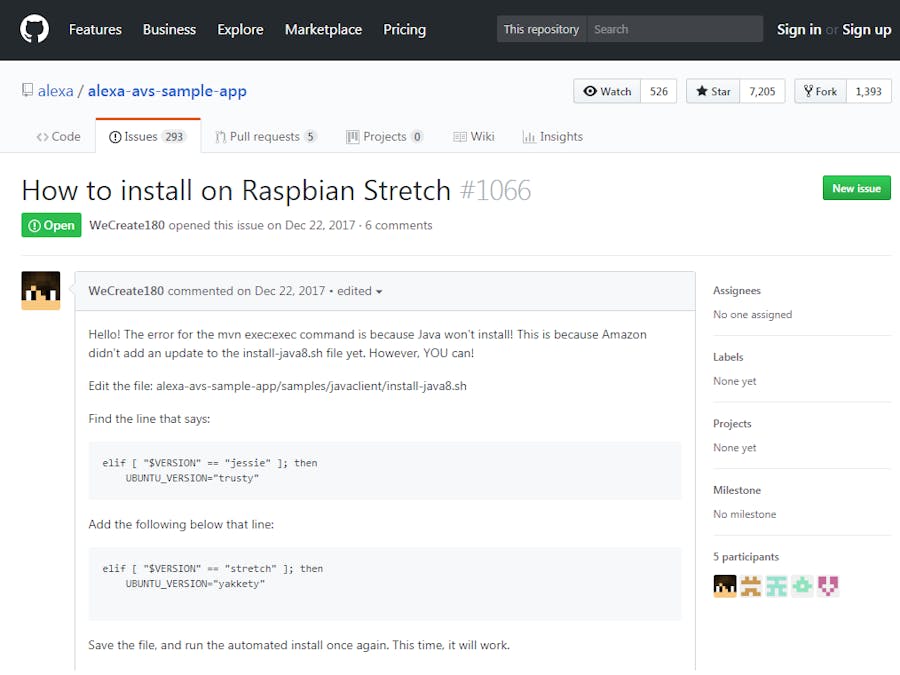
The fix itself is applied in Step 5: Update the install script with your credentials. It is explained in issue #1066 on the Alexa GitHub page, posted by WeCreate180 on December 22nd, 2017:
Hello! The error for the mvn exec:exec command is because Java won't install! This is because Amazon didn't add an update to the install-java8.sh file yet. However, YOU can!
Edit the file: alexa-avs-sample-app/samples/javaclient/install-java8.sh
Find the line that says:
elif [ "$VERSION" == "jessie" ]; then UBUNTU_VERSION="trusty"
Add the following below that line:
elif [ "$VERSION" == "stretch" ]; then
    UBUNTU_VERSION="yakkety"
Save the file, and run the automated install once again. This time, it will work.
To fix the problem, open the the java install script 'install-java8.sh'. On line 18, copy and paste in the above instructions to check for Stretch. Or, since you know that it doesn't need to find anything else, just replace "jessie" with "stretch" and "trusty" with "yakkety" and save.
One other thingIf your OS is the full Raspbian OS, you're ready to go. But if you are running Raspbian Stretch Lite, before you execute the automated install file, run this install command, helpfully provided later in the issue thread by user noemu:
sudo apt-get install dirmngr
You can now complete Step 6 and all the subsequent steps successfully.
Expression of thanksI take no credit for this guide. I wrote it to assist others who are searching for a solution after running into the error message in Step 7 that I did. Thanks WeCreate180 and everyone in t! You're my heros.


Comments