


Hardware components | ||||||
 |
| × | 1 | |||
 |
| × | 1 | |||
 |
| × | 2 | |||
 |
| × | 2 | |||
| × | 1 | ||||
| × | 1 | ||||
| × | 1 | ||||
| × | 1 | ||||
Before looking at the code, I will first list the requirements that should be implemented:
- The cart moves every 5 minutes, from one end position to the opposite one.
- End positions are detected by LDRs (light-dependent resistor) using daylight.
- When it becomes too dark to reliably detect the end positions by LDR, the cart should drive from the left end position to the middle.
- If it is dark, the left end position is detected by using a Hall sensor.
- When it gets light again, the cart moves from the middle to the left end position and continues its journey every 5 minutes.
- If the cart is moving from one end position to the other and does not reach the destination after 15 seconds, the motor should stop.
- The number of times the cart has moved from one end position to the other is counted.
- When the cart has reached an end position, the current count is displayed using the NeoPixels.
- The NeoPixels should be switched off again after 20 seconds.
Now let's look at how to use the rules from the first and second part of the guide (functions for conditions, procedures for states and state changes that first bring the hardware into the desired state and then define what should happen next, power-on and run) to translate the requirements into an easy-to-understand program.
Example 3: Cart that goes back and forthAs always, you'll find the code in the code section of this project.
The code starts with some setup and helper procedures.
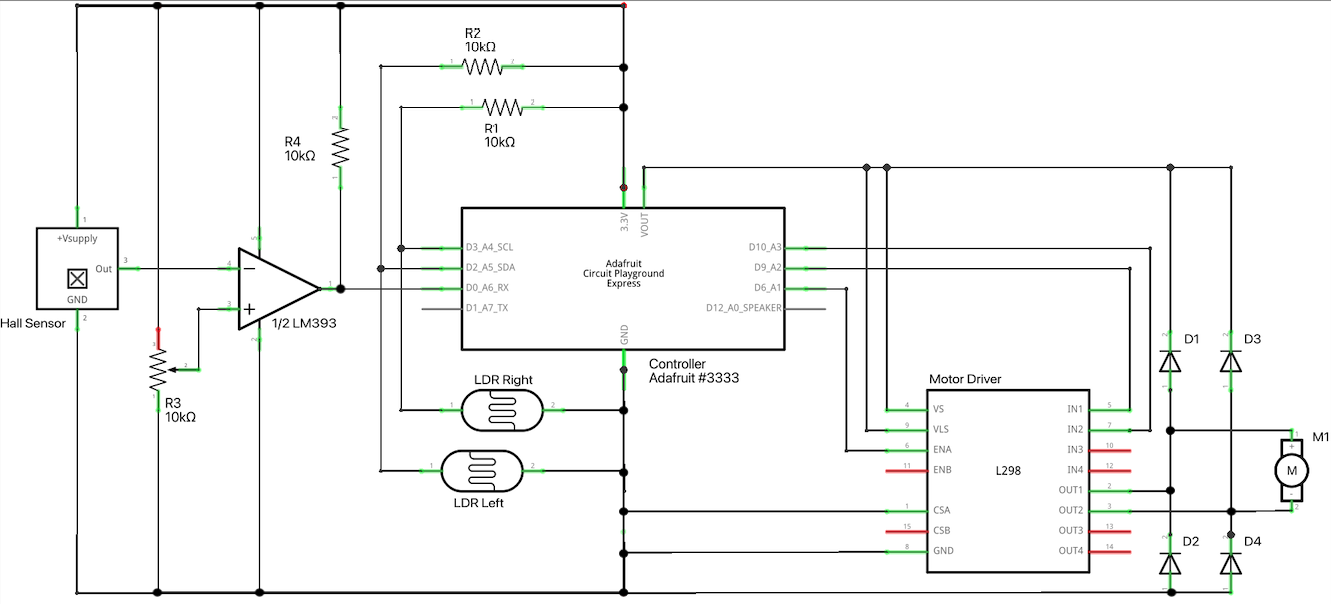
Lines 1-5 are the necessary imports. Lines 7-17 and 20 define the hardware in- and outputs used by the rest of the program. Lines 18-19 define some variables for helping with the NeoPixel colors. Lines 21-22 switch off the NeoPixels. And line 23 initializes the count (number of times the cart has moved from one end position to the other) to zero.
The helper procedures stop(), drive_right(), and drive_left() in lines 25-38 do what they're named: They stop the motor, drive the cart to the right or left. To do this, they set the inputs of the L298 H-Bridge to the correct values.
Lines 40-53 define the functions representing conditions:
- is_dark() returns True if it is too dark.
- is_light() returns True if the daylight is bright enough.
- is_right() returns True if the cart is at the right end position.
- is_left() returns True if the cart is at the left end position - by LDR or Hall sensor, if it is too dark. The Hall sensor is "active low". That means it gives the value False when the cart triggers it.
- is_between() returns True if the cart is neither in the left nor in the right end position.
Line 55 creates the data structure needed for cooperative multitasking (the queue). Then procedures for states and changing states follow.
The procedures in lines 57-76 conceptually form a cycle that represents "moving every 5 minutes, from one end position to the opposite one":
- at_right_end_position() stops the motor, increases and shows the count and then waits 5 minutes (300000 milliseconds) before activating drive_to_left_end_position().
- drive_to_left_end_position() causes the cart to drive to the left and then waits either for the left end position to be reached (detected by is_left()) or for 15 seconds (15000 milliseconds) to elapse (we'll cover this later). When the left end position is reached, at_left_end_position() is called.
- at_left_end_position() stops the motor, increases and shows the count and then either drives to the waiting position in the middle (we'll cover this later) or waits 5 minutes (300000 milliseconds) before activating drive_to_right_end_position().
- drive_to_right_end_position() works like drive_to_left_end_position(), but left and right are swapped. When the right end position is reached, at_right_end_position() is called, closing the cycle.
The basic cycle is abandoned in two cases:
- if it gets too dark, calling drive_to_waiting_position() and
- when the 15 seconds elapse without reaching an end position, calling to fault().
The requirements about going to the middle if its too dark and going back to the left end position when it gets light again are implemented in lines 78-84:
- drive_to_waiting_position() causes the cart to drive to the right for 2 seconds (2000 milliseconds), and then calls at_waiting_position().
- at_waiting_position() stops the motor and then waits for at least 60 seconds of light. In this case, drive_to_left_end_position() is called.
The procedure increase_and_show_count() in lines 89-97 counts the number of cart movements and displays the current count. It creatively implements this requirement by using colors for a quinary system (0 = black, 1 = red, 2 = yellow, 3 = green, 4 = blue).
20 seconds (20000 milliseconds) after displaying the count, hide_count() is invoked. It switches all NeoPixels to off.
All that remains is to get the hardware into the correct state after power-on and running the tasks.
Initializing is done by the init() procedure in lines 103–109. It distinguishes three cases:
- If it is dark, the hardware starts with at_waiting_position().
- If it is not dark and the carriage is either at the right end position or somewhere in between, drive_to_left_end_position() is called.
- In all other cases, the initialization calls drive_to_right_end_position().
The tasks are executed using the same loop that we saw in the examples from the first and second parts of the guide.
Try it yourselfIf you want to try the example, the software part is easy:
- Update Circuit Playground Express to CircuitPython 9.2.8, see https://learn.adafruit.com/adafruit-circuit-playground-express/circuitpython-quickstart#install-or-update-circuitpython-2929611.
- Download cooperative_multitasking.mpy from https://bitbucket.org/amotzek/circuit-python/downloads/ and copy it to the lib folder of Circuit Playground Express.
- Copy the source code of the example to code.py in the root directory of Circuit Playground Express.
I don't expect anyone to recreate the hardware part - the purpose of this project is to demonstrate the use of the cooperative_multitasking library. Just in case:
- I'm not sure if the parts included in Creative Box Basic are actually sufficient to build the model, or if I used parts I've had since childhood. Fischertechnik's product range is extensive, and if necessary, a 3D printer can help.
- The circuit diagram in the schematics section shows how to connect the electronic components.
That's it. I hope the three examples from the first, second and this part of the guide have clarified the use of the cooperating_multitasking library. You can test whether you've understood the key points with the following short quiz.
QuizLet's consider the functions and procedures in Example 3: Which is a helper, a condition function, a state procedure, a state change procedure?
Do all state and state change procedures conform to the "bring the hardware into the desired state first, then define what should happen next" pattern?
Wrap UpThe five rules slightly reformulated:
- There can be functions representing conditions.
- There typically is a procedure for every state.
- There can also be procedures for changing states.
- The body of a procedure for a state or for changing states first brings the hardware into the desired state. Then it defines what should happen next.
- Choose what happens when the hardware is powered on.
- Let the hardware run.
The API of the Tasks object:
- Tasks can be added to the list using the
now,after,if_then, andif_for_thenmethods. - With
now(f), the call to procedurefis placed at the beginning of the list. The call tofis then executed immediately. - With
after(time_span, f), the call to procedurefis executed aftertime_spanmilliseconds. - With
if_then(g, f), the call to procedurefis executed as soon as functiongreturns the valueTrue. - With
if_for_then(g, time_span, f), the call to procedurefis executed ifghas returned the valueTruefor at leasttime_spanmilliseconds. now,after,if_then, andif_for_thencan have a named parameterpriority=nto set the priority of the task ton.- With
only_one_ofyou can declare that only one of several tasks should be executed—the one that becomes active first.
Professional software development always includes automated testing. How to perform automated test without hardware is covered in the fourth and final part of this guide.

_3u05Tpwasz.png?auto=compress%2Cformat&w=40&h=40&fit=fillmax&bg=fff&dpr=2)

Comments