


Hardware components | ||||||
| × | 1 | ||||
 |
| × | 1 | |||
| × | 1 | ||||
 |
| × | 2 | |||
| × | 1 | ||||
DISCLAIMER: There is a wrong information about the 5V to power the Hailo, the vbus current is limited. To power the Hailo connect its 5V to the pin 2 on the 40-pin header of the board.
For a more in-depth guide, we've created a detailed tutorial hosted on GitHub. In this tutorial, you'll find step-by-step instructions, code examples, and additional resources to help you better understand and implement the concepts discussed here. Whether you're a beginner or looking to deepen your knowledge, this comprehensive guide covers everything you need.
You can access the GitHub repository with the full code here: https://github.com/System-Electronics/astrial_tutorials/tree/main/10-csi_mipi
IntroductionThis tutorial will explore how to set up and use the Astrial board with a MIPI Camera, in particular the Raspberry Pi Camera. The Astrial board is a versatile platform designed for various embedded applications. By connecting a MIPI camera, you can leverage the power of the Astrial board to capture and process video streams, making it suitable for projects in computer vision, surveillance, and interactive media.
The following sections will guide you through the necessary hardware and software setup steps. By the end of this tutorial, you will have a functional video stream from your RPI Camera camera displayed on a monitor connected to the Astrial board. Additionally, we'll run a detection script to demonstrate basic image processing capabilities.
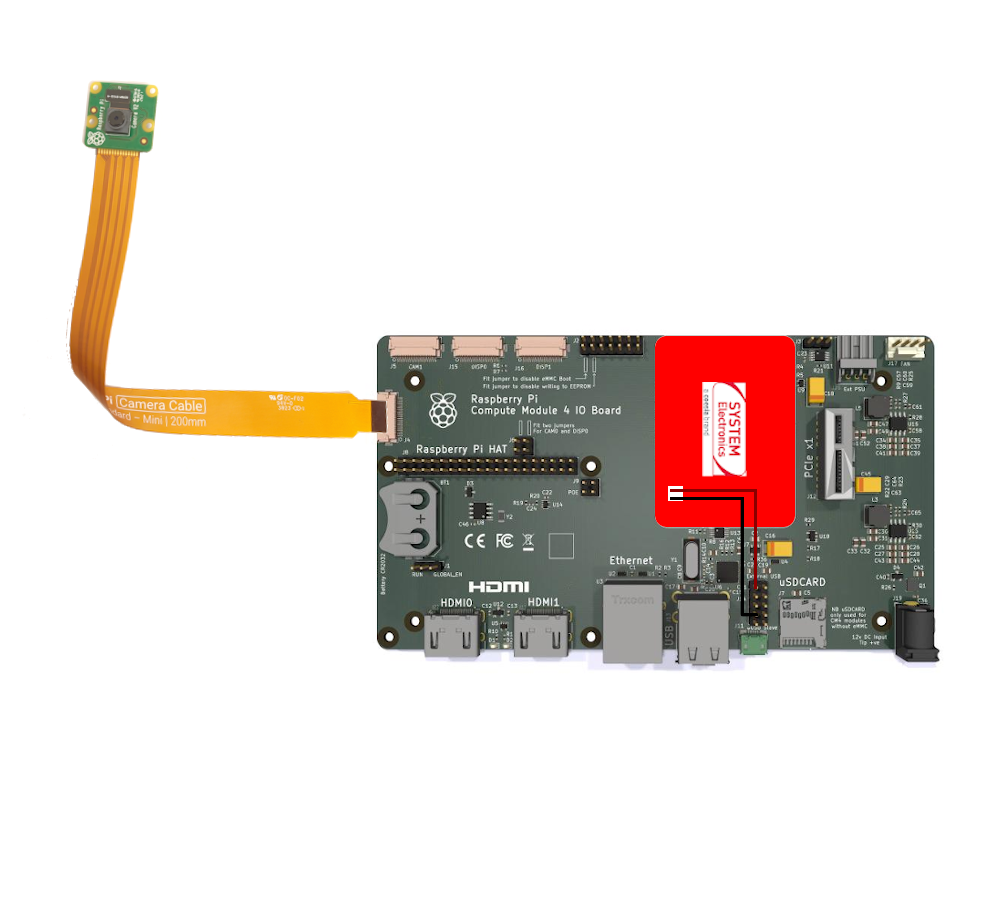
Hardware setupFirst you need to fit 2 jumpers on J6 as shown in the image below to enable the CSI/MIPI port CAM0
Then you can connect the Raspberry Pi Camera to the CM4 Carrier board using either CAM0 or CAM1 port using RPI CAMERA CABLE STANDARD-MINI-300MM.
Lastly, connect an HDMI monitor: for this tutorial, to see the video stream, you need to connect a display to the CM4's HDMI port
Software setupWith the hardware in place, we can now proceed to the software configuration:
- Launch the ISP media server: launch the ISP media server in dual mode so that you can choose between CAM0 and CAM1 MIPI port (you still won't be able to use both of them simultaneously), while if you launch it in single mode only CAM0 will be usable.
cd /opt/imx8-isp/bin
./run.sh -lm -c dual_imx219_1080p60 &- Copy the detection script: For this tutorial we are going to use a slightly modified version of the detection script that you will find on your newly flashed Astrial. The onlu difference is that we are going to use the 'synchailonet' GStreamer component instead of the 'hailonet' one. To use the modified version copy the 'detection.sh' script provided in the code section of this article to the Astrial, under the '/home/root/apps/detection' folder.
- Run the script: Go to the detection script directory and launch the script to see the video stream with object detection on your monitor (Replace <video device> with your camera number, they are either video2 or video3 if you are using CAM0 or CAM1 respectively).
cd /home/root/apps/detection
./detection.sh -i /dev/<video device>
You should now see the video stream on your monitor. Put some objects in front of the camera and see if they get detected.

Comments