


Hardware components | ||||||
 |
| × | 1 | |||
 |
| × | 1 | |||
| × | 1 | ||||
 |
| × | 1 | |||
| × | 2 | ||||
| × | 1 | ||||
| × | 2 | ||||
| × | 1 | ||||
Software apps and online services | ||||||
| ||||||
In a hospital room, the rhythm of life changes. For many children, time slows down, shaped by therapies, routines, and long periods away from school and friends. Over time, the sense of isolation grows, and with it, the risk of missing not just lessons, but the joy of discovery, creativity, and connection.
🤖 Wally: A Human Approach to EdutainmentOur edutainment robot Wally was created in response to this very need. It is more than a tool; it is a way to humanize medical care. It aims to bring learning, creativity, and connection back into the lives of children facing long hospital stays, making them feel seen, involved, and connected to the world of learning, even from a hospital bed. It doesn’t replace school, but it rebuilds a link to it, softly, through play and curiosity, applying the techniques of edutainment.
Designed to teach coding and robotics in a playful way, Wally is simple and made from low-cost materials like LEGO arms, rubber bands, and a series of M5Stack components. This allows the creation of hands-on activities, also supported by short lessons in a PowerPoint format for young children and adolescents. Wally promotes cognitive development, fostering critical thinking, problem-solving, and creativity. Furthermore, it offers a meaningful real-world application of STEM knowledge, making learning relevant and engaging. During their hospitalization, young patients can apply what they learn to tangible contexts, integrating their participation into the therapeutic process. The physical act of manipulating and assembling the robot also helps to preserve fine motor skills, often affected by extended medical treatments. Wally’s impact goes beyond traditional education, offering comprehensive support to help shape a promising future for young patients.
⚙️ A Simple, Accessible, and Powerful Tool
From a technical standpoint, Wally utilizes M5Stack components to enable programmable, responsive behaviors. The system can be customized to enhance the learning experience, allowing adaptability to different learning scenarios. To make the robot accessible to all learners, especially those with no prior experience in programming, all interactions are programmed using a visual, block-based environment of UIFlow. When more advanced sequences are needed, custom blocks have been developed to simplify the logic while maintaining clarity and engagement. This ensures that students can focus on creativity and exploration, building confidence as they gradually approach more structured programming concepts.
🛠️ How to Build Wally1. Build the Base Frame
- Insert 2 short pins on the bottom-right corner of the frame taken from the 360° Kit, leaving one empty hole between them.
- On the opposite side, insert the long pins in the same configuration.
➤ Note: the shorter end of the long pin goes into the frame; the longer part should stick out.
2. Create the Ball Support Arm
- Take the LEGO arm (5 holes) and insert 2 short pins in the outermost holes.
- Attach the ball caster underneath the LEGO arm using double-sided tape.
3. Add the Wheels
- Connect the 2 motors to their wheels.
- Insert:
4. Join the Two Frame Parts
- Slide a rubber band underneath the frame, near the wheels.
- Attach the ball support arm to the shorter side of the wheel structure by pressing the exposed pins into the available holes.
5. Connect the M5 StickC Plus
- Plug the M5 StickC Plus into the 8-channel servo module.
6. Match the Motor Wires
- Each wire has colors:G (brown) = ground V (red) = voltageS (yellow) = signal
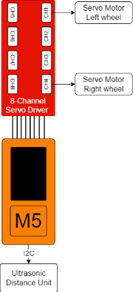
- Plug the motor wires into channels 2 and 3 of the servo: ➤ Match the wire order (G-V-S) with the letters on the board (red box).
➤ The number represents the channel (green box), and it increases in the direction of the arrow.
- With the wheels resting on the table and the passive wheel facing left, connect the cable of the lower wheel to channel 3; then, connect the cable of the other wheel to channel 2.
7. Secure the Electronics
- Gather the cables inside the LEGO frame.
- Place the M5 StickC Plus on the frame and secure it using a rubber band.
8. Add the Ultrasonic Sensor
- Connect the sensor to Port A on the M5 StickC Plus.
- Use a second elastic band to fix the sensor to the front of the robot.
✅ Wally Is Ready!


Comments