
Hardware components | ||||||
 |
| × | 1 | |||
| × | 1 | ||||
 |
| × | 1 | |||
 |
| × | 1 | |||
 |
| × | 1 | |||
 |
| × | 1 | |||
 |
| × | 1 | |||
 |
| × | 1 | |||
 |
| × | 1 | |||
Software apps and online services | ||||||
 |
| |||||
_4YUDWziWQ8.png?auto=compress%2Cformat&w=48&h=48&fit=fill&bg=ffffff) |
| |||||
| ||||||
| ||||||
Hand tools and fabrication machines | ||||||
 |
| |||||
I mostly wanted to use an ATTINY45 for some purpose and get marginally better at making PCBs in KiCAD and designing an enclosure in Solidworks so decided this would be a good opportunity to do both.
I have a gas stove at home. I can't currently change it to induction due to electricity costs in my state so I figured, if I can't change it out, at least let me make something that will be an easy indicator of whether or not there are bad gasses where I'm cooking.
Smoke detectors do an OK job but they are no where close to where you are breathing or working when you're in the kitchen so I figured I could make something better. A simple bar light to show me an approximate level of gas detected and if it goes up then I should open a window. If it stays at a low level then I'm maybe OK? Idk.
I also wanted to implement Charlieplexing because I read too much about it. What is Charlieplexing you might ask (or if you know then just skip to the next section)?
CharlieplexingIt was named after Charlie M Allen who was an application engineer. I guess he had a bunch of LEDs and very few pins and decided he was going to go for it and make something cool. There's a good wikipedia article about it but the basic idea is this: you can control N(N-1) LEDs using charlieplexing. If you have 3 pins, you can control up to 3 (3-1) = 6 LEDs. The important thing to note is that you have to change the pins from OUTPUT HIGH, OUTPUT LOW, and INPUT. Here is a basic sketch of a charlieplexing circuit:
You have three pins you can control, X1, X2 and X3. As you can see, X1 is tied directly to Y1, X2 to Y2 and X3 to Y3. Because LEDs are diodes, they are directional (with the arrow pointing to the negative), changing what X1, X2, and X3 will change which LED is lit. You can see this in the next photo:
In the above example, we set X1 as OUTPUT HIGH meaning that Y1 will have 5VDC (or 3.3VDC) running on it (noted in red). When we set X2 as OUTPUT LOW (0VDC), Y2 will also become 0VDC and this will cause D12 to turn on and light because it has the correct voltage in the correct direction. X3 is set as an INPUT so it will not be 0VDC or 5VDC and will prevent D13 from also lighting.
If we set the frequency of the LEDs to be fast enough, we could light up all 6 LEDs and the user would see them as one solid block of LEDs. I thought this was a neat approach and I could avoid buying a multiplexer chip which would reduce the components scope a bit.
One thing to note is that if you know you're going to have the same LEDs in the matrix, you could reduce the scope by having common resistors (one per line) which would make it so you could drive 6 LEDs with only 3 resistors. Because you only drive one LED at a time, this allows you to save on that resistor cost (which is really where all the expense goes, amirite?). I didn't do this even though I ended up using only one type of LED but I digress.
ATTINY45Oh the ATTINY45. Factually the MOST POWERFUL INTEGRATED CIRCUIT TO EVER LIVE (if you don't count the 555 timer which truly is the BEST IC EVER TO GRACE THIS PLACE WE CALL EARTH). I know factually is doing a lot of lying in that previous sentence but whateves. I wanted to use the ATTINY45 because it's crazy cheap and I thought it would be fun to use. Programming it is kind of a pain unless you watch this delightful video by this dude on YouTube.
Anyway, it's a pretty good video and pretty straightforward on how to program the ATTINY.
The SensorSo the hardest part of this entire project was figuring out how to wire this sensor. I wanted to use a gas sensor because that's kind of the whole goal so I went on Sparkfun and found their gas sensors and ended up with the MQ-4 which detects methane which seems pretty good around a stove because gas stoves use natural gas and natural gas is mostly methane so overall seems fine. I also picked it because it was in stock which is really the most important aspect of any purchase.
Anywho, can you spot the difference between the wiring diagram from the datasheet and the wiring diagram from the example?
Instructions: The above fig is the basic test circuit of MQ-4. The sensor requires two voltage inputs: heater voltage (VH) and circuit voltage (VC). VH is used to supply standard working temperature to the sensor and it can adopt DC or AC power, while VRL is the voltage of load resistance RL which is in series with sensor. Vc supplies the detect voltage to load resistance RL and it should adopts DC power.
So these don't seem to really match in my mind. The example wiring diagram has 3 pins tied to 5VDC which it seems like in the datasheet, only two spots are supposed to get 5VDC and then you put a resistor on the outlet and read the voltage across that resistor. I decided that the example image was a liar but that then led to the next question: How do I tell what pin is what?
You look at the datasheet and say, yeah, makes sense. There's some sort of little bar on the bottom and that'll tell me the orientation right?
WRONG! There's nothing. I had to hook up an oscilloscope to figure out which pin was actually the analog input pin to figure out how to wire this thing. It was a very confusing thing and idk why they did it like that. Also the pins are thick so use alligator clips to do it or else you'll screw up your dupont connectors like I did.
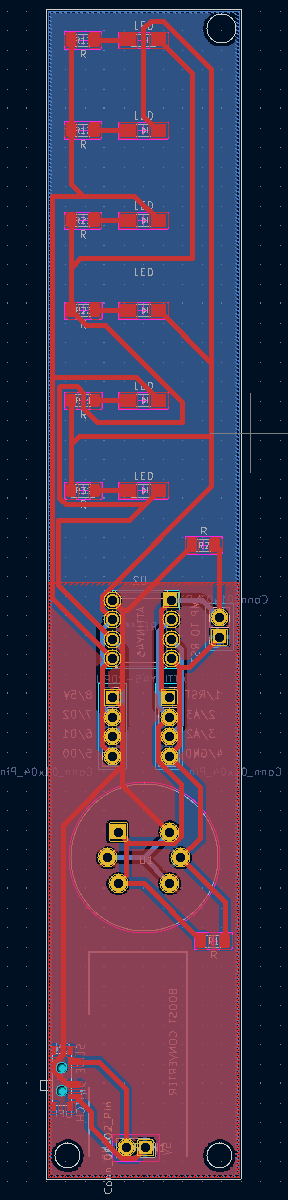
In my PCB layout, the MQ-4 label faces the LEDs in the PCB. Pins 6, 4 and 2 get 5VDC and you can see that (the blue with the label U1 in it).
Here's a future reference for everyone. Maybe I'm the only one who got confused by this but whateves.
I knew I was going to use an ATTINY45 because they are delightful little chips. I knew I was going to implement some Charlieplexing with LEDs because how could I not and I knew that I was going to use the MQ-4 sensor because I had already bought it. I didn't want this to be something you plug in with a USB cable because I wanted to place it wherever so I figured I'd just have a little lithium battery or just like a few AAA batteries in a battery pack and drive it all off that. The main struggle was that I needed 5VDC for the MQ-4 sensor and that would be difficult to get to with a 3.7VDC (or lower) supply. I opted to get a Lipower Boost Converter from Sparkfun because it could provide 5VDC and seemed easier than doing that myself.
I wanted 5 LEDs to show the intensity and I had the ATTINY45, LiPower, the MQ-4, resistors for the LEDs and MQ-4 and a switch on the board to turn it on and off. I wanted some troubleshooting pins just to make sure I could test if something was wrong and that was pretty much it. I wanted the ATTINY45 and LiPower to be on the bottom of the board because the top had LEDs and the MQ-4 but that was pretty much it. I figured a size of a ruler wasn't a bad shape and I think it worked OK. See the attachments for the schematic and the PCB layout.
Enclosure DesignSo I knew that I had to have a battery but I didn't want to purchase a specific one that would fit in the width of my 1" wide board so I opted for what I had lying around which was an enclosure that could fit 3 AA batteries. It's relatively enormous so I decided to just add a hole in the back of the enclosure to send the battery pack through. At some point I might decide to buy an appropriately sized battery but it is not this day!
It's a bunch of soldering. I bought the boards off of PCBWay which was smooth as it typically is. I got them in blue which looked pretty cool. The boards have to get approved so it takes a bit before you can pay for it but they do their checks to make sure they can manufacture it which gives you time to double check stuff.
I made a mistake on the board because I forgot to flip the LiPower when I put it on the bottom of the board so I had to wire it kind of funky. It makes attaching the battery connector difficult. I also soldered the standoff for the ATTINY45 on the wrong section. I liked the idea of troubleshooting the pins and so made a dedicated section on the board to connect to (which is why there are two spots for the ATTINY45 but only one is used). Overall, soldering was smooth with the big caveat of the gas sensor direction. Also the LEDs have a very small arrow on them. I went with 1206 style LEDs to practice some small soldering and it went fine. Just make sure you note the LED arrow.
I touched on this above but the most difficult part of the programming is just setting up an Arduino Uno to program the ATTINY45. Once you get that part, it's not actually that difficult to load sketches or anything. The code is crazy basic but one thing to note is that you can only turn on one LED at a time so keep that in mind. If you make the delay really short, it'll look like it's persistent to your eyes. Check out the sketch at the end.
Final AssemblyFrom there, plop it into the enclosure and connect the battery. Put a cover on it and turn it on.
With the cover on and the battery in, we can see it control all the lights.
From here you can badly paint the enclosure and then you're finished! Now revel in the fact that you will get approximate information about the gas in the room. It's not exact but nothing truly is!
Well we did it! We made a thing, practiced making a PCB, made a real basic enclosure and used the ATTINY45 - one of the GREATEST CHIPS OF ALL TIME! I think that if you wanted to, you could build this too! If you comment, I'll through the corrected PCB design on PCBWay so you can skip doing KiCAD stuff (but honestly, it's much more fun if you do that yourself).
Make sure to smash that like and subscribe button and I'll catch you on the flip side!


_Ujn5WoVOOu.png?auto=compress%2Cformat&w=40&h=40&fit=fillmax&bg=fff&dpr=2)
_3u05Tpwasz.png?auto=compress%2Cformat&w=40&h=40&fit=fillmax&bg=fff&dpr=2)
Comments