


Hardware components | ||||||
 |
| × | 1 | |||
| × | 1 | ||||
 |
| × | 2 | |||
| × | 1 | ||||
| × | 48 | ||||
| × | 1 | ||||
| × | 2 | ||||
 |
| × | 1 | |||
| × | 1 | ||||
| × | 3 | ||||
 |
| × | 1 | |||
| × | 2 | ||||
| × | 2 | ||||
 |
| × | 1 | |||
 |
| × | 1 | |||
 |
| × | 10 | |||
| × | 1 | ||||
| × | 1 | ||||
| × | 1 | ||||
| × | 1 | ||||
| × | 1 | ||||
 |
| × | 1 | |||
Software apps and online services | ||||||
| ||||||
 |
| |||||
| ||||||
 |
| |||||
 |
| |||||
| ||||||
Hand tools and fabrication machines | ||||||
 |
| |||||
1.1 Introduction
FindMyGrocery is a smart grocery-assistance system designed to make finding products inside large grocery stores faster and easier.
In a traditional grocery store, customers often have to search through multiple racks to find a particular product. FindMyGrocery combines Artificial Intelligence, RFID, robotics, sensors, a product database, and a web-based interface to simplify this process.
The user can search for a grocery product through the interface, check its price and availability, view its details, and locate it inside the store. The system can also identify products using AI or RFID and can use a miniature autonomous robot to navigate through the store layout and reach the required rack.
The original concept of FindMyGrocery was intended to be deployed in a real-world grocery store environment, using full-sized racks, products, and an autonomous robotic system. However, implementing and testing the complete system in an actual supermarket environment was not feasible at the current stage of development due to practical and logistical constraints.
Therefore, the project has been implemented as a scaled-down miniature supermarket prototype. A miniature store layout with appropriately sized racks and products has been developed, and a compact autonomous robot has been designed specifically to operate within this environment. This scaled prototype preserves the core functionality and working principles of the proposed full-scale system while providing a controlled environment for development, testing, and demonstration.
The miniature implementation serves as a proof of concept for the FindMyGrocery system and provides a foundation for future expansion into a full-scale deployment in real grocery stores.
1.2 What Can FindMyGrocery Do?
FindMyGrocery is designed around six main user-facing functions:
- Find GrocerySearch for a grocery product and instantly view its price, availability, details, and exact location within the miniature store. The system can also highlight the corresponding rack/product using WS2812B lights.
- Take Me to the ProductOnce a product is found, the user can request navigation. The miniature robot follows the predefined path through the store and takes the user to the required product location.
- Check PriceIdentify a product and view its selling price, MRP, and quantity directly through the interface.
- Product DetailsView detailed information about a selected grocery product, retrieved from the central product database.
- Create BillAdd products to a digital bill, specify quantities, calculate the total, and generate a unique bill ID.
- Admin PortalThe administrator can manage the grocery-store database, including products, categories, prices, MRP, stock, RFID identifiers, AI labels, and product locations.
1.3 Technologies Behind the System
The above functions are powered by multiple technologies working together:
- AI Product IdentificationA computer-vision system uses OpenCV and YOLO-based object detection models to identify supported grocery products from camera input.
- RFID IdentificationAn RFID module is used to identify products through their unique RFID tags. The detected RFID information is matched with the corresponding product in the database.
- Voice InputVoice input allows users to interact with the system without relying entirely on manual typing, providing a more natural way to search for products.
- Line-Following RobotTCRT5000 and IR sensors allow the robot to detect the predefined path, while the TB6612FNG motor driver controls the N20 motors.
- Smart Rack LightingWS2812B LEDs are used to highlight the rack associated with the selected product.
2.1 The Problem
One of the problems I noticed in large grocery stores is that finding a particular product can take a surprising amount of time.
When the racks are large and there are hundreds or thousands of products, customers may have to:
- Walk through multiple racks.
- Read product labels manually.
- Ask store employees for help.
- Search for prices separately.
- Walk back and forth to find different products.
This becomes even more difficult when the customer needs to find several products.
Problem Statement
Finding products in large grocery stores can be time-consuming because customers often have to manually search through racks or ask for assistance. FindMyGrocery aims to make this process faster by digitally locating, identifying and guiding users to grocery products.
2.2 Why I Built It
The idea behind FindMyGrocery came from a simple question:
Why can’t a grocery store have a robot or assistant that helps customers find the products they need?
I wanted to build a system that could find a product, identify its location, and even guide the customer to it. Instead of making just a grocery-search website, I wanted to connect the digital system with a physical miniature grocery store using AI, RFID, robotics, and smart racks and wanted to create a proper robot GROBOT:TheGrocery Assistant Robot.
3. The FindMyGrocery SolutionThe complete system architecture and an end-to-end demonstration of FindMyGrocery can be seen in the video below.
3.1.1 Smart Grocery Racks
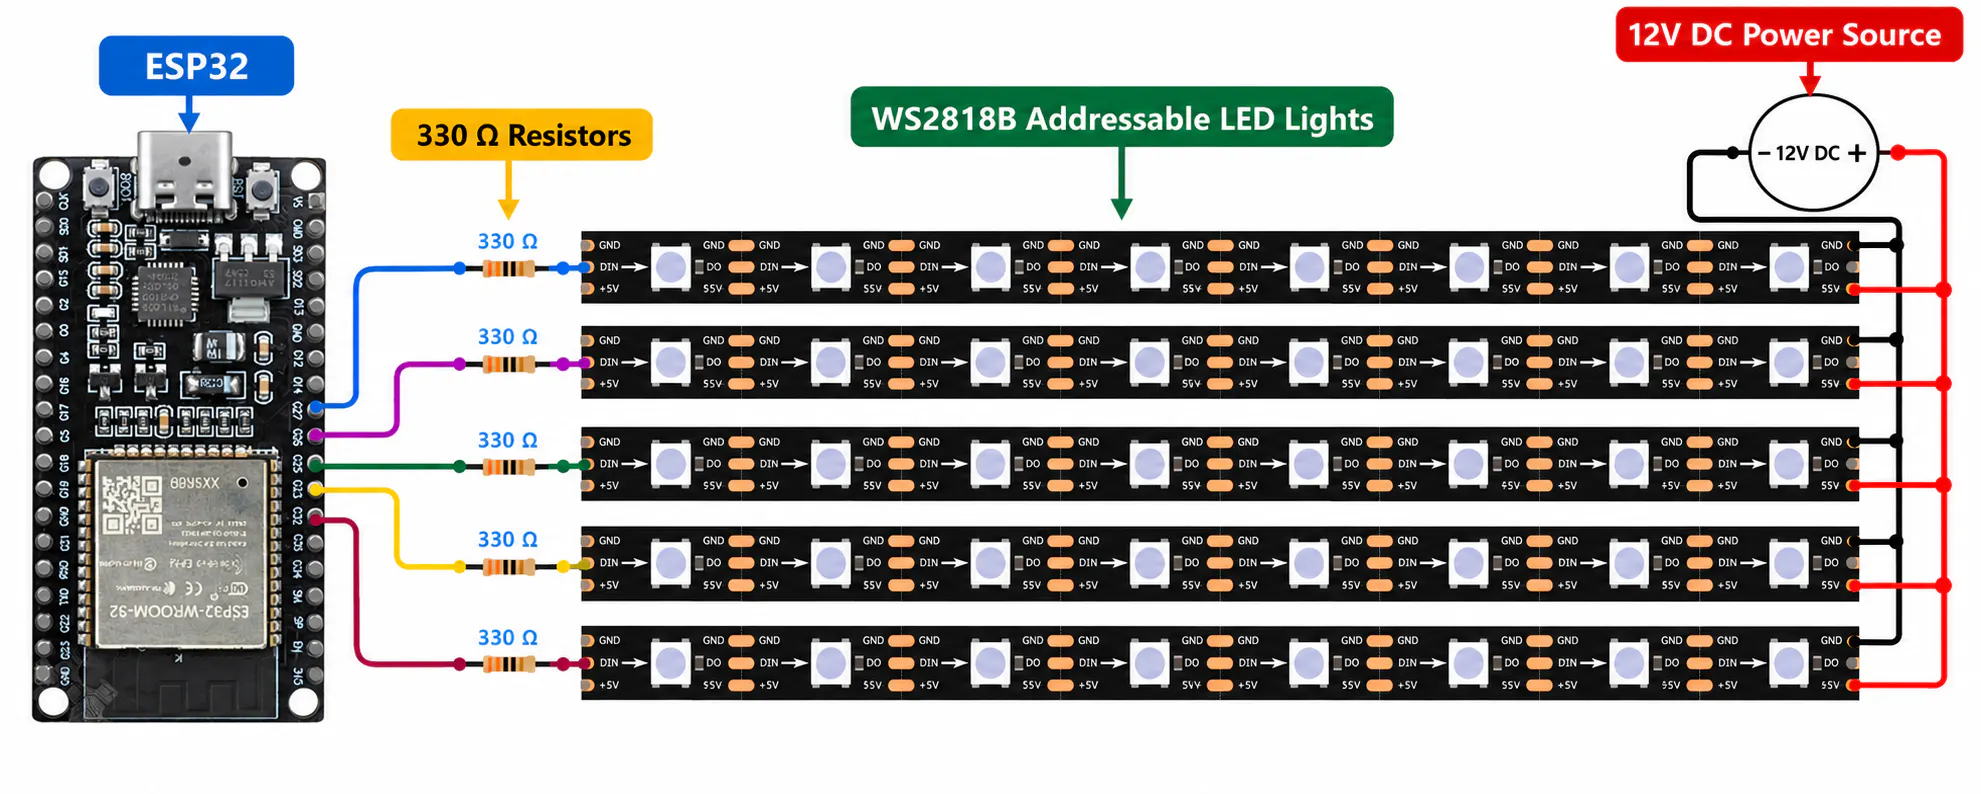
The miniature grocery store consists of multiple shelves equipped with WS2812B addressable LED lights. Each rack is controlled by an ESP32/ESP8266-based controller, allowing the system to communicate with the rack wirelessly.
When a customer searches for a product, the system determines its exact rack and shelf location from the database. The corresponding LEDs can then be activated to highlight the required rack, row, column, or product location, making it much easier for the customer to identify the product physically.
The smart lighting provides a simple but effective connection between the digital search system and the physical grocery store.
The complete code for the Smart Rack ESP32 is available in the GitHub repository at:
FindMyGrocery/RackESP32/RackESP32/RackESP32.inoYou Can refer to this circuit diagram below Each WS2818B Addressable Led Light Strip is connected to ESP32 Pins Via 330ohm Resistors.
3.1.2 Grocery Items
The miniature grocery store contains 16 different types of grocery items, each designed to closely resemble its real-world counterpart. The products are recreated using materials such as paper, thermocol, and other easily available materials, with printed packaging to achieve a realistic appearance. Each item is also equipped with barcodes and RFID tags for identification and interaction with the FindMyGrocery system.
3.1.3 GroBot - Grocery Assistant Robot
GroBot is the physical robotic assistant of FindMyGrocery. Its purpose is to navigate through the miniature grocery store and guide the customer to the required product location.
The robot's 3D model was designed using Autodesk Fusion 360 and The complete 3D model can be downloaded from the GitHub repository at:
FindMyGrocery/GroBot 3D Model/GroBotRobot.stl
This model is divided into three main sections to organize the electronics and mechanical components efficiently.
1. Bottom Plate
The bottom section contains the main movement and sensing components:
- 2 × N20 DC Motors
- 2 × Wheels
- 3 × TCRT5000 Line Sensors
- 1 × Servo Motor
The TCRT5000 sensors are positioned underneath the robot to detect and follow the line-based navigation path, while the N20 motors provide movement.
2. Middle SectionThe middle section provides space for the main computing and power components:
- Arduino UNO Q
- Power supply / battery system
- DC-DC Step-Down Converter
3. Top SectionThe top section contains the user-interaction and identification components:
- ESP32-S3-BOX-3
- RC522 RFID Scanner Module
This arrangement keeps the robot compact while separating the movement, computing, power, and identification components into different layers.
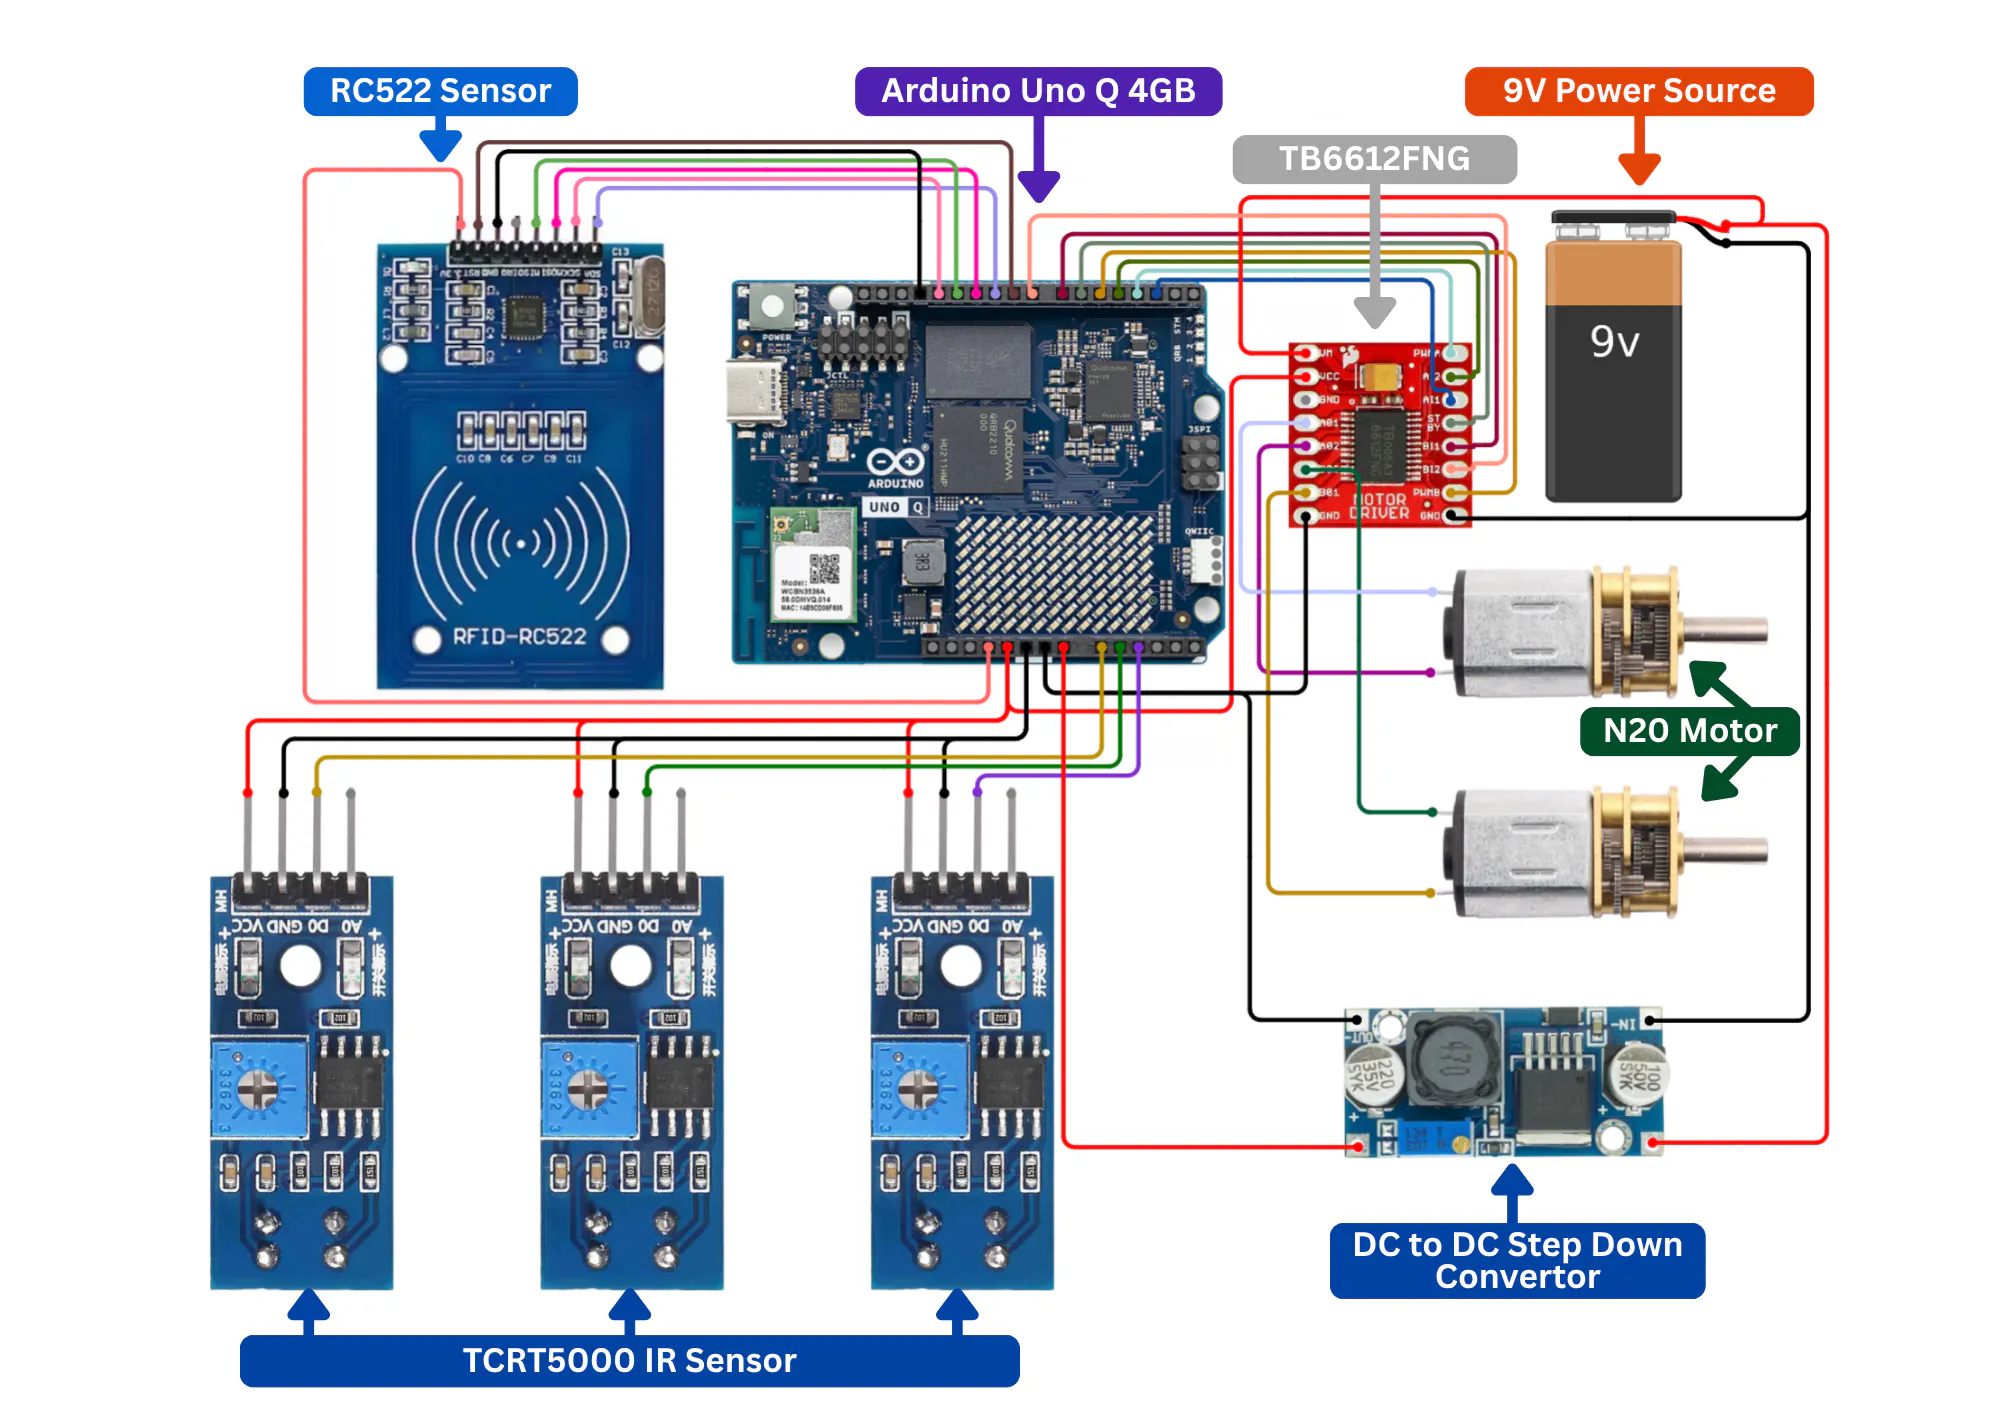
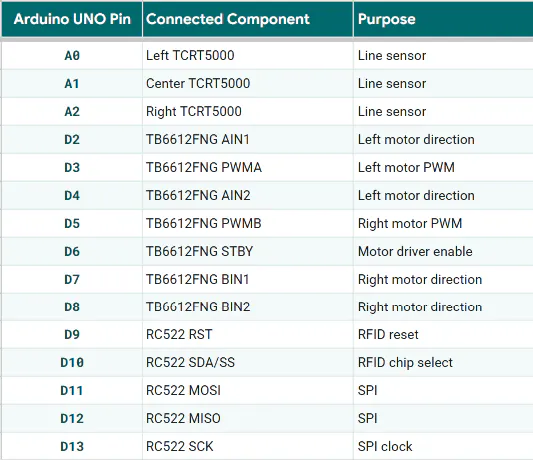
The complete circuit connections between the Arduino UNO Q, TB6612FNG motor driver, N20 motors, TCRT5000 sensors, RC522 RFID module, servo, power supply, and other components are shown in the circuit diagram below.
You Can Refer To These GPIO Pinout Table
This section explains how to obtain the FindMyGrocery source code, configure the different hardware platforms, and run the complete system.
4.1 Software Requirements
The following software is required depending on which part of the project you want to run or modify:
Core Software
- Arduino App Lab : Used to run the Arduino UNO Q application and Python environment.
- Python 3 + pip : Used for the FindMyGrocery Flask server and its dependencies.
- Arduino IDE : Used to program the ESP32-based smart racks.
- ESP-IDF : Required for developing and flashing the ESP32-S3-BOX-3 firmware using idf.py.
- Git : Used to clone and manage the FindMyGrocery repository.
Additional Development Tools
- SquareLine Studio : Used for designing/modifying the graphical interface of the ESP32-S3-BOX-3.
- Edge Impulse : Used for training the AI models for product identification.
- Required Arduino libraries : Libraries such as MFRC522, SPI, Wi-Fi libraries, and other libraries used by the respective firmware.
4.2 Project Structure
The complete source code and project files are available in the FindMyGrocery GitHub repository.
The important project structure is:
FindMyGrocery/
│
├── Arduino_UNOQ_Files/
│   ├── AppLabCodes/
│   │   ├── FindMyGrocery.zip
│   │   └── TestMotorsAndSensor.zip
│   │
│   └── Server/
│       ├── app.py
│       ├── database.py
│       ├── seed_database.py
│       └── ...
│
├── ESP32_S3_Box_3_Files/
│   └── ESP32S3BOX3/
│       ├── components/
│       └── FindMyGrocery/
│           ├── components/
│           ├── main/
│           ├── managed_components/
│           ├── spiffs/
│           ├── CMakeLists.txt
│           ├── dependencies.lock
│           ├── partitions.csv
│           ├── sdkconfig
│           └── sdkconfig.defaults
│
├── SquareLine Files/
│   ├── SquareLine/
│   └── SquareLineExports/
│
├── GroBot 3D Model/
│   └── GroBotRobot.stl
│
├── Images/
│
├── RackESP32/
│   └── RackESP32.ino
│
├── .gitignore
└── readme.md
4.3 Installation and Setup
Step 1 :Clone the Repository
First, clone the FindMyGrocery repository:
git clone https://github.com/amangandotra/FindMyGrocery.gitNavigate into the project:
cd FindMyGroceryThe complete project source is now available locally.
Step 2 :Configure the Arduino UNO Q
Navigate to the UNO Q files:
cd Arduino_UNOQ_FilesThe AppLabCodes folder contains the complete Arduino App Lab application:
AppLabCodes/
├── FindMyGrocery.zip
└── TestMotorsAndSensor.zip
Import the App Lab Application
Open Arduino App Lab and import:
FindMyGrocery.zipThis contains the UNO Q application, including the Python side and the Arduino sketch required for the FindMyGrocery system.
Copy the Server to the UNO Q Linux Side
The Server folder contains the Flask server and database-related files.
From your computer, copy it to the UNO Q using:
scp -r Server arduino@<UNO_Q_IP>:~/Replace <UNO_Q_IP> with the IP address of your Arduino UNO Q.
For example:
scp -r Server [email protected]:~/Then connect to the UNO Q:
ssh arduino@<UNO_Q_IP>and verify that the server directory has been copied:
ls ~/ServerThe server can then be configured and started from the UNO Q Linux environment.
Step 3 :Configure the Smart Rack ESP32
The smart rack firmware is located at:
RackESP32/RackESP32.inoOpen this file in Arduino IDE and select the appropriate ESP32 board and port.
Before uploading the code, update the Wi-Fi and rack configuration:
const char* ssid     = "YourSSIDHere";
const char* password = "YourPasswordHere";

const char* hostName = "rack-a";
const char* rackName = "racka";
For multiple racks, the hostName and rackName should be configured according to the particular rack.
For example:
const char* hostName = "rack-a";
const char* rackName = "racka";
After configuring the Wi-Fi credentials, compile and upload the firmware to the ESP32.
The ESP32 then connects to the network and controls the WS2812B smart rack LEDs according to commands received from the FindMyGrocery system.
Step 4 :Configure the ESP32-S3-BOX-3
The ESP32-S3-BOX-3 project is located at:
ESP32_S3_Box_3_Files/
└── ESP32S3BOX3/
    └── FindMyGrocery/
Navigate to the project directory:
cd ESP32_S3_Box_3_Files/ESP32S3BOX3/FindMyGroceryMake sure ESP-IDF is installed and configured.
Then build the project:
idf.py buildConnect the ESP32-S3-BOX-3 through USB and identify its serial port.
Then flash the firmware:
idf.py flashFinally, monitor the serial output:
idf.py monitorYou can also perform the build, flash, and monitor steps together using:
idf.py build flash monitorThe ESP32-S3-BOX-3 firmware provides the interactive interface used by the original FindMyGrocery system. The ESP32-S3-BOX-3 is an ESP-IDF-based platform, so idf.py is the appropriate build and flashing tool.
4.4 Running the Complete System
Once the individual components have been configured:
1. Start the Flask server on the Arduino UNO Q.
Navigate to the Server directory and run:
cd ~/Server
python3 app.py
The Flask server will start and handle communication between the web application, database, and hardware components.
2. Run the FindMyGrocery App Lab application on the UNO Q.
- Open Arduino App Lab.
- Open the imported FindMyGrocery application.
- Select the UNO Q as the target device.
- Click the Run ▶ button in App Lab.
- The App Lab application will start and handle the UNO Q hardware-side operations such as RFID, robot control, and communication with the Flask server.
3. Power and connect the Smart Rack ESP32 modules to the same network.
4. Run the ESP32-S3-BOX-3 firmware if the physical interface is being used.
5. Open the FindMyGrocery web interface from a device connected to the same network.
6. The complete system can then communicate between the web application, database, UNO Q, Smart Rack ESP32 modules, RFID system, and GroBot.
5. Complete Project DemonstrationThis section demonstrates the complete FindMyGrocery system from the user's perspective. It covers the complete workflow, starting from the homepage and going through each of the four major features one by one.
5.1 Homepage
The FindMyGrocery homepage is the first screen presented to the user. It provides four main options:
- Find Grocery : Search for a grocery item and locate it inside the store.
- Check Price : Identify a product and instantly view its price and MRP.
- Product Details : Identify an unfamiliar product and hear information about it.
- Create Bill : Scan multiple products, generate a bill, and receive a unique Bill ID.
Let's go through each feature one by one.
5.2 Find Grocery
Imagine a customer enters a large grocery store but does not know exactly where a particular product is located. Instead of searching through multiple racks or asking someone for help, the Find Grocery feature helps the customer locate it.
When the user selects Find Grocery, two options are provided:
1. Type Search 2. Voice Search
5.2.1 Type Search
The user can select Type Search, which opens a screen asking:
What are you searching for?
An input field is provided where the customer can enter the name of the required grocery item. After entering the product name and clicking Search, the system processes the request and searches the grocery database.
5.2.2 Voice Search
The second option is Voice Search. When selected, an interactive screen opens and asks the user to speak.
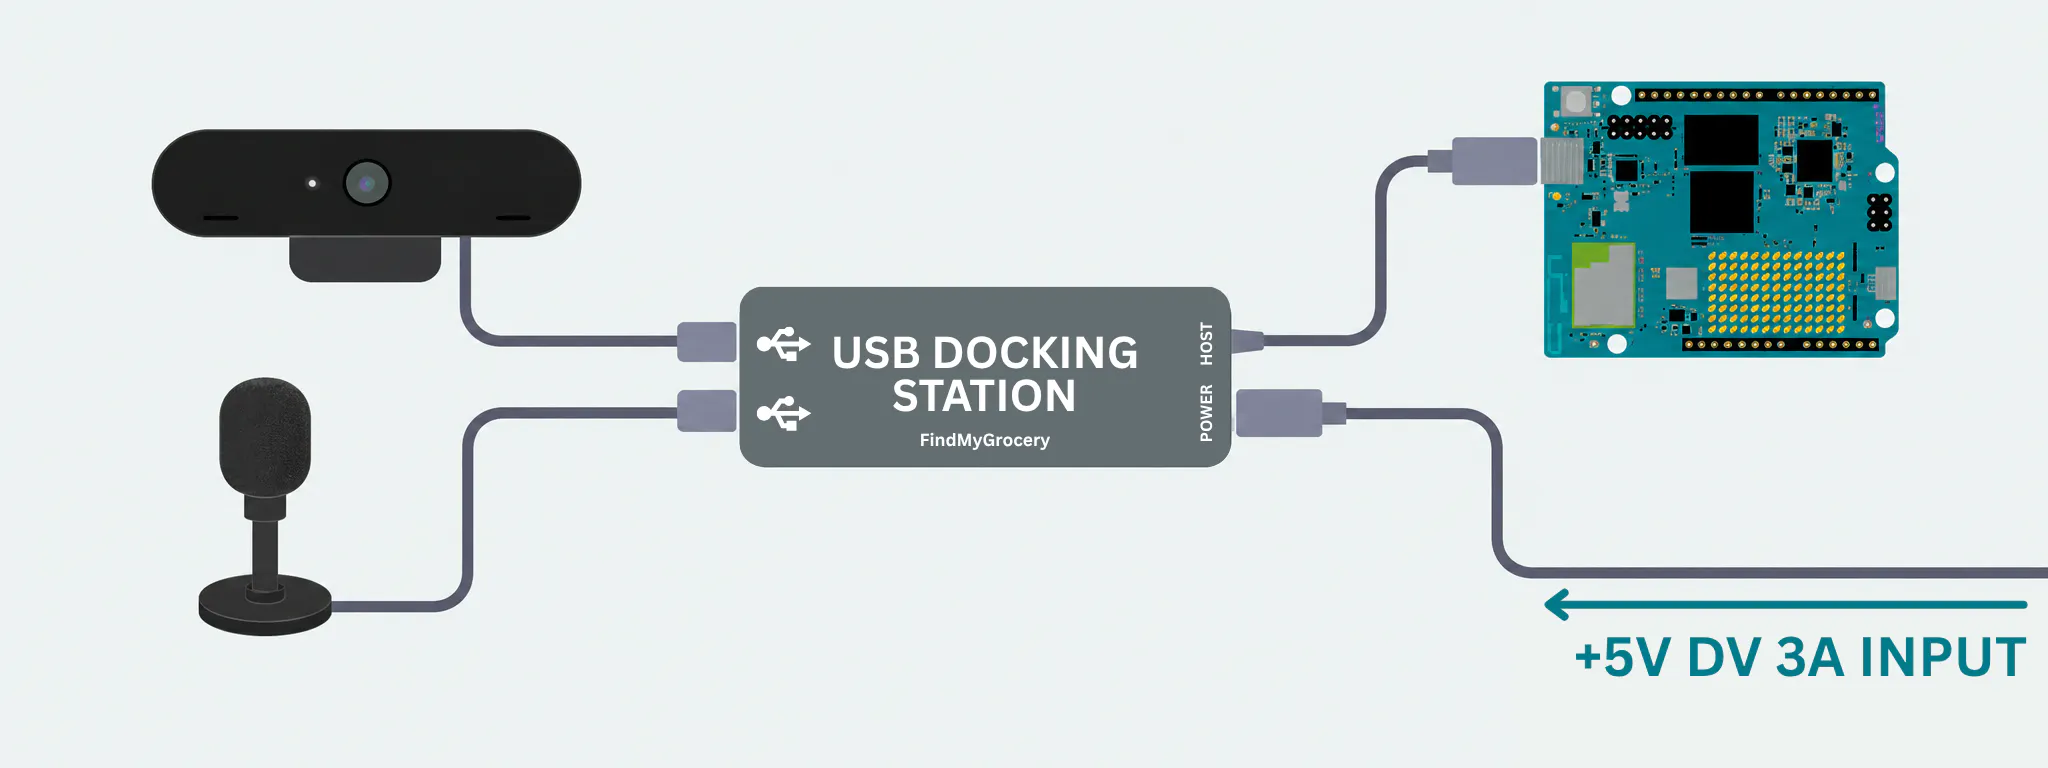
The microphone connected to the Arduino UNO Q starts listening, and the system processes the user's speech to determine which grocery item was requested. Once the requested product is identified, the system automatically proceeds to the next screen.
5.2.3 Grocery Found
Once the input from either Type Search or Voice Search is processed and the requested grocery is available, the system displays the Grocery Found screen.
This screen provides important product information such as:
- Grocery Name
- Price
- MRP
- Quantity
- Availability
- Exact Store Location
For example, the location can be displayed as:
Rack A → Left Side → Row 1 → Column 1
The screen also provides three additional options:
1.Highlight Shelf : Highlights the rack containing the required grocery by making its lights blink.
2.Highlight Item : Highlights the exact physical position of the grocery on the rack using the smart LED system.
3.Take Me There :
Activates GroBot, the line-following robotic assistant. Using its line-following sensors, the robot follows the predefined path to the exact location of the requested product. Once it reaches the destination, the corresponding rack/item light is also activated to indicate the final location.
This completes the Find Grocery workflow.
5.3 Check Price
Now imagine that a customer has picked up a grocery product but cannot clearly see its price. Instead of searching for the price manually, imagine having an assistant that can simply identify the product and instantly tell you its price.
That is the purpose of the Check Price feature.
When this feature is enabled, the Arduino UNO Q activates the available identification systems, including the camera, RFID reader, and scanning functionality. The user is provided with three different ways to identify the product:
5.3.1 Camera / AI Identification
The user can simply show the product to the camera.
For this functionality, a custom YOLO-based AI model is trained to recognize and categorize the grocery products. The camera captures the product, the AI model processes the image, and the identified product is then matched with the corresponding product information in the database.
5.3.2 RFID Identification
If an RFID tag is attached to the product, the user can simply bring it near the RFID reader.
The unique RFID identifier is read by the system and matched with the corresponding product stored in the database.
5.3.3 Barcode Identification
The user can also use the conventional barcode method.
Instead of using a dedicated QR/barcode scanner, the project's camera is used to read the barcode and identify the product.
Once the user successfully identifies the product using any of these methods, the Product Found screen appears and displays the product information, including:
- Product Name
- Price
- MRP
- Quantity
This provides the customer with an instant way to check the price of a product.
5.4 Product Details
The third option is Product Details.
Imagine visiting a grocery store and seeing a product that you have never seen before. You want to know what the product is, what it contains, or simply learn more about it.
This feature is designed for that purpose.
When Product Details is opened, the AI camera starts detecting the product placed in front of it. Once the system identifies the object, the corresponding product information is retrieved.
For the demonstration, I integrated Amazon Alexa as the audio interface. After identifying the product, the system uses the speaker to provide the user with relevant information about the detected grocery item.
This allows FindMyGrocery to act not only as a product-finding system but also as an interactive product information assistant.
5.5 Create Bill
The final major feature is Create Bill.
Imagine that a customer has finished shopping but there is a large queue at the billing counter. Instead of waiting in a long queue, the customer can scan the products independently and create the bill before reaching the payment counter.
When Create Bill is opened, the user is presented with an empty bill. The system activates the available product-identification methods, including the camera and RFID reader.
Products can then be added to the bill using:
- AI Camera Identification
- RFID
- Barcode Scanning
Each successfully identified product is added to the bill along with its relevant information and quantity.
After adding all the required products, the customer simply clicks Create Bill.
The system then displays a Bill Created Successfully screen containing:
- Total Products
- Total Quantity
- Total Amount
- Unique Bill ID
For example, a generated bill may look like:
Total Products: 6Total Amount: ₹118Bill ID: FMG-243494
The customer can then provide this unique Bill ID at a designated fast-payment counter, where only payment needs to be completed. This can significantly reduce the time spent waiting in the conventional billing queue.
5.6 Demonstration Conclusion
And that completes the FindMyGrocery project demonstration.
I understand that demonstrating a complete hardware, software, AI, robotics, and database-based project purely through documentation can be difficult. I have tried my best to explain the complete workflow and make the system as easy to understand as possible.
However, for a much better understanding of how all the components work together in real time, I strongly recommend watching the complete project demonstration video shared above. The video provides a more detailed and interactive view of the actual system, its features, and the way the different components communicate with each other.6. AI & Computer Vision
6.1 Objective
The objective of the AI system is to enable FindMyGrocery to recognize grocery products using computer vision. The detected product is then linked with its stored information and location in the store.
6.2 Dataset Collection
Images of grocery products were collected from multiple angles, orientations, and lighting conditions to improve the model's ability to recognize products in real-world situations.
Approximately 100–150 images were collected per product for training.
Example products:
- Blue Chips
- Maggi
- Tedhe Medhe
6.3 Labelling
The collected images were labelled according to their respective product classes using Edge Impulse. Each image was assigned the appropriate product label before being used for training.
Screenshots: Dataset → Labels → Training Data
6.4 Model Training
A YOLO-based object detection model was trained to identify grocery products from camera input.
The overall AI pipeline is:
Product Images → Dataset → Labelling → Training → YOLO Model → Deployment → Product Detection
6.5 Model Deployment
The trained model is integrated into the FindMyGrocery application to perform product detection from the camera feed. When a product is recognized, the system can use the detected class to provide the corresponding product information and location.
7. Database & Admin Portal7.1 Database
FindMyGrocery uses SQLite as a local product database. Each product record stores essential information such as product name, brand, category, price, MRP, stock, RFID ID, AI label, and physical location.
This database connects the digital product information with the corresponding products in the physical miniature store.
7.2 Admin Portal
The Admin Portal provides an interface for managing store data. Administrators can:
- Add and update products
- Manage prices and stock
- Configure RFID identifiers
- Configure AI product labels
- Assign and update product locations
This ensures that the digital database remains synchronized with the physical store layout, allowing the system to correctly identify and locate products.
8. Conclusion & Project Resources8.1 Conclusion
FindMyGrocery demonstrates how AI, RFID, robotics and software can work together to improve the grocery-shopping experience.
The project combines a smart product database, web interface, AI-based product recognition, RFID identification, rack indication and robotic navigation into one integrated miniature grocery-store prototype.
The idea is not limited to a miniature model. The same concept could be expanded to larger stores by increasing the number of products, racks, robots and sensors while maintaining the same core software architecture.
The project helped demonstrate that technologies such as AI and robotics can be used not only for industrial applications but also for everyday problems such as finding products in a grocery store.
9.1 Future Scope
Potential future improvements include:
- Larger product database
- Improved AI recognition
- Real-time inventory management
- Multiple robots
- Dynamic path planning
- Mobile application
- Voice-based grocery search
- Automatic checkout
- Integration with real supermarket inventory
- Cloud synchronization
- Full-scale supermarket deployment
Thankyou


Comments