

Hardware components | ||||||
 |
| × | 1 | |||
 |
| × | 1 | |||
 |
| × | 1 | |||
 |
| × | 1 | |||
 |
| × | 1 | |||
| × | 3 | ||||
 |
| × | 3 | |||
 |
| × | 2 | |||
| × | 1 | ||||
 |
| × | 1 | |||
| × | 1 | ||||
 |
| × | 1 | |||
| × | 1 | ||||
Hand tools and fabrication machines | ||||||
| ||||||
| ||||||
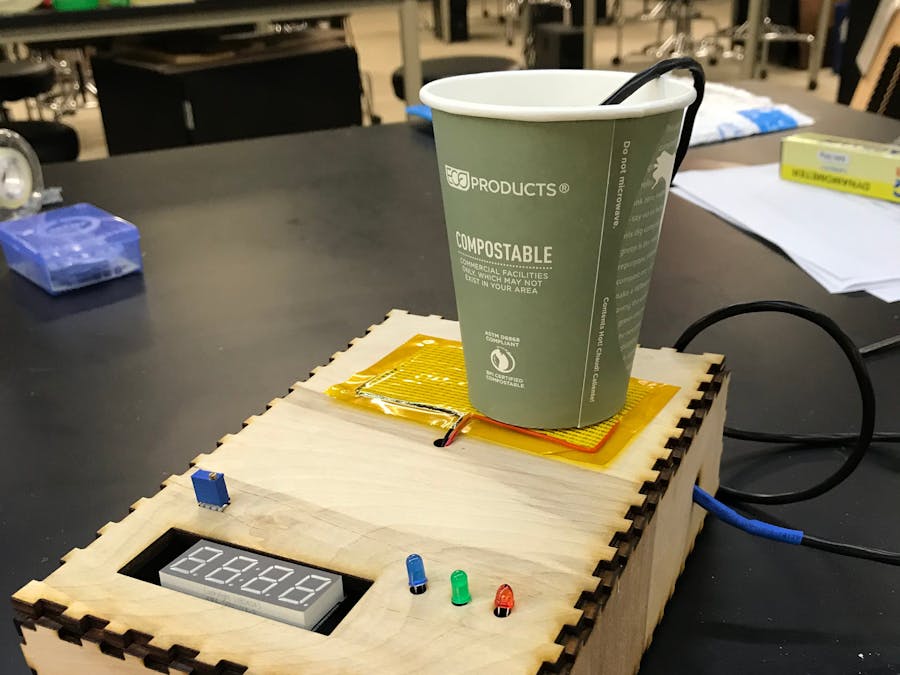
I always like to work with a nice, perfectly hot, cup of coffee next to me, and I know I'm not the only one. However I often find myself drinking coffee that is either too hot or too cold, so I decided to do something about it.
Overview:This project lets you heat up your coffee (or other beverage) to the temperature you decide. By adjusting a potentiometer, you can let the system know what temperature you prefer and in return the device will tell you if the coffee is too hot ro too cold.
In order to operate the device, you just need to turn on the pocket beagle and select the temperature you want for your coffee using the potentiometer. The desired temperature in Celsius is displayed in the Hex display and a set of LED light will inform you when the coffee is good to go. A red LED light will flash if the coffee is to hot, a blue LED light will flash if the coffee is to cold, and a green LED will let you know when the coffee is within 5 degrees of the desired temperature.
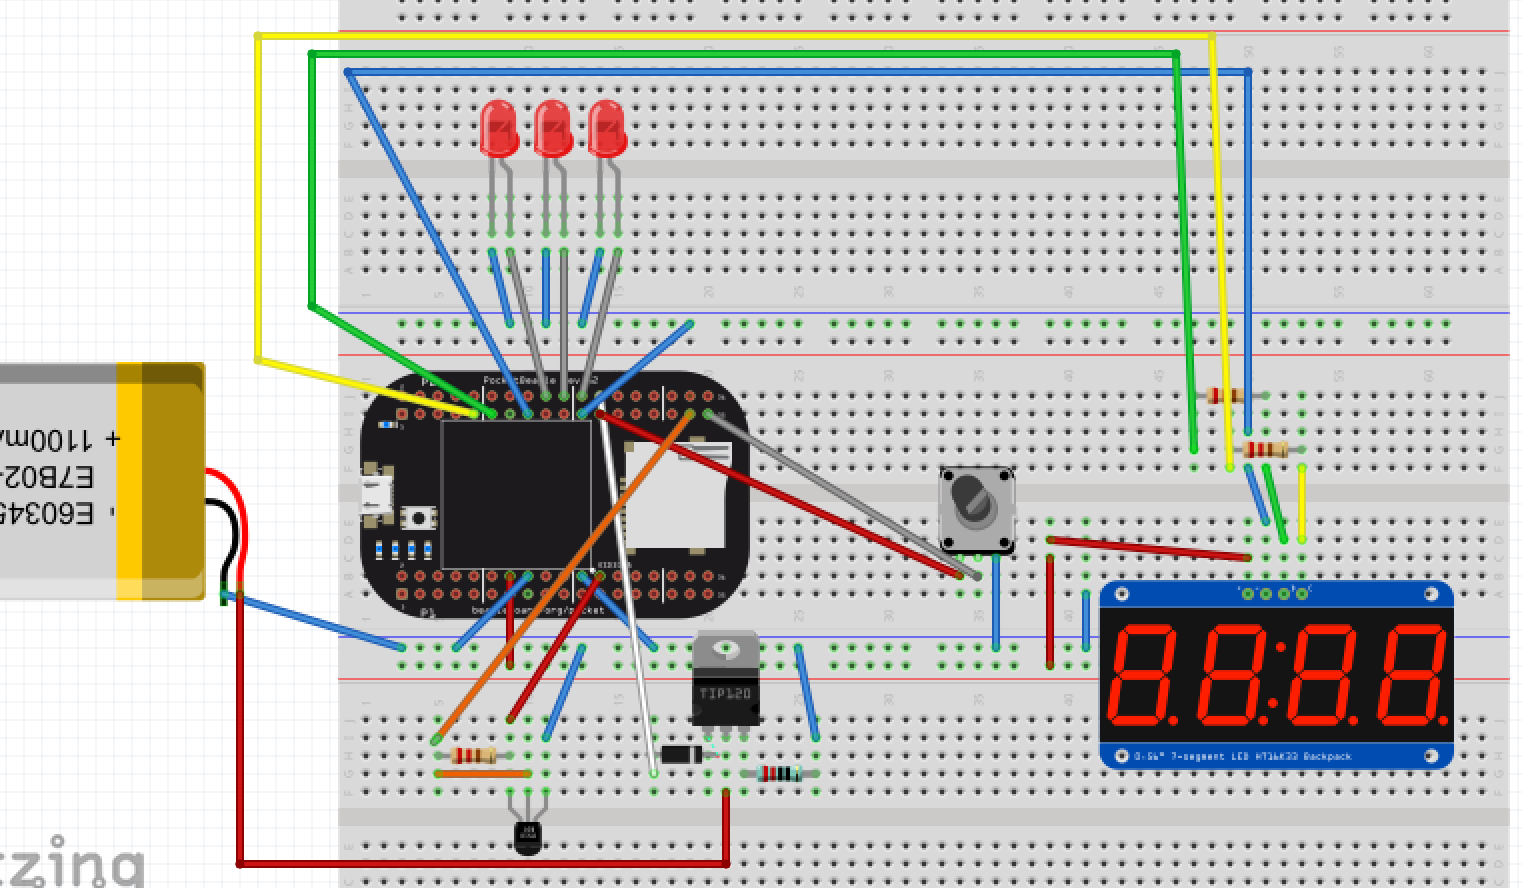
Electronic Wiring:The main component of the device is the PocketBeagle. In addition, several other components (all listed above) were also used. Here are some pictures that show how to wire the device. To power the pocket beagle I used the 12V battery and the DC voltage regulator shown below. The same power source (without the DC voltage regulator) is used to power the heating mat through the transistor.
For a detailed electronic wiring please refer to the Fritzing diagram attached below.
Housing:For the housing I made a box using a laser cutter and I added the holes on the top face for the LEDs, the potentiometer, the heating mat, and the hex display. I also added a hole for the thermistor on one of the sides. The files for the design are attached in the attachments section.
Build Instructions:
To build this device just follow the Fritzing diagram to connect all the components to the pocket beagle. It is very important to add the diode between the pocket beagle and the transistor in order to protect the PocketBeagle from any undesirable extra current that might cause it to fail. I learned this lesson the hard way because I burned the PocketBeagle that I was using, which is the reason I couldn't include a video of the device operating.
Once you connect everything, you need to add .dtbo file for the DS18B20 temperature sensor to the to the firmware library located under /lib/firmware. You can create the .dtbo file by adding the attached .dts file to the PocketBeagle Overlays and using the make command. After you've added the .dtbo file to both firmware, you need to use the sudo nano /boot/uEnv.txt command to include the file on boot. Add the file by adjusting the following line with the name of your .dtbo file: #uboot_overlay_addr4=/lib/firmware/<file4>.dtbo.
Now you just need to reboot the device, run the python program, and you're good to go!
Operation:
After installing everything, all you need to do is run the program and you're ready to start using the device. If you want to have the program run on boot you can follow this instructions.
After the program starts running you can adjust your desired temperature (in Celsius) and the LEDs will let you know when the coffee is ready. The red LED will turn on if the coffee's temperature is well above the desired temperature. The blue LED will turn on when the coffee is too cold and the green LED will turn on when the coffee's temperature is within 5 degrees of the desired temperature.
Future Improvements:
Some future improvements that can be included in this project are:
- Add the option to select the temperature scale used by the device (Fahrenheit or Celsius).
- Use a screen to display the coffee's current temperature, the desired temperature, and the desired tolerance.
Useful Links:
- General PocketBeagle Information: http://www.righto.com/2017/12/hands-on-with-pocketbeagle-tiny-25.html#fn:analog
- Compiling the device tree for the DS18B20 Temperature Sensor: https://www.cs.sfu.ca/CourseCentral/433/bfraser/other/2016-student-howtos/DS18B20Thermometer.pdf


Comments