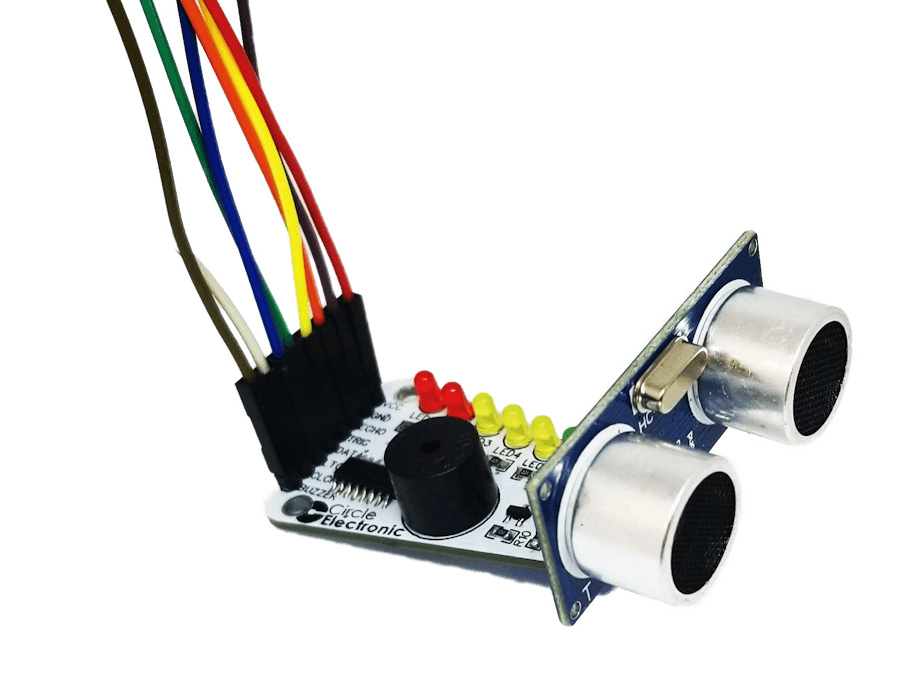
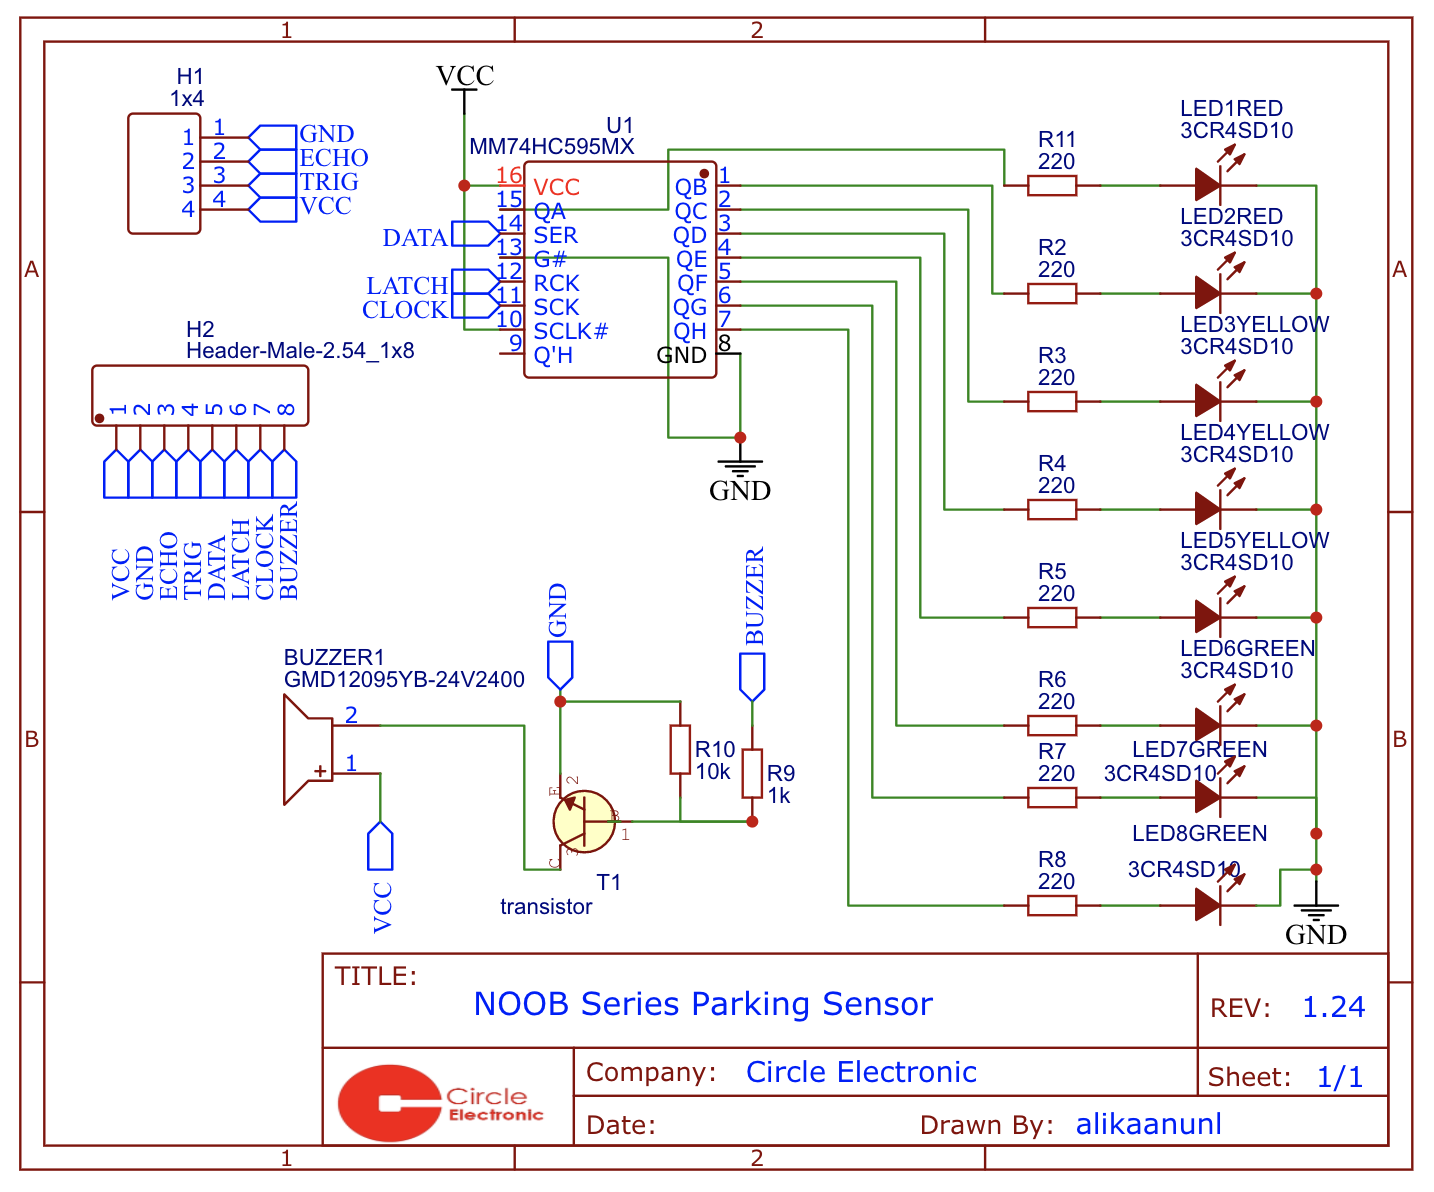
#define trigpin 12  //We need trig and echo pin for use HC-SR04 Sensor.
#define echopin 11
#define clock 10 //Clock, latch and data pins are about 74HC595 shift register
#define latch 9 // We need to use this pins for our LED's
#define data 8 //More details at: https://www.arduino.cc/en/tutorial/ShiftOut
#define buzzer 5 //We are using 1 buzzer for voice to get feedback betwwen obstacles and us

static int range; //We need this variables for use our Ultrasonic Sensor
static int Time;

byte leds[]={0b10000000,
0b11000000,
0b11100000,
0b11110000,
0b11111000,
0b11111100,
0b11111110,
0b11111111,
0b00000000 };
//We need to assign our leds for how many from them will be working in the range for between obstacles and us

void setup()
{
  pinMode(trigpin, OUTPUT); //This code is about what our pins are will be output or input
  pinMode(echopin, INPUT);
  pinMode(buzzer, OUTPUT);
  pinMode(latch, OUTPUT);
  pinMode(clock, OUTPUT);
  pinMode(data, OUTPUT);
}

void loop()
{
  digitalWrite(trigpin, HIGH);  //This area about our sensor codes
  delayMicroseconds(1000); //More details  at https://howtomechatronics.com/tutorials/arduino/ultrasonic-sensor-hc-sr04/
  digitalWrite(trigpin, LOW);
  Time = pulseIn(echopin, HIGH);
  range = (Time/2) / 29.1;
//After from here we are setting which leds and buzzer will be active at which range, you can change the ranges as you wish
  if(range>=141){
  digitalWrite(latch,LOW);
  shiftOut(data,clock,MSBFIRST,leds[8]);
  digitalWrite(latch,HIGH);
  //We are setting our leds off at over 141cm range
  }
  if(range>=121&&range<=140){
  digitalWrite(latch,LOW);
  shiftOut(data,clock,MSBFIRST,leds[0]); //Which led scnerio will be work in this range
  digitalWrite(latch,HIGH);
    bzzr(1000); //our buzzer intensity in this range
  }
  if(range>=101&&range<=120){
  digitalWrite(latch,LOW);
  shiftOut(data,clock,MSBFIRST,leds[1]);
  digitalWrite(latch,HIGH);
    bzzr(700);
}
  if(range>=81&&range<=100){
  digitalWrite(latch,LOW);
  shiftOut(data,clock,MSBFIRST,leds[2]);
  digitalWrite(latch,HIGH);
    bzzr(500);
}
  if(range>=61&&range<=80){
  digitalWrite(latch,LOW);
  shiftOut(data,clock,MSBFIRST,leds[3]);
  digitalWrite(latch,HIGH);
    bzzr(300);
  }
  if(range>=41&&range<=60){
  digitalWrite(latch,LOW);
  shiftOut(data,clock,MSBFIRST,leds[4]);
  digitalWrite(latch,HIGH);
    bzzr(200);
  }
  if(range>=21&&range<=40){
  digitalWrite(latch,LOW);
  shiftOut(data,clock,MSBFIRST,leds[5]);
  digitalWrite(latch,HIGH);
    bzzr(100);
  }
  if(range>=11&&range<=20){
  digitalWrite(latch,LOW);
  shiftOut(data,clock,MSBFIRST,leds[6]);
  digitalWrite(latch,HIGH);
    bzzr(50);
  }
  if(range>=0&&range<=10){
  digitalWrite(latch,LOW);
  shiftOut(data,clock,MSBFIRST,leds[7]);
  digitalWrite(latch,HIGH);
    bzzr(1);
  }
 }

void bzzr(int speed){
  digitalWrite(buzzer, LOW);
  static unsigned long time=millis();
  if(millis()-time >=speed){
  time=millis();
  digitalWrite(buzzer, HIGH);
      }
  } //This is buzzer function. You dont need to know this for use the parking sensor.


_ztBMuBhMHo.jpg?auto=compress%2Cformat&w=48&h=48&fit=fill&bg=ffffff)


Comments