

Hardware components | ||||||
| × | 1 | ||||
 |
| × | 1 | |||
| × | 1 | ||||
| × | 1 | ||||
| × | 1 | ||||
| × | 1 | ||||
 |
| × | 1 | |||
| × | 1 | ||||
| × | 1 | ||||
| × | 1 | ||||
| × | 1 | ||||
| × | 1 | ||||
Software apps and online services | ||||||
 |
| |||||
| ||||||
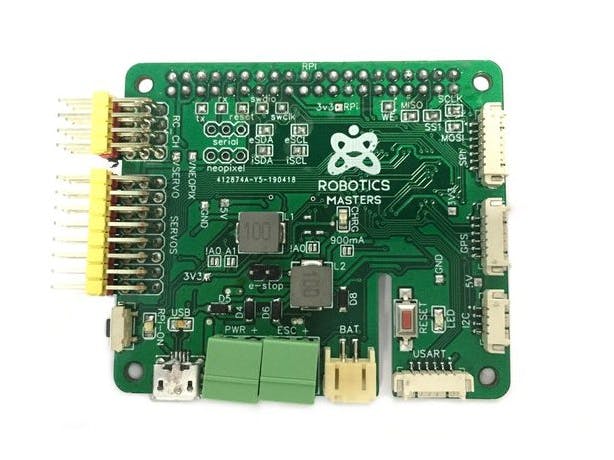
What Do I Build Next? A RoboHat MM1 and EduCar Kit based robot as made available from the Crowdsupply website... https://www.crowdsupply.com/robotics-masters/robo-hat-mm1.
The RoboHat MM1 had a good write-up, good features, and the price seemed right. So I backed it, and waited. I even ordered two MM1's.
I want to say at that point, (4/11/20) that I expected a lot more from this Robohatmm1 board as it was taunted as a Raspberry Pi add-on. I really want to make this project work.
So far, that's all it is...it rides on top of the Raspberry Pi. I have not been able to find documentation that clearly describes how to interface the "PI's" operating system with the "MM1" and the EduCar kit that I purchased with this kit. So far my experience shows that this "MM1" functions similarly to Adafruit's CircuitPython based boards or those using Adafruit's SEESAW / Arduino environment bootloader (but using that I couldn't access any servo ports or available features). Its one bootloader environment or the other.
It's been frustrating for me trying to get even the "Raspberry Pi Donkeycar software" to even install and communicate. Trying to figure what code needs to be downloaded and where it needs to be and how everything, hardware wise is interconnected via wiring has been a challenge. I hope this project I am sharing can bring some insight.
Enough with the shortcomings:
As documentation and code examples became available, actually on the Hackster.IO website to promote this boards' many capabilities, I was able to build.
https://www.hackster.io/wallarug/getting-started-with-robohat-mm1-arduino-ide-1d1954
https://www.hackster.io/wallarug/getting-started-with-robohat-mm1-circuitpython-d3ee77
https://www.hackster.io/wallarug/robo-hat-mm1-drones-circuitpython-and-self-driving-cars-cbee34
As well as on the Robotics Masters website:
https://www.roboticsmasters.co/
And links to supported Code and examples:
https://github.com/robotics-masters
And fast email support from CIAN BYRNE at Cian Byrne <cian@roboticsmasters.co> who helped me put code examples in the proper file locations on the "CIRCUITPY" directory...which got this kit mobile.
https://raw.githubusercontent.com/peterpanstechland/RoboticsMasters_educar/master/robohateducar.py
Enough with the unsolicited attributes and honors...on to my BUILD!
I wanted it (the RoboHat MM1) because it could be connected to the various 40 pin Raspberry Pi single board computers. Guess what? I just happen to have some available and I have many extra/other parts and hardware available just in case.
I was initially excited when my shipment was delivered on February 7th, 2020.
This is all there was...no confetti explosion
Time to do some internet searching for information... and to build the EduCar kit.
Step 1: Gather required materials and hardware- DC Motors
Step 2: Gather required hardware to attach DC Motors to base platform
Step 3: Attach DC Motors and encoder wheels
Step 4: Attach battery holder- location 1
Step 5: Attach brass Free-wheel standoff posts to platform base
Step 6: Attach Free-Wheel to brass stand-off posts
Step 7: Attach rubber wheels onto DC Motors
Step 8: Figure out how to install, orientate additional included sensors- Oops, I need to remove DC Motors
Step 9: Figure out how to install, orientate additional sensor-part 2- Line Following sensor and bump switch
Step 10: Relocate battery holder to accommodate Raspberry Pi board installation
Step 11: Mark and drill standoff holes for Raspberry Pi
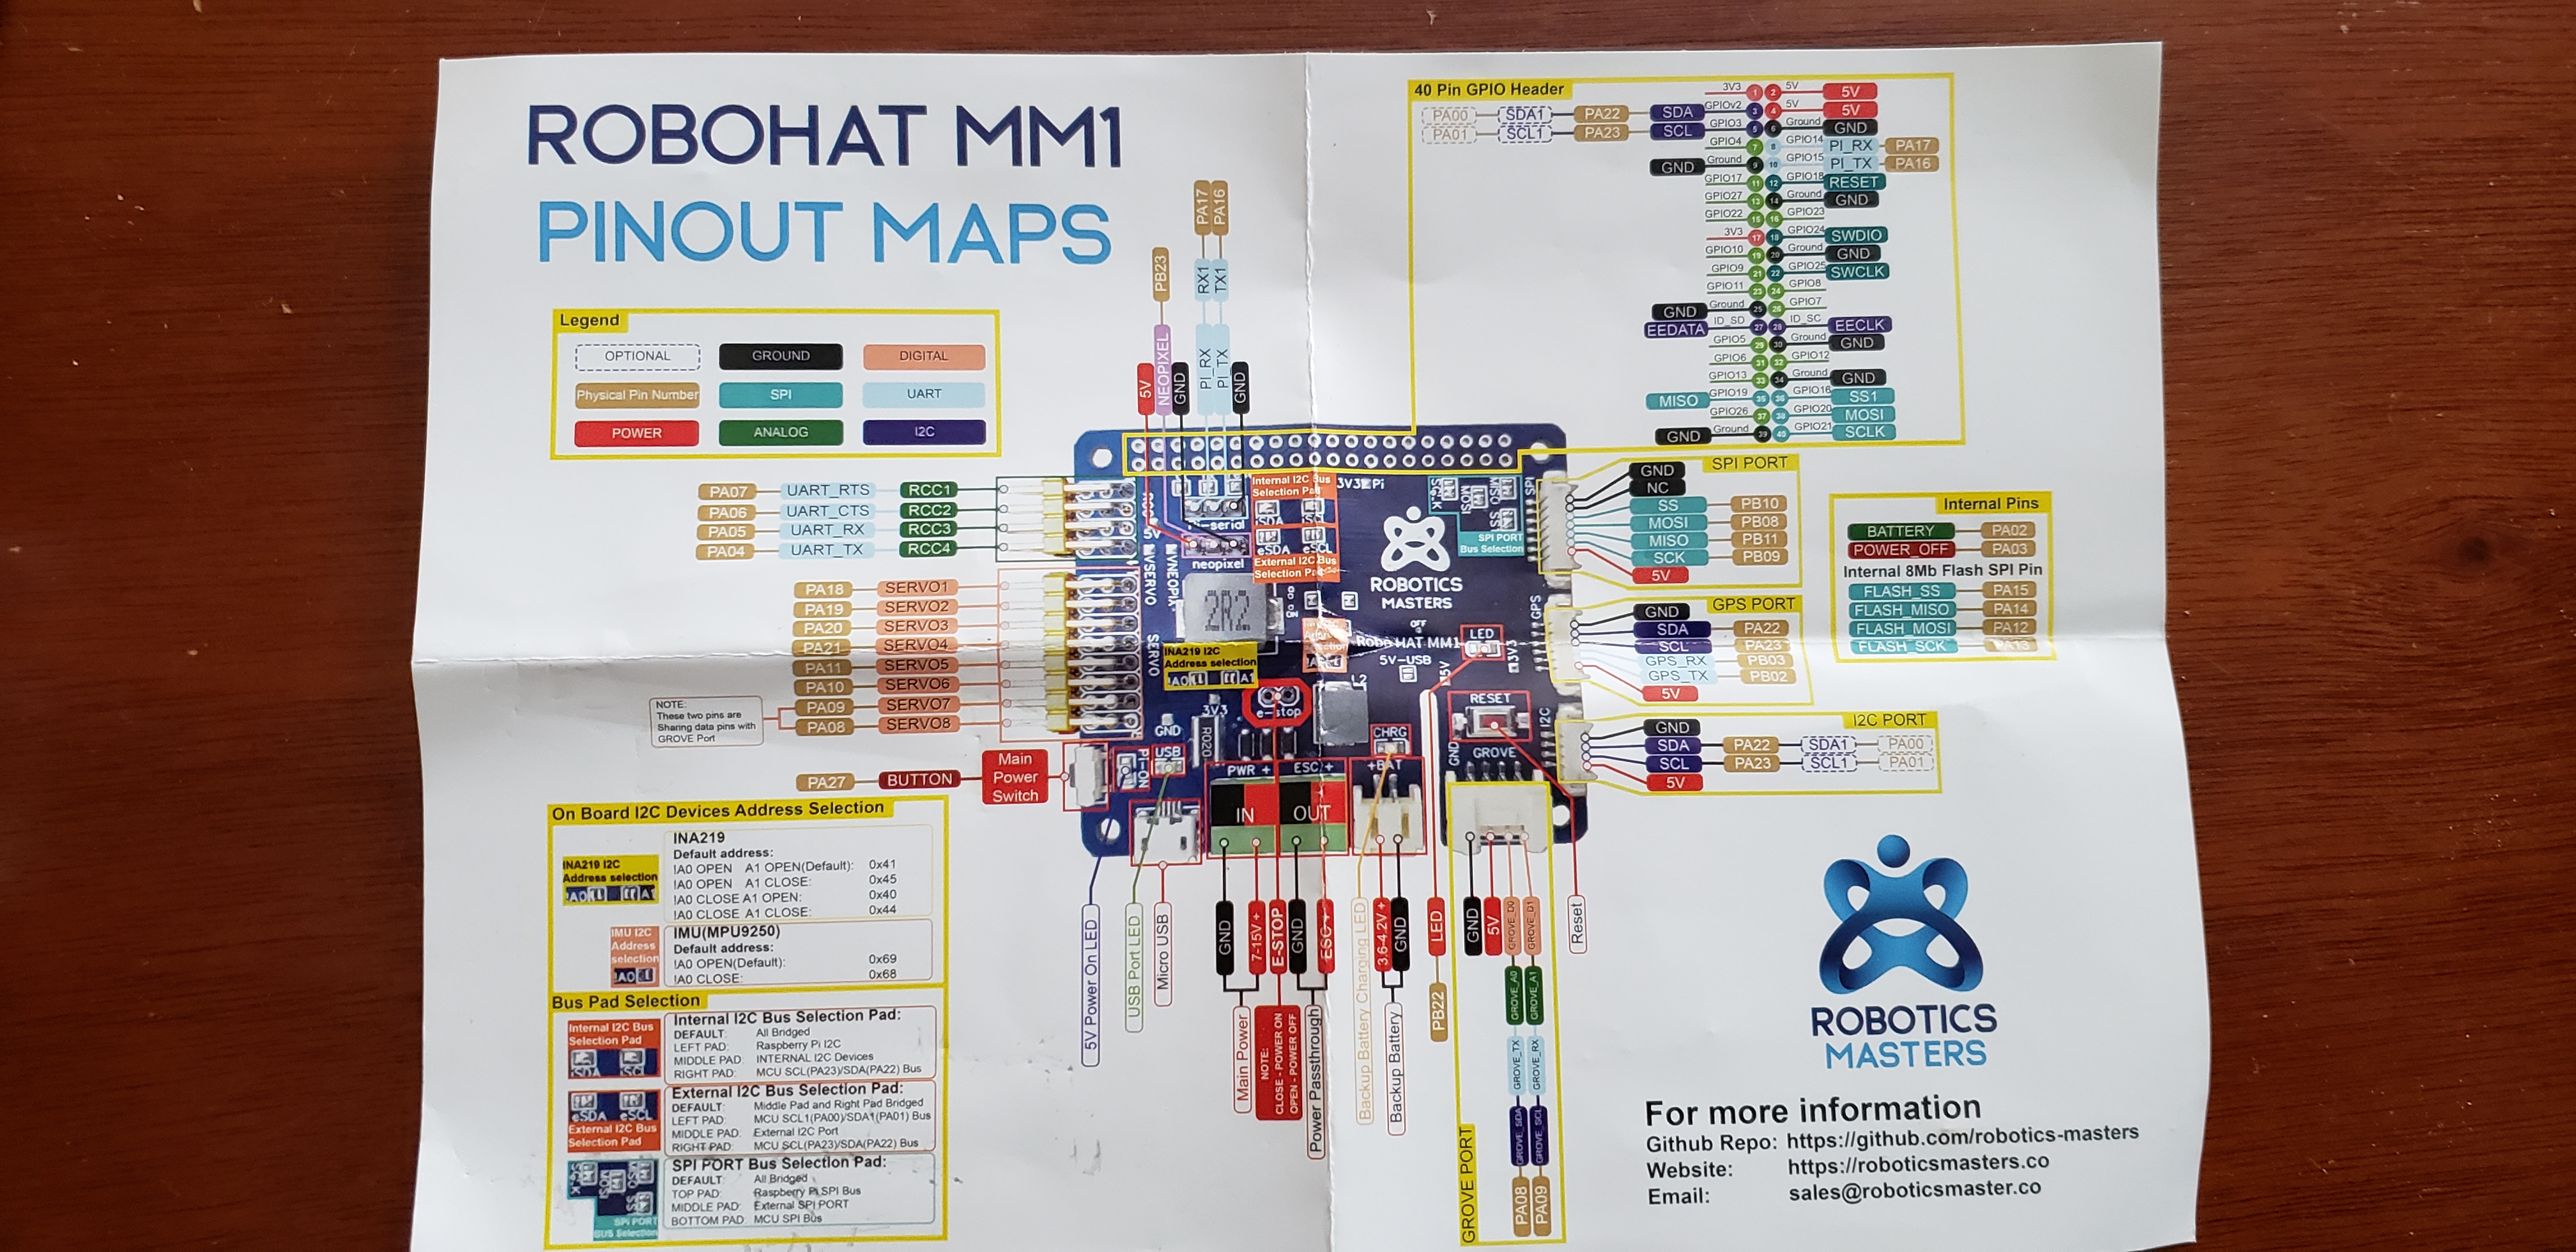
Step 12: Attempt to Mount RoboHat MM1 onto Raspberry Pi
The included nylon stand-offs only joined the RoboHat MM1 to the Raspberry Pi. I needed stand-offs that threaded together through the boards. Luckly, I had been prepared and had bought a kit awhile ago.
Below to be continued: 3/14/2020... to utilize sensors and hardware included with the purchased kit.
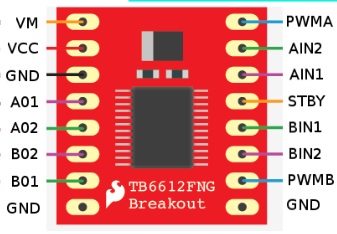
Step 13: Figure out how to attach and wire up the TB6612 Motor Controller- reviewing the " robohateducar.py " file I was able to connect this.
" def __init__(self):# Left Ain1(backward) Ain2(Forward) Right Bin1(backward) Bin2(Forward)# Ain2self.driver_left_in2 = pulseio.PWMOut(board.SERVO3, frequency=RoboHatEduCar.DRIVER_PWM_FREQ)
# Ain1self.driver_left_in1 = pulseio.PWMOut(board.SERVO4, frequency=RoboHatEduCar.DRIVER_PWM_FREQ)
# Bin1self.driver_right_in1 = pulseio.PWMOut(board.SERVO5, frequency=RoboHatEduCar.DRIVER_PWM_FREQ)
# Bin2self.driver_right_in2 = pulseio.PWMOut(board.SERVO6, frequency=RoboHatEduCar.DRIVER_PWM_FREQ)
self.wheel_enc_left = pulseio.PulseIn(board.SERVO1, maxlen=30)self.wheel_enc_right = pulseio.PulseIn(board.SERVO2, maxlen=30) "Step 14: Figure out how to connect 16 Channel PCA9685 PWM servo controller- not needed (but documentation for the Donkeycar build showed this board).
Step 15: Figure out how to wire up DC Motor speed encoder-reviewing the " robohateducar.py " file I was able to connect this. My Interconnection diagram shows the use of RCC1-4 servo ports/pins for the Ground and 5V pins. I later have moved those points to unused SERVO1-6 points. This is because the "DonkeyCar" software uses RCC1-4 pins to control the servos for steering but I haven't configured my EDUCAR kit for that capability. A work-in-progress!!!!
Step 16: Figure out how to attach the HC-SR04 Ultrasonic Sensor-TBD- I have this mounted to the pan-n-tilt assembly that'll also hold the RPi Camera, from a previous Robot build.
Step 17: Figure out how to attach the LED string-TBD
Step 18: Figure out how to distribute DC power via step-down regulator-not needed (but documentation for the Donkeycar build showed this board). So I must wire the battery holder to the power switch which I hadn't incorporated yet. It (the switch) is mounted but is not tied to the 7.4 vdc battery supply. The switch will interrupt the red wire connection from the battery to the MM1 power input.
Step 19: Install Raspberry Pi Camera with Pan-n-Tilt-TBD, I must again remove battery holder and Raspberry Pi/MM1 assemblies to mount the Pan-n-tilt assembly and still maintain access to wiring and ports on the Raspberry Pi/MM1 assemblies.
Step 20: Figure out how to install the Bluetooth Module-TBD-Do I need this? since the RPi has one.
Step 21: Develop code for each sensor, when required-TBD
On 4/5/2020, I again reached out to the Roboticsmasters website "Cian Byrne" for further coding assistance. I was following, documentation provided for using the "CIRCUITPYTHON" coding schema.
Following links from:
https://robohatmm1-docs.readthedocs.io/en/latest/firmwares/circuitpython/
to enter bootloader mode and then:
I downloaded the most recent "UF2" release from the " https://circuitpython.org/board/robohatmm1_m4/ " website. I then downloaded and loaded the most recent "CircuitPython Libraries" from Adafruit.
" https://github.com/adafruit/Adafruit_CircuitPython_Bundle/releases "
Copied the libraries to the "LIB" folder on the "CIRCUITPY" drive on the RoboHatMM1 -EDUCAR kit and copied the "listed" code.py file to test the DC Motors.
I initially could not get my kit to do anything, I was getting missing module errors when I tried to run the code example.
Be sure to copy the "robohateducar.py" file to the "LIB" folder....
Here are my 1st DEMO videos:
Some DEMO code revisions:
This project will be updated as I develop and expand code and add functionality with the Raspberry Pi and its camera, pan-n-tilt dual axis servos.
Definitely, not finished.....stay tuned


Comments