

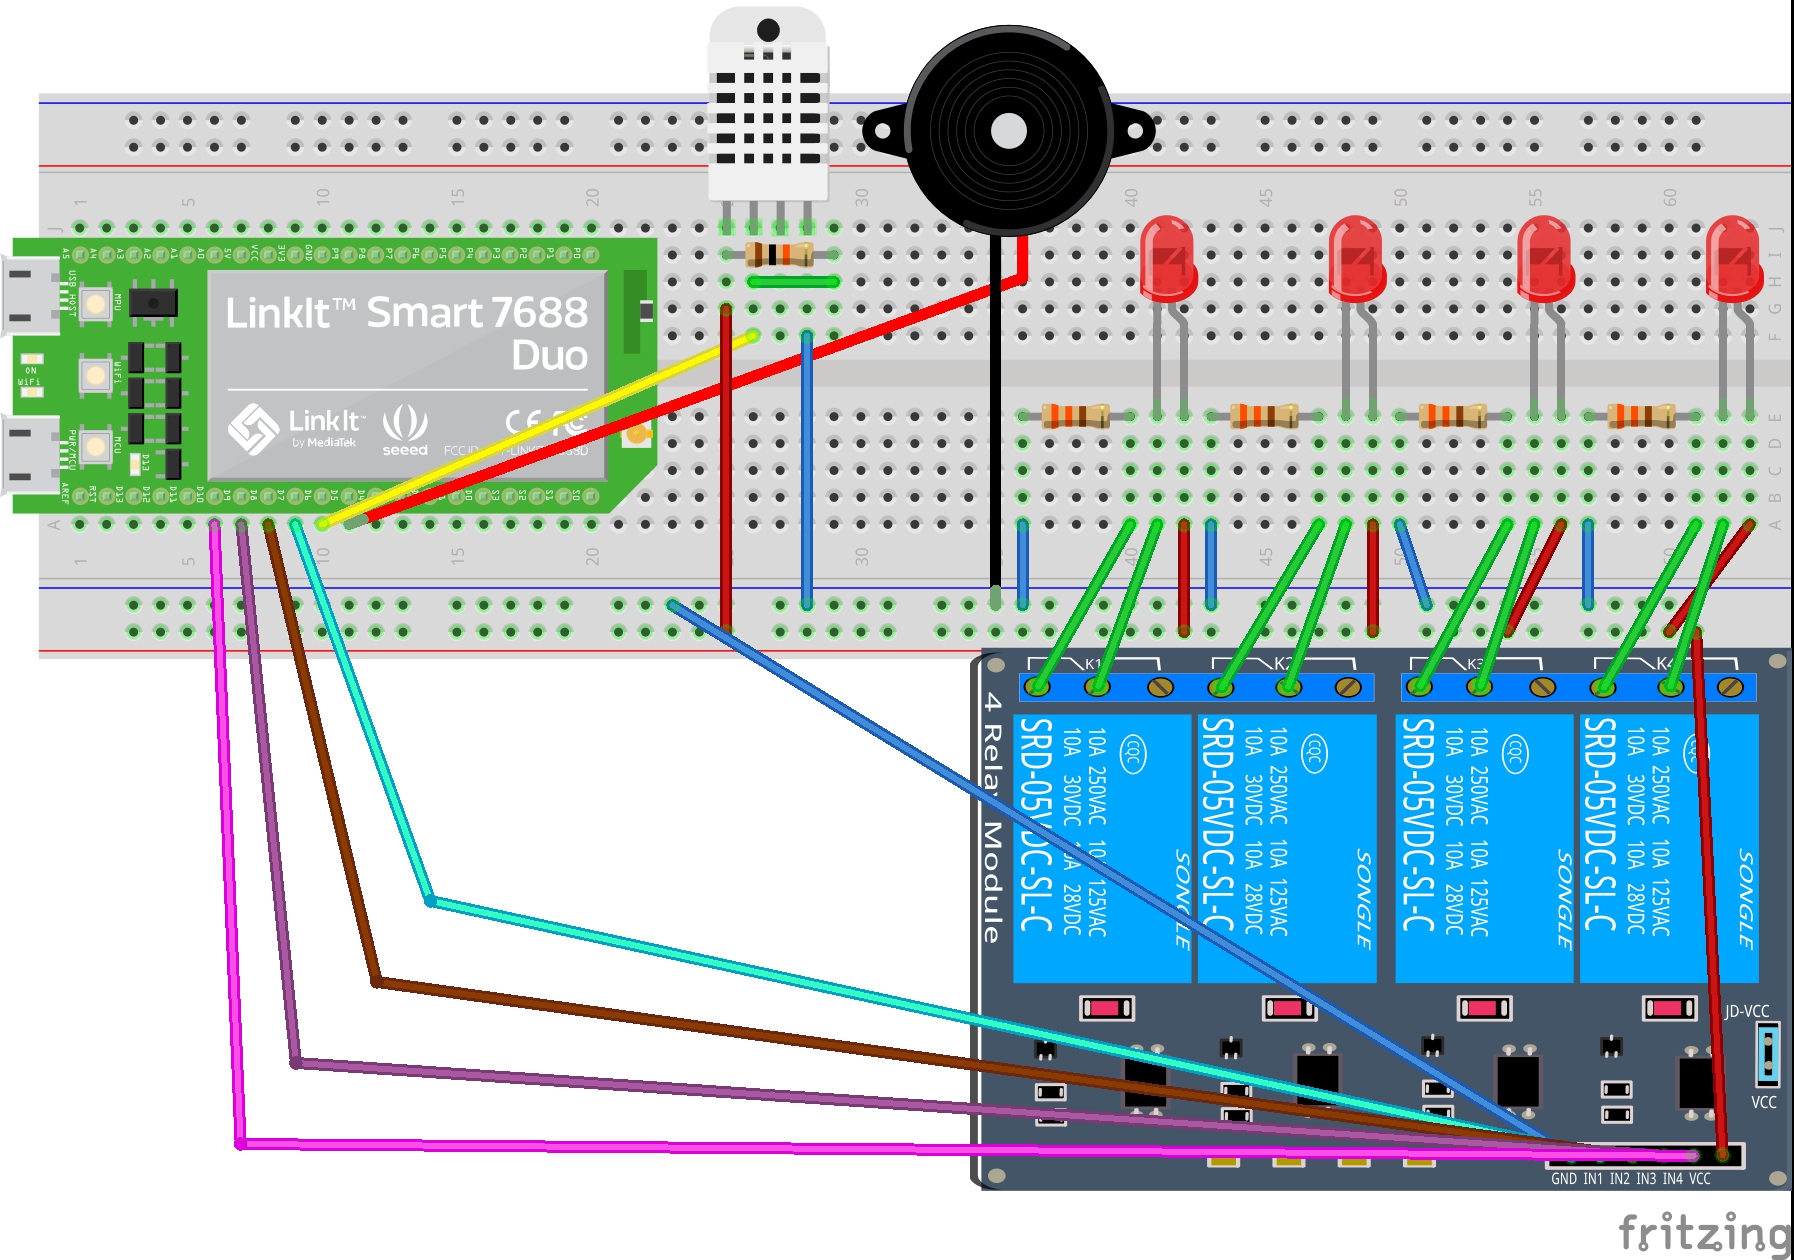
Hardware components | ||||||
 |
| × | 1 | |||
 |
| × | 1 | |||
 |
| × | 1 | |||
 |
| × | 1 | |||
 |
| × | 1 | |||
 |
| × | 1 | |||
 |
| × | 1 | |||
 |
| × | 4 | |||
 |
| × | 1 | |||
| × | 1 | ||||
Software apps and online services | ||||||
 |
| |||||
| ||||||
I am doing an automation project as the final work of automation in the university. The goal is to make a home system with an application; in this case, we will use the Blynk platform due to its ease of use and its ability to communicate with the Linkit Smart 7688 Duo board. We will also implement a camera that can be used for home security.
StepsCreate Blynk Account
- First you have to download the Blynk app in the Google app store:
- Then create a new account:
- Next step is to create a new project:
- You must choose the device you should work with.
In this case, it is of vital importance to choose "Arduino Yun" as the device and "WiFi" as the connection type in order to be able to connect with Linkit Smart 7688 Duo.
Then a screen like the one below will appear where Blynk will send an email with the data to register your device.
In the email comes the Auth Token. That is used for the Arduino code and its connection in Blynk. Also, there comes a link with the Sketch Generator that serves to obtain the code to upload to our board Linkit Smart 7688 Duo.
In the Sketch Generator, you have to choose "Arduino Yun," the type of connection "YunBridge" and write your Auth Token, and the code will be generated automatically. You can copy it and paste it in Arduino IDE and upload it to the Linkit 7688 board.
To upload a sketch to the Linkit Smart 7688 Duo board, you can see the following tutorial where it is explained very well: tutorial.
DisplayThe application has two tables to display the value of the humidity and temperature sensors, and 4 buttons to turn on and off the LEDs connected to the 4-channel relay module.
When any button is lit, it can be displayed as follows:
Webcam Code
I used the Bridge and Process libraries to communicate with the processor so I can make Python programs that will control my webcam.
Sensor Code
I was going to use the DHT22 sensor, for that reason the code includes the library of the sensor and also uses the timer of the Blynk platform to send the readings of the sensor.
Temperature and Humidity Code
I used 3 functions; the first was to perform the reading of the temperature and humidity sensor.
Webcam "Take Picture" Code
Then there is a function to control the web camera from the terminal using the processing library. The example of this you can see in the following link:
https://www.twilio.com/blog/2015/02/arduino-powered-photobooth-arduino-yun-a-webcam-and-dropbox.html
Setup Code
In the Setup function, we initialize the bridge, Blynk, the DHT22 sensor, the serial communication and the timer, as well as define LED as an output that will be the alarm with the buzzer that we will use later.
Loop Function Code
Finally, we have the loop function that activates the communication between Blynk and the LinkitSmart 7688 Duo. It also starts the timer to count the values of the sensors, then reads the value of the Monitor Series. In this example, when sending the value of "1", it triggers the routine that activates the buzzer, sends an email to the user using the function Blynk.email and takes and sends the photograph.
You can change the value of the serial monitor by the value of a sensor, preferably the PIR HC-SR501 sensor, but I do not currently have that sensor and my project is by way of demonstration.
Dropbox Code
The Python code for sending it to Dropbox is as follows:
import dropbox
import datetime
suffix = datetime.datetime.now().strftime("%Y-%m-%d-%H-%M-%S")
filename = "photobooth-" + suffix + ".jpg"
client = dropbox.client.DropboxClient('YOURACCESSTOKENGOESHERE')
f = open('/mnt/sda1/pic.jpg', 'rb')
response = client.put_file(filename, f)
print "uploaded:", response
In the following video, I show the operation of the application of Blynk and turn on and off the LEDs.
In the following video, I show the operation of the application of Blynk and send the value of "1" by the serial monitor so that the camera takes a photo and automatically sends it to Dropbox. You can improve the example using any sensor.
I hope you can make your own version; and if you have any questions with the project, I can help you.
The project works for both the Linkit Smart 7688 Duo and the Arduino Yun.


Comments