


Hardware components | ||||||
_ztBMuBhMHo.jpg?auto=compress%2Cformat&w=48&h=48&fit=fill&bg=ffffff) |
| × | 1 | |||
| × | 1 | ||||
| × | 1 | ||||
Software apps and online services | ||||||
| ||||||
At the end of the previous episode, we promised you that the next demonstration will concern the automatic opening of a sliding gate. When creating this example, however, we decided that for the reader (beginner) the issue is unnecessarily complex, in regards to both programming and assembling it together. Therefore we will show you the advanced features of the Adeon Library on a traffic light and then show you the automatic gate opening in a bonus episode. Since this article builds on previous articles, we recommend a little refresher.
AssignmentImagine that we need to remotely control a traffic light that is connected to Arduino and has the following features:
- Lighting-up of the individual traffic lights
- Adjusting the brightness of each color
- Automatic switch-off after a given time interval
- Restriction of traffic light control according to user rights
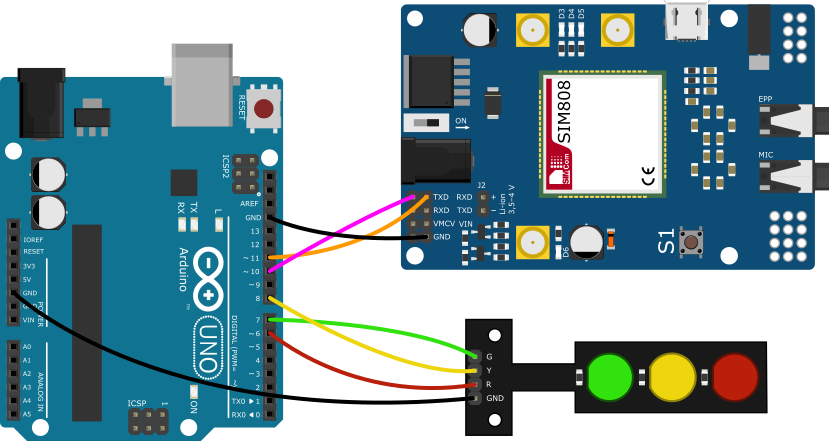
The traffic light consists of three LEDs of a different color. To light up one of the LEDs, we need to power it through the Arduino digital pin. Once the pin status is in the log. 1 (5 V DC) the LED lights up and when log. 0 it goes off. We can also change the brightness by PWM control.
Note: To make the text clearer, we do not include the entire code here, but only its snippets.
Create usersFirst, as in the previous article, we will create users (or phone numbers) which will be authorized to send SMS for traffic light control. For the sake of clarity and easy understanding, we will create a total of three users, with each user having different access rights - admin ( pnAdmin ), user ( pnUser ) and host ( pnHost ).
The user is defined by a variable (field of characters) in which the phone number is stored. If we wanted to write the phone number directly into the Adeon :: addUser parameter, we can do so. Finally, we call the Adeon::printUsers function to list the users on the serial line to verify that the addition was successful.
void userInit(){
    //add users with ADMIN, USER or HOST rights
    adeon.addUser(pnAdmin, ADEON_ADMIN);
    adeon.addUser(pnUser, ADEON_USER);
    adeon.addUser(pnHost, ADEON_HOST);
    adeon.printUsers();
}The next important step is, of course, the creation of parameters, on the basis of which Arduino will control the traffic light. First, we set the parameters for individual LEDs - parRed for red, parYellow for yellow and parGreen for green. To change the value of the parRed parameter, we bind the “callback” function callbackRed, which is based on the value passed to control the red LED. We define the callbackYellow and callbackGreen functions the same way.
The fourth parameter parAutoOff will represent the time in seconds after which the entire semaphore goes off.
The last parameter, parAccess, will serve as a means to change the access rights to the parameter controlling the LEDs. The action itself is provided by the linked “callback” function accessManagement. By changing the access rights to LED parameters, we are able to prevent certain participants from adjusting or changing them.
Finally, the parameters are also written by calling the Adeon::printParams function.
void paramInit(){
    //add parameters
    adeon.addParamWithCallback(callbackRed, parRed, 0);
    adeon.addParamWithCallback(callbackGreen, parGreen, 0);
    adeon.addParamWithCallback(callbackYellow, parYellow, 0);
    adeon.addParam(parAutoOff, 10);
    adeon.addParamWithCallback(accessManagement, parAccess, 0);
    adeon.printParams();
}The on/off function, which is linked to a parameter that determines the status of the LEDs (eg parRed ), is programmed to be able to control the brightness intensity. Thus, this time the parameter values will not only take values of 1 and 0 (as in the case of the first part relay), but values of 0 to 255 (the higher the value, the brighter the LED shine).
The current value of the parameter is passed to the parameter of the callbackRed function. The parameter value is also listed on the serial link.
void callbackRed(uint16_t val){
    //callback function which is called if value of parameter is edited
    Serial.print(F("RED LED VAL: "));
    Serial.println(val);
    (val > 255) ? analogWrite(RED, 255) : analogWrite(RED, val);
}In order to be able to control the program based on time information, we must use the timer function. Arduino offers several ways to work with time. One of them is the millis function, which is part of the Arduino kernel, and its return value indicates the time in milliseconds since the development board was started. In our program, however, it will work directly with a 16-bit timer that, after each overflow (the timer overflows after a specified period of time in Hz), triggers an interruption and starts an interrupt service routine (ISR). The program inside the body of the ISR function checks to see if any of the parameter values for the LED illumination is in the log state. At the same time, it checks whether the value of parAutoOff is different from zero. If the condition is true, the counter variable is incremented every second. This process periodically continues until the counter is less than the value of parAutoOff (in seconds). When the counter variable is equal to the auto-shutoff parameter value, the
Adeon::editParamValue method is called. The method changes the value of e.g. parRed parameter and calls the callbackRed function, which turns off the red LED.
ISR(TIMER1_COMPA_vect) {
    uint16_t r = adeon.getParamValue(parRed);
    uint16_t g = adeon.getParamValue(parGreen);
    uint16_t y = adeon.getParamValue(parYellow);
    uint16_t autoOffTime = adeon.getParamValue(parAutoOff);
    if((r != 0 || g != 0 || y != 0) & autoOffTime != 0){
        if(autoOffTime > counter){
            counter++;
        }
        else{
            adeon.editParamValue(parRed, 0);
            adeon.editParamValue(parGreen, 0);
            adeon.editParamValue(parYellow, 0);
            adeon.printParams();
        }
    }
    else{
        counter = 0;
    }
}An interesting feature of the Adeon library is the ability to specify individual access rights for specific user groups. The default access value for each parameter is level administrator(ADEON_ADMIN). To change this value, use the Adeon:: setParamAccess method.
In our program, the entire process is backed up by the callback function of the accessManagement function, which is linked to the parAccess parameter. Based on the new parameter value, it is calculated for which LED the change is intended and what is the new access right. The Adeon::setParamAccess method is then called and the access right is changed. The parAccess parameter is shared among all three LEDs. The comments at the beginning of the accessManagement body tell us what values we can use to change access rights.
void accessManagement(uint16_t val){
/*
10 - RED ADMIN
11 - RED USER
12 - RED HOST
20 - GREEN ADMIN
21 - GREEN USER
22 - GREEN HOST
30 - YELLOW ADMIN
31 - YELLOW USER
32 - YELLOW HOST
*/
    uint8_t colorSelect = val / 10;
    switch(colorSelect){
    case 1:
        changeAccess(val % 10, parRed);
    break;
    case 2:
        changeAccess(val % 10, parGreen);
    break;
    case 3:
        changeAccess(val % 10, parYellow);
    break;
    default:
        Serial.println(F("UNKNOWN PARAM"));
    break;
    }
}

void changeAccess(uint16_t val, const char* param){
    Serial.print(F("PARAM "));
    Serial.print(param);
    Serial.print(F(" SET TO: "));
    switch(val){
    case 0:
        adeon.setParamAccess(param, ADEON_ADMIN);
        Serial.println(getName(ADEON_ADMIN));
        break;
    case 1:
        adeon.setParamAccess(param, ADEON_USER);
        Serial.println(getName(ADEON_USER));
        break;
    case 2:
        adeon.setParamAccess(param, ADEON_HOST);
        Serial.println(getName(ADEON_HOST));
        break;
    default:
        Serial.println(F("NO CHANGE"));
    break;
    }
}
Note : If parRed access is set to user (ADEON_USER), the device will only process messages with that parameter from participants with user ( ADEON_USER ) or administrator (ADEON_ADMIN) rights. The message of the participant with the host rights (ADEON_HOST) will be ignored, so the participant is not able to control the LED. However, the administrator can change the access rights by sending an SMS with an updated parAccess value.
ConclusionIn the above paragraphs, we described the functions that allowed us to control not only the traffic light with LEDs, but we also demonstrated how to use a parameter in the timer function or how to change access rights. For a more detailed description of the Adeon library, visit the wiki page where you will find information that will shed light on any confusion. You can also find the configuration for the mobile application in the attachment.


Comments