
Hardware components | ||||||
| × | 1 | ||||
 |
| × | 1 | |||
 |
| × | 1 | |||
 |
| × | 1 | |||
Hand tools and fabrication machines | ||||||
 |
| |||||
For many years I just wanted to make something with LEDs that blinks to my heartbeats (and not only when I'm staying perfectly still, and yet skipping a beat here and there). That turned out to be surprisingly difficult, I tried and failed for years. But not anymore!
Actually all heavy lifting is done by uECG - a small wearable ECG device which is open source and has an Arduino-friendly output pin (that pin goes high/low with each heartbeat). Processing these pin states is way easier that processing ECG signal, and I've tried to get most out of it.
UPD: you might want to check 2nd iteration of this project, that receives data via radio link.
1. Schematics
Since we work only with digital signals here, it is very simple. But as a wearable it would be much more reliable (and smaller) if most connections are soldered - for a quick test it's not necessary, but if you are going to wear it during some heavy activity, I highly recommend that.
Schematics looks like this:
- DI pin of the LED ring goes to pin D11 (configurable in the code)
- DRV pin of the uECG device goes to pin D3 (also configurable)
- Battery's + goes to Arduino 5V and LED ring 5V inputs
- Battery's - goes to Arduino GND, ring GND and uECG's GND
I've used LiPo battery directly as a 5V input - there is no mistake, if you will connect it to Vin - it won't work reliably (voltage regulator on Vin introduces voltage drop and we absolutely can't afford one here). The thing is, Arduino is stable as long as input voltage doesn't get below 3.4 volts. LiPo battery starts at 4.2 volts when fully charged, and gets to 3.4 volts only when there is less than 15% charge left. So with any battery larger than ~200 mAh you can get a decent operation time. Other than that, please keep in mind that battery should be connected via some, well, connector :) Because you want to disconnect it from schematics and charge once in a while.
2. Code
The program works in a simple way: it constantly reads D3 pin, and when change is detected - pushes time of that change into 20-elements array. Difference between first and last element, divided by 20, is average time per beat (in milliseconds). So dividing 1 minute (60000 milliseconds) by that number gives us BPM value. You can adjust number of elements in the array. Smaller number of elements would lead to faster response, but less stable results (any problem in beat detection would lead to a large jump in calculated BPM). Higher number of elements would give more stable data, but slower response when BPM changes fast.
Then BPM is mapped into color (blue->green->yellow->pink->red when BPM goes from low to high), and into number of LEDs: for 80 BPM eight segments are on, for 110 - eleven and so on (scale also adjustable in the code).
#include <Adafruit_NeoPixel.h>
#ifdef __AVR__
#include <avr/power.h>
#endif
// DI pin of LED ring
#define PIN 11
// number of pixels in the ring
#define NUMPIXELS 16
// input pin for connecting uECG
int in_pin = 3;
Adafruit_NeoPixel pixels = Adafruit_NeoPixel(NUMPIXELS, PIN, NEO_GRB + NEO_KHZ800);
void setup() {
pixels.begin(); // This initializes the NeoPixel library.
pinMode(in_pin, INPUT); //set pin to input mode
digitalWrite(in_pin, 1); //enable PULLUP: this is critical, uECG doesn't have internal pull-up
}
//we store last 20 heartbeats to averge BPM over them
//with higher value, it will become more reliable,
//but it will take more time to see output change when BPM changes
#define BEAT_HIST 20
long beats[BEAT_HIST];
void push_beat(long ms) //shift all beats in array and insert current one
{
for(int x = 0; x < BEAT_HIST-1; x++)
{
beats[x] = beats[x+1];
}
beats[BEAT_HIST-1] = ms;
}
int get_bpm() //using time difference between first and last beats
{
long dt = beats[BEAT_HIST-1] - beats[0];
long bpm = BEAT_HIST * 60000 / dt;
return bpm;
}
long last_pix_upd = 0; //to keep track of when we updated pixels previous time
int prev_in_state = 0; //previous state of input pin: we want to process only changes of state
void loop()
{
long ms = millis();
int in_state = digitalRead(in_pin); //1 when no beat detected, 0 in beat
if(in_state == 1 && prev_in_state == 0) //react only to change
{
push_beat(ms);
}
prev_in_state = in_state;
if(ms - last_pix_upd > 10) //don't update pixels too often
{
int r, g, b;
last_pix_upd = ms;
int bpm = get_bpm();
int max_bright = 120; //value of maximum brightness, max 255. But you don't always want it at max :)
float dd = 20; //change in BPM between color tones (blue->green->yellow->pink->red)
float t1 = 90, t2, t3, t4; //t1 - "base" BPM, lower than t1 would be blue
t2 = t1 + dd;
t3 = t2 + dd;
t4 = t3 + dd;
//code for changing color depending in which t1...t4 range we are now
if(bpm < t1){ r = 0; g = 0; b = max_bright; }
else if(bpm < t2) { r = 0; g = max_bright * (bpm-t1)/dd; b = max_bright - g; }
else if(bpm < t3) { r = max_bright * (bpm-t2)/dd; g = max_bright - r; b = r/4; }
else if(bpm < t4) { r = max_bright; g = 0; b = max_bright/2 - max_bright * (bpm-t3)/(2*dd); }
else {r = max_bright; g = 0; b = 0; }
if(in_state) //when not in beat, 1/4 intensity, so only beats are highlighted
{
r *= 0.25;
g *= 0.25;
b *= 0.25;
}
int on_pixels = (bpm+5)/10; //number of used LEDs: for 60 BPM, 6 LEDs will be on, for 120 - 12 etc
for(int i=0;i<NUMPIXELS;i++)
{
if(i < on_pixels) pixels.setPixelColor(i, pixels.Color(r,g,b));
else pixels.setPixelColor(i, pixels.Color(0,0,0)); //turn off all other LEDs
}
pixels.show();
}
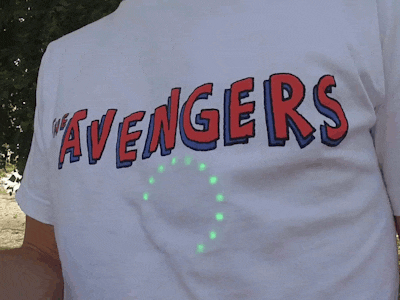
}3. Assembly as a wearable
It is convenient to place Arduino inside the ring - it matches size almost perfectly. Battery fits nearby too. Do not forget that uECG is placed on a chest - so you need a wire with connectors, first you place it, then you put on a shirt with other components, and then you plug the connector. Otherwise it would be really inconvenient to put it on - believe me, I tried ))
That's basically it - if everything was done right, within 30 seconds after you plug all connectors it will start blinking and indicate BPM.
4. Field testing
I tested it while walking and running - and found that during the run, battery bounces right over ECG sensor, distorting its readings. When I moved it all a bit, it turned out that wire connecting uECG with Arduino is too short and it pulls ECG sensor with each step, distorting readings again. Overall, I got reliable beats only when walking and standing, but not running - yet I think I will improve that. Sensor itself, when I used it with different shirt, displayed BPM correctly during the run too (checked via its app).
Also, turns out that LEDs on a chest might look cool but are practically useless. It's really inconvenient to look down to check your pulse. I think in the next iteration I'll make some kind of wrist bracelet that will indicate beats instead.
P.S. If you are interested in uECG project - you can check its hackaday page, there are a lot of technical details, PCB designs, discussion and project logs


Comments