


Software apps and online services | ||||||
| ||||||
Motivation:
I was inspired by the mood ring trend that came about in the
1970s. The mood ring has a thermochromatic sheet that changes color according
to temperature. The theory behind the mood ring is that when the surface of your![]() skin is a certain temperature, this corresponds to a certain mood, so the
color reflects the wearer’s mood. I am critiquing the arbitrariness of this process
skin is a certain temperature, this corresponds to a certain mood, so the
color reflects the wearer’s mood. I am critiquing the arbitrariness of this process![]() by allowing the user to select
by allowing the user to select![]() the color and therefore select
the color and therefore select![]() their
“mood” for themselves. The colors I used for the discs correspond to those in
mood ring color charts
their
“mood” for themselves. The colors I used for the discs correspond to those in
mood ring color charts![]() . My device is meant to reference the mood ring trend,
but most importantly, encourage play
. My device is meant to reference the mood ring trend,
but most importantly, encourage play![]() for the wearer.
for the wearer.
Design Evolution:
As soon![]() as we were handed the assignment
as we were handed the assignment![]() to 3D print a ring,
I immediately thought of the mood ring. I have been a fan of the trend for a
while, and last
to 3D print a ring,
I immediately thought of the mood ring. I have been a fan of the trend for a
while, and last![]() year, I created a device called “Mood Tagging,” a spray paint
can that allowed users to spray the color of their mood virtually on a screen.
My prototype did not implement the mood technology, so I would ask users to
choose from eight moods, which each corresponded to a different color. The
Manual Mood Ring was inspired by Mood Tagging, which simplified mood into eight
categories and allowed users to choose one for themselves. I knew I wanted to
create a ring with a box on it that would be able to hold several colored discs
and have a hole to display the top one. I began by creating a band and adding a
pre-designed hexagonal box that I scaled down, added a hole on the top, and attached
year, I created a device called “Mood Tagging,” a spray paint
can that allowed users to spray the color of their mood virtually on a screen.
My prototype did not implement the mood technology, so I would ask users to
choose from eight moods, which each corresponded to a different color. The
Manual Mood Ring was inspired by Mood Tagging, which simplified mood into eight
categories and allowed users to choose one for themselves. I knew I wanted to
create a ring with a box on it that would be able to hold several colored discs
and have a hole to display the top one. I began by creating a band and adding a
pre-designed hexagonal box that I scaled down, added a hole on the top, and attached![]() to the ring. My first print was a black ring, which did not size
exactly right for my finger. Also, the box I was using had a lip to clip shut,
but the resolution was too small to be printed out, so the box could not close.
Because I attached
to the ring. My first print was a black ring, which did not size
exactly right for my finger. Also, the box I was using had a lip to clip shut,
but the resolution was too small to be printed out, so the box could not close.
Because I attached![]() the bottom of the box to the ring in the design, the print
was not very clean, and filler material prevented my ring from having a clean
finish. For my next iteration, I decided to scrap the predesigned box and
create my own one, this time with a round shape. I created a cylinder and added
a hole in the middle to hollow it out. I copied it and added a round hole in
the top. I decided to print the ring in three separate parts: the ring, the
bottom of the box, and the top of the box. I also decided to add a gap in the
ring, so it would fit fingers of different sizes. To create the box that would
close and shut, I added two notches that fit together on either side of the
box. For this print, I used clear plastic which looked a lot nicer. The ring
turned out well, and I used this for my final. The box was a bit large — it
extended too far away from the finger, and wouldn’t shut tightly. The top would
easily slip off. I needed to add notches on the other end to hold it in place
in the other direction
the bottom of the box to the ring in the design, the print
was not very clean, and filler material prevented my ring from having a clean
finish. For my next iteration, I decided to scrap the predesigned box and
create my own one, this time with a round shape. I created a cylinder and added
a hole in the middle to hollow it out. I copied it and added a round hole in
the top. I decided to print the ring in three separate parts: the ring, the
bottom of the box, and the top of the box. I also decided to add a gap in the
ring, so it would fit fingers of different sizes. To create the box that would
close and shut, I added two notches that fit together on either side of the
box. For this print, I used clear plastic which looked a lot nicer. The ring
turned out well, and I used this for my final. The box was a bit large — it
extended too far away from the finger, and wouldn’t shut tightly. The top would
easily slip off. I needed to add notches on the other end to hold it in place
in the other direction![]() . For the next iteration, I added these features and
scaled down the box, so it would sit thinner on the finger. I made sure to get
my measurements exact on the notches, so they would fit together perfectly.
This print worked
. For the next iteration, I added these features and
scaled down the box, so it would sit thinner on the finger. I made sure to get
my measurements exact on the notches, so they would fit together perfectly.
This print worked![]() well, and the box opened
well, and the box opened![]() and shut properly. I next glued the
bottom of the box onto the ring with acetone and secured
and shut properly. I next glued the
bottom of the box onto the ring with acetone and secured![]() it later with super
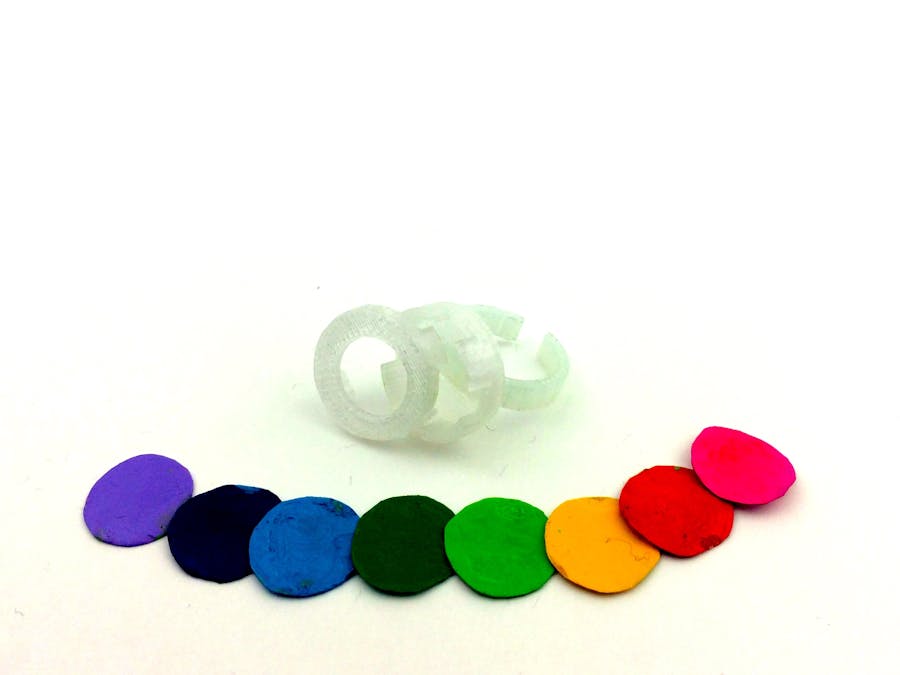
glue. To create the discs, I measured an approximate proper size on a piece of
paper. I then cut out eight identical ones and painted them with different
colored acrylic paint on either side. To create a nice finish and water proof
them, I painted them over with nail polish. Finally, I put them into the box,
choosing my favorite color-mood, and shut the box. Manual Mood Ring was ready
for wearing.
it later with super
glue. To create the discs, I measured an approximate proper size on a piece of
paper. I then cut out eight identical ones and painted them with different
colored acrylic paint on either side. To create a nice finish and water proof
them, I painted them over with nail polish. Finally, I put them into the box,
choosing my favorite color-mood, and shut the box. Manual Mood Ring was ready
for wearing.
STL Files:
Final Product:
Possible Next Iterations:
I was really happy with how my ring turned out, but want to
consider more iterations for future projects. I was thinking I could create
higher quality colored discs out of a slightly thicker plastic material and
laser cut them. Also, my box is quite difficult to open![]() and shut, so it would
be worth investigating other designs that would allow the user to more easily
open the box and change the color. From feedback I received, it would also be
interesting to explore a ring that just contained a box without an opening to
be used as a tiny, secret compartment. I will hopefully get to explore these
possibilities in future versions of my ring.
and shut, so it would
be worth investigating other designs that would allow the user to more easily
open the box and change the color. From feedback I received, it would also be
interesting to explore a ring that just contained a box without an opening to
be used as a tiny, secret compartment. I will hopefully get to explore these
possibilities in future versions of my ring.

Comments