IntroductionIt's not always easy to take appropriate care of ill people or elderly living in our homes. In my case, I live with a person on an early stage of dementia. This means that some things that are not supposed to happen, happen. For example, this person cannot walk without wearing special shoes but sometimes forgets so, or maybe is not able to go to certain places and, without us noticing, there's no way to stop it. The worst case scenario (which has happened and that's mostly why I decided to create this) is when, at night, this person wakes up (without the special shoes) and falls down to the floor, making several injuries.
That said, here's the Arduino 101 way of caregiving! For the main unit, I'll be using the Arduino 101 connected to the app called Blynk over BLE. To do so, simply download blynk library at blynk.cc and the companion app for iOS or Android.
Arduino 101 with Blynk app (Their names and logos belong to them :). )
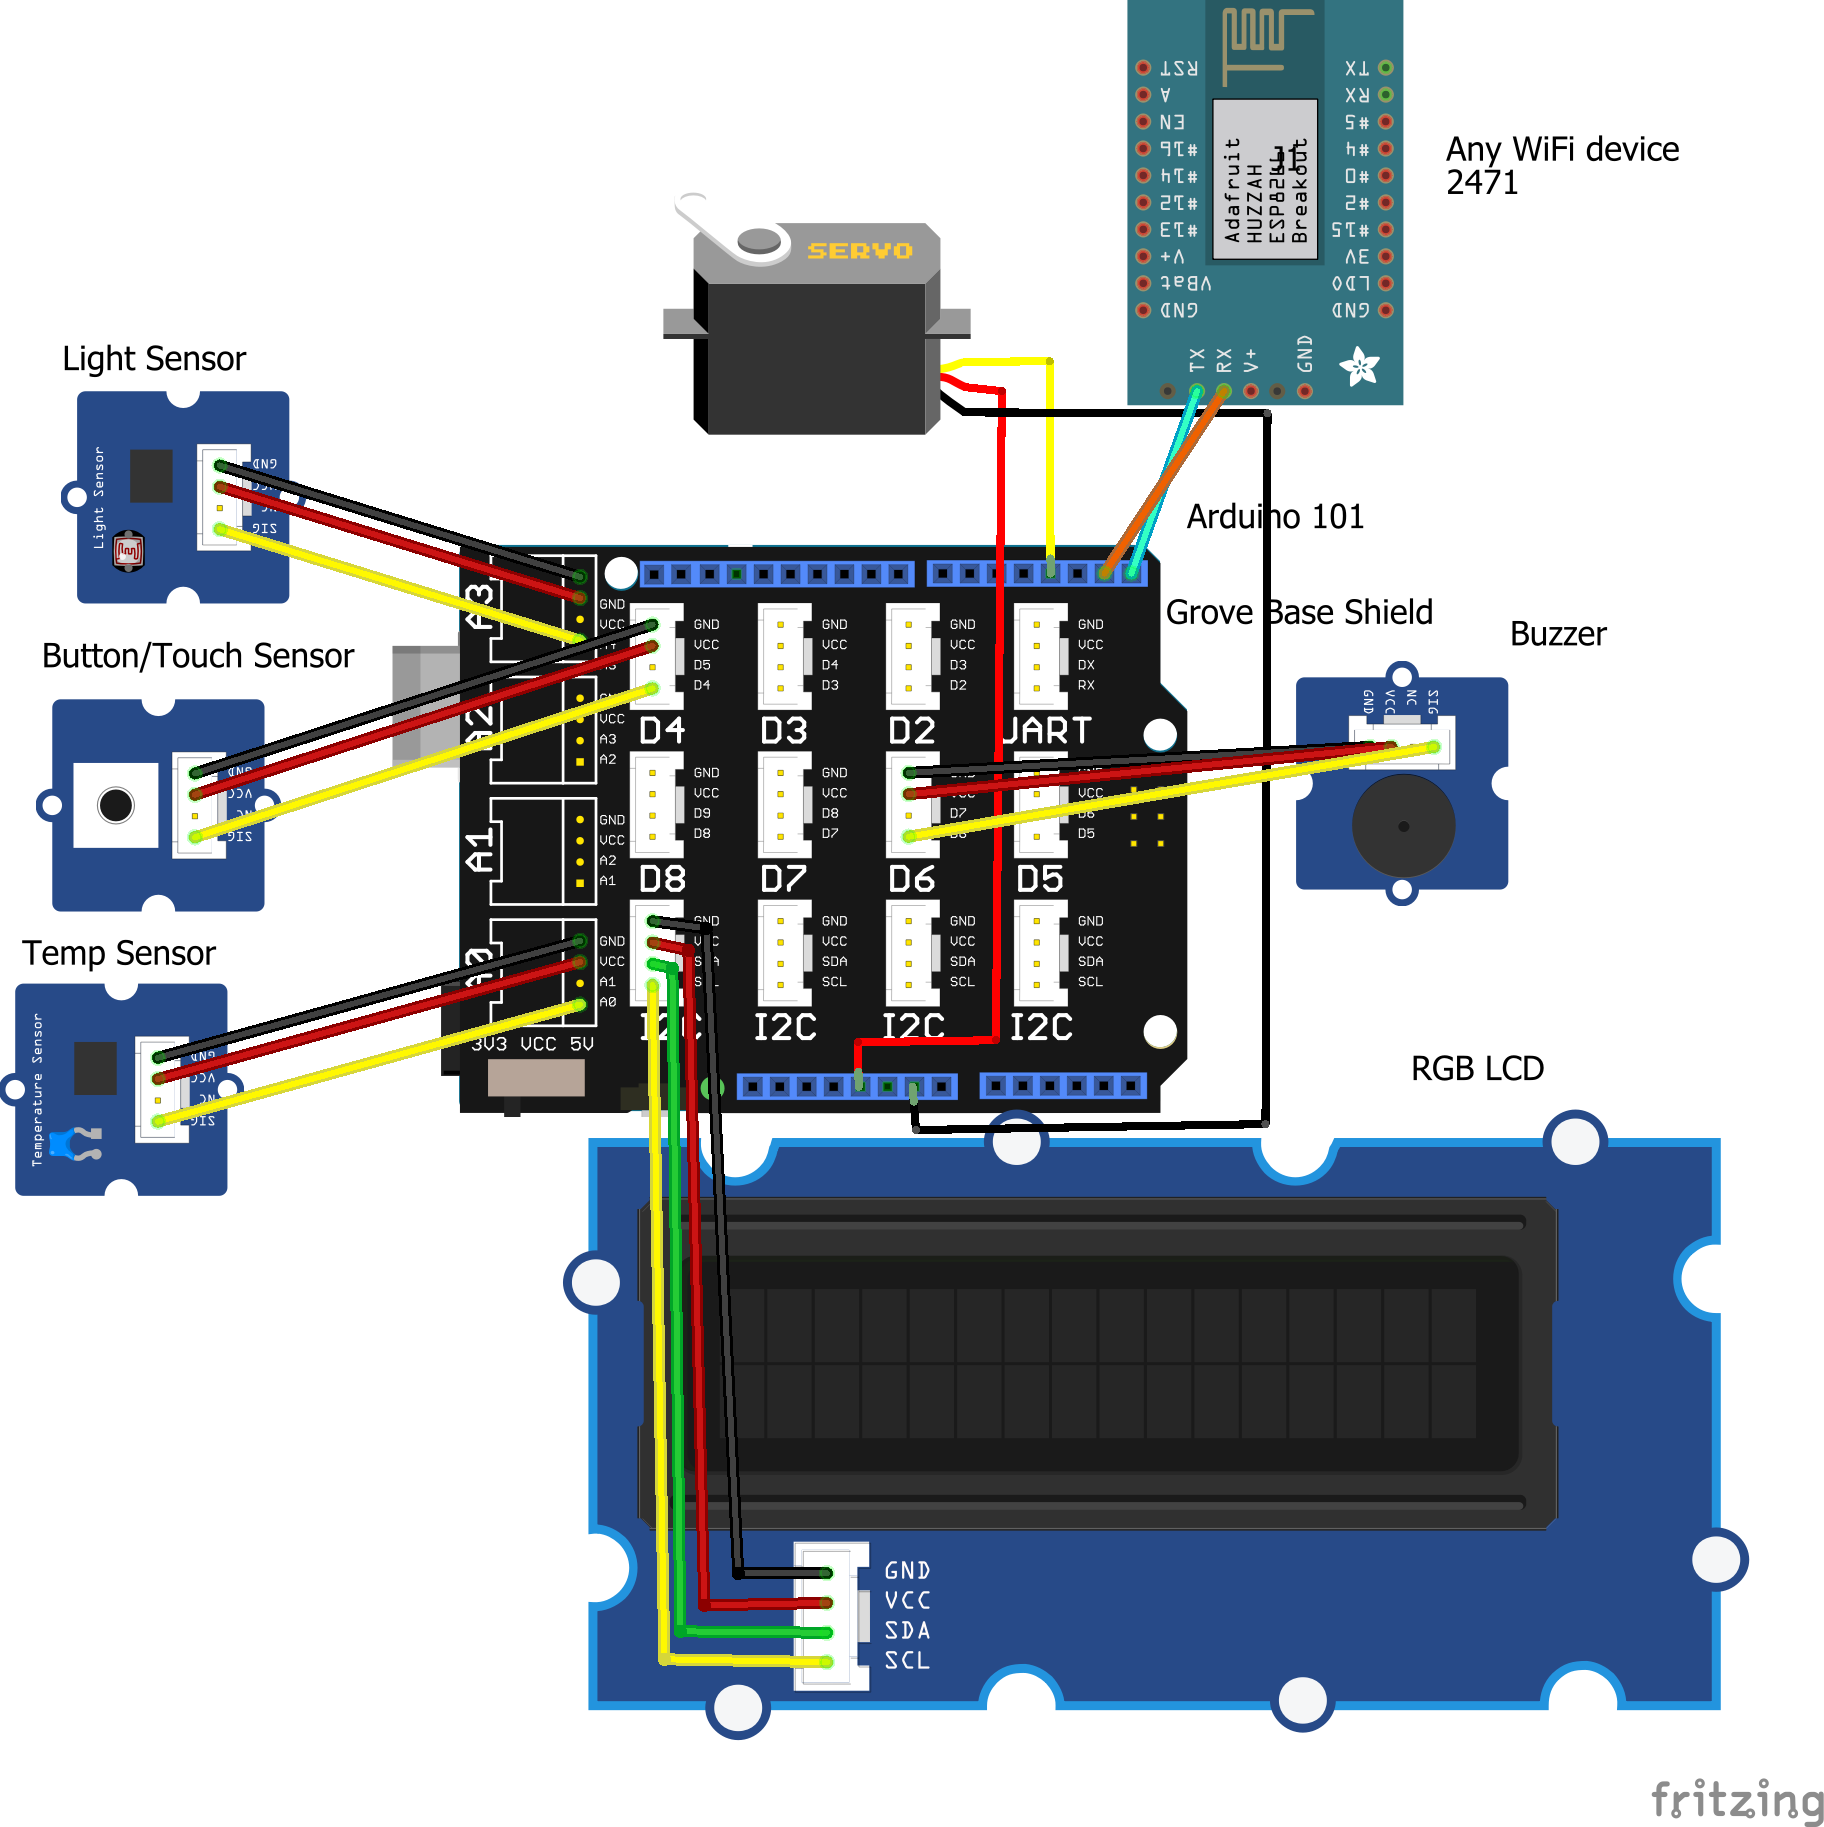
This board has a Seedstudio Grove Base Shield on it, so it's easier to connect the components. Let's analyse them one by one:
- Temperature Sensor -> It is quite important to know the temperature ins
- ide the room this person will sleep, so here it is. It is connected to A3, and has no warnings programmed.
- Sound Sensor -> For me this is the most important sensor. It is useful in almost any situation; if the person falls, screams, wakes up or any other thing, an alarm will be triggered (apart from the LCD turning red) so even if you are asleep a warning will wake you up. To disable the alarm simply touch the touch sensor or the button (whatever you decide to include)
- Touch Sensor/Button -> It has two functionalities. First of all it tells you which temperature the room is using the LCD when pressed. Secondly, it stops the alarm when pressed.
- RGB LCD -> This screen will provide general information about sensors, apart from a nice "everything is fine" message.
- Servo -> In my case, we have automatic blinds triggered by a switch. In order for this to work the servo is normally at 90º position, and it turns to one side or the other in order to press the "up" switch or the "down" switch.
- Buzzer -> This buzzer does an essential paper: warn you by sound.
- WiFi device -> Even though Blynk app is awesome and it has many uses, you might want to extend the system. With the capabilities of MQTT protocol and a WiFi device (such as any ESP8266 board) you can send this data wherever you want like, for example, a Node-RED app, to trigger more alarms, a camera... Let me know what you create!
Grove Starter Kit, where I got most of the components from
The awesome Blynk app has some several widgets which interact with our boards and their sensors. Let's go, again, one by one:
- Sound Graph -> Every 10 seconds, this bar-style graph updates, letting you motorize the sound history. The widget has some code linked to it, so when the Sound value exceeds 400 the alarm triggers.
- Sound Labeled Value -> As the name says, this widget indicates the precise sound every 2 seconds. Like the first one, the alarm triggers when it exceeds 400.
- Temperature Graph -> Taking values between 0 and 70 this line-style graph measures the temperature every 5 minutes. As it hasn't got any alarm connected to it, it's not necessary to check that often.
- Temperature Labeled Value -> This widgets tells the exact value of the temperature, every 5 seconds.
- Light Sensor -> It detects light levels and sens them to A0. It's matched with a piece of code that turns off LCD's backlight at night, for comfortable sleeping. However, it is not affected when alarm is triggered, then the screen will be as red as a screen can be.
- The Blind Timer -> With a start hour of 22:00 and stop hour of 08:00, this timer is useful for the Blind's ups and downs. It works by sending 0 or 1 to virtual pin 1.
- Last but not less important, the BLE connection widget -> It's essential if you want to communicate with the board.
Apart from these, there's enough room for some buttons and sliders, so be creative here! With MQTT, anything can be made.
Automatic StuffThere are some automatic processes running on this system. The first one is the blind controller. Thanks to the Timer widget on Blynk we can set times for events to happen. For example, I've set that the Blinds go down at 22:00h and up at 08:00h. It is so cool.
Besides, when the light sensor detects no light, the RGB screen's light will disappear, making the room more confortable (the person I live with hates bright lights in the room while sleeping, like most of us I guess).
MQTTFor MQTT, we will use simple Serial Communication, wiring the Arduino's RX (D0) pin to WiFi device's TX, and WiFi device's RX to Arduino's TX (D1). The MQTT broker is completely up to the user, you can find some of them with a simple Google search. This is topic is large enough for a tutorial or a set of them, so I won't talk much about it. PubSubClient and this Adafruit tutorial look like a good starting point. Node-RED is also worth a view.
ConclusionSo, this is all guys! I hope you like the project as much as I do. Leave a comment with your opinion and share it over there! Any questions, of course, ask me right away.
Bye!


_baVEVgguW1.jpg?auto=compress%2Cformat&w=48&h=48&fit=fill&bg=ffffff)


Comments