


Hardware components | ||||||
 |
| × | 1 | |||
 |
| × | 2 | |||
| × | 1 | ||||
| × | 1 | ||||
 |
| × | 1 | |||
| × | 1 | ||||
| × | 1 | ||||
Software apps and online services | ||||||
 |
| |||||
 |
| |||||
| ||||||
This project was created as a way to save time for employees at the World-Wide Texas Instruments campuses. The parking garage currently requires employees to scan their badge for access. This can take up valuable time that an employee could devote to furthering TI initiatives.
In order to accommodate this issue our team began to throw together some ideas on how to optimize this process.
Introducing...
The Machine Learning, Licence Plate Reading, Automatic Garage Gate Opener.
M.L.L.P.R.A.G.G.O. to keep it "short" and sweet.
The MLLPRAGGO innovation fixes this by reading the employees license plate and providing quick access into the garage.
Our system is able to detect when a car approaches one of the gate entrances in the parking garage, take a photo of the car's license plate, then compare the license plate alpha-numeric I.D. to a database that has the employee's license plate information. Access to the garage is granted based on employee status.
To talk about the project we will split up the parts into sections: BeagleBoard X15/ Ultrasonic Sensors, MSP430G2553 MCU, Image Acquisition, License Plate Detection/Image Processing, Database, and Gate Actuation.
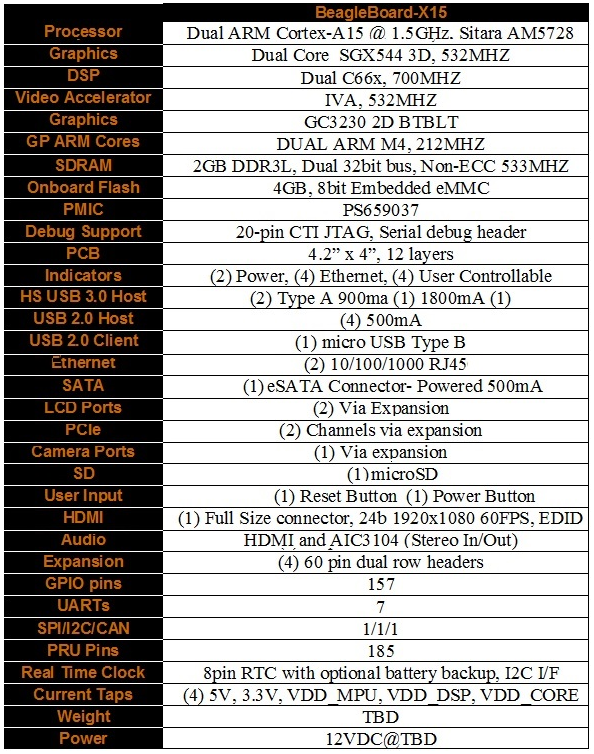
BeagleBoard X15
The BeagleBoard-X15 is a high powered version of the original BeagleBone Black. Due to the high CPU requirements of the image processing algorithms this device better fit our needs in the project.
Ultrasonic SensorsThis is the HC-SR04 ultrasonic ranging sensor. This economical sensor provides 2cm to 400cm of non-contact measurement functionality with a ranging accuracy that can reach up to 3mm. Each HC-SR04 module includes an ultrasonic transmitter, a receiver and a control circuit.
There are only four pins that you need to worry about on the HC-SR04: VCC (Power), Trig (Trigger), Echo (Receive), and GND (Ground). This sensor is very easy to use and was easily implemented in our design.
There will be 2 sensors mounted to the front of the parking garage access arm. These will interface with the MSP430G2553. The G2553 will apply a 5 microsecond pulse to the Trig pin of the device. This will initiate the sending of an ultrasonic signal which will travel out and bounce back off of an object. The reflected signal is then read back as a digital pulse on the echo pin. The time between then the trigger and the echo is then used to determine the distance using the fact that sound travels at a constant rate of speed.
Texas Instruments’ LaunchPad development boards are a great place to start for any MCU project. The MSP430 is an easy-to-use flash programming microcontroller. The MSP430 MCU was specifically designed to be low-cost and low-powered
The Launchpad is used to monitor the HC-SR04 ultrasonic sensors and drive the PWM Signal for the servo.
Image AcquisitionIn order to acquire an image of the car's license's plate a Logitech 720p HD WebCAM was used. The main purpose for choosing this camera was that it had a USB interface. To get started with the camera, attach it to the Beagle board X15 by connecting to the USB port on the board.
We used the video for Linux (v4l) video capture application interface for Linux in order to utilize the usb cam.
In order to take a picture with the camera we will need to install the v4l library package. Use the following commands to do this,
sudo apt-get install v4l-utils
sudo apt-get install libv4l-dev
If the last command does not work for you then you can try the following,
sudo apt-get update
sudo apt-get install libv4l-dev
A tutorial from Derek Molloy was used to figure out how to setup the camera. Please see the following video for a step-by-step procedure on how to set the camera up.
Since the webcam that we are using is a 720p camera we changed the camera's resolution. This was done through the following command,
'v4l2-ctl --set-fmt-video=width=1280,height=720,pixelformat=0'
As mentioned in the video the boneCV Git-Hub repo was used for the camera. To clone the repo type the following command.
'git clone git://github.com/derekmolloy/boneCV.git'
Once the repo has been cloned the 'grabber.c' file located within the boneCV directory was modified. This file is what takes the image, but there is a for loop towards the bottom that iterates 20 times leading to 20 images being taken. For our project we would only like one image at a time so the file needs to be edited. Emacs was used to edit the file. To learn more about emacs visit the following site: https://www.digitalocean.com/community/tutorials/how-to-use-the-emacs-editor-in-linux
'sudo apt-get install emacs' //Install emacs to modify the file.
'emacs grabber.c' //open the file to modify
Scroll down within the file and delete the for loop that iterates 20 times when the photo is taken.
After deleting save the changes by doing (Ctrl+x, followed by Ctrl+s)
To exit do (Ctrl+x, followed by Ctrl+c)
Now we should be ready to acquire an image!
Navigate to the boneCV directory, then type './build' in order to build the project with the changes that were made with the grabber.c file. Then type './grabber'. This should run the code and acquire the image. A higher resolution warning may popup, but that is normal.
After the image is taken it will appear within the boneCV directory as 'grabber000.ppm'. The extension of the image can be changed to switch the format of the image acquired within the 'grabber.c' file.
License Plate Detection/Image ProcessingFor the license plate detection and character recognition, we initially planned on training our own neural networks. We soon learned that there is not a publicly available data set for United States based license plates. Instead we searched for pre-trained neural network models and open source libraries to help us with detection and processing.
We tested many open source libraries and found one, openalpr, to have the best results. Openalpr is a license plate detection and character recognition library written in C++. The library also has bindings for C#, Java, Node.js, Go, and Python.
The library can be found at the following link: https://github.com/openalpr/openalpr
Openalpr Detection and Recognition Process:
1) Region of Interest Detection
Using Local Binary Patterns, possible license plate regions are detected throughout the input image.
2) Image Binarization
Multiple binary images are created from the input image to aid in character detection.
3) Character Analysis
Using known characteristics of a license plate character such as average character size, character-sized regions are detected in the possible plate regions.
4) Plate Edge Detection
Edge detection is used to find the precise edges of the license plate based on the detected plate regions of interest.
5) Deskew
A deskew phase is used to standardize the size and orientation of the detected plate regions.
6) Character Recognition
All remaining plate region of interest are then processed to detect the license plate alphanumeric string. Google's Tessaract-OCR library is used. This library uses a pre-trained neural network to analyze each character and determine what the correct value is.
DatabaseA database of valid license plates is needed to check each extracted plate number against. In this project we simply use a text file to mimic the database and store the valid plate strings in the text file. When our python script begins, the list of valid plates is read. Once a plate number is extracted, we check the list of valid plates to see if the extracted plate matches a valid plate. If a match is found, we send the signal to open the gate. The servo motor should take care of opening and closing the gate.
Our database implementation is very simple, but there are many other options that can be considered. An alternative solution would be to host a database on a server that could be updated from a web application. This would allow employees to update their license plate information in case they get a new car or use a different car for the day. Time constraints did not allow us to attempt this implementation.
BeagleBone X-15 Major Components
-1 x AM5728 TI Sitara Proccesor
-2GB DDR3 RAM
-4GB 8-bit eMMC on-board flash storage
-2D/3D graphics and video accelerators (GPUs)
-2×700-MHz C66 digital signal processors (DSPs)
-2×ARM Cortex-M4 microcontrollers (MCUs)
-4×32-bit programmable real-time units (PRUs)


Comments