

Hardware components | ||||||
 |
| × | 1 | |||
| × | 1 | ||||
- Today we will learn how to build an local web server using raspberry pi 3 model B (RPi 2, zero will work well) also we will make a web page which will be the user interface to the system.
- The web page will allow the user to control (send orders) RPi GPIO Pins over the internet, Example: If I am in America and my house in Egypt I will be able to control my Egypt's house lights and any appliances that connected to the PI GPIO over the internet. That's Cool Right!!
- We will use Flask Microframework for Python to turn our RPi to a Local Web Server, we will use Python to talk to the web server, also we will use HTML and CSS to make a web Page.
We will divide this tutorial in four parts:
- The first part: is how to control the RPi GPIO using basic Python Prpgramming without any web servers.
- The second part: is how to make a simple web page using HTML and CSS
- The Third part: is how to host the web page which we built on The RPi (local web server) Using Flask and Python.
- The fourth part: is how to control RPi GPIO over the internet.
IMPORTANT: IF YOU ARE FAMILIAR WITH THE BASICS OF RASPBERRY PI AND PYTHON AND WANT TO SEE THE FINAL PROJECT PLEASE JUMP TO THE LAST PART OF THIS TUTORIAL TO NOT GET BORED :)
THE FIRST PART: (control the RPi GPIO using basic Python Prpgramming without any web servers)- First Example (Led Blinking)
First: We need to go to this directory on the Raspberry Pi do this by writing this in the Terminal.
cd /home/pi/Documents
Then we need to make a new folder called ledBlinking to organize our Work (best Practice) we do this in the documents directory by writing:
mkdir ledBlinking
Then we need to go to the folder which we made (ledBlinking):
cd ledBlinking
Then we need to make the Python Script using nano editor which will do the work.
nano ledBlinking.py
The nano editor will open empty like this:
- then we need to write the Code To Control The GPIO26
- we need to make the led turn on for 1 second and turn off for 1 second
That is the code if you are new to Python or RPi we will explain each line in the code don't worry.
import time
import RPi.GPIO as GPIO
first Line: we import the time library to allow us to use the (sleep function) to make a delay between each order
second Line: we import the RPi.GPIO to initialize and allow us to control the GPIO in the RPi as (inputs or outputs). we give it a simple name (GPIO) for further uses.
GPIO.setmode(GPIO.BCM)
There is two main modes to numbering the GPIO:
The GPIO.BOARD option specifies that you are referring to the pins by the number of the pin the plug - which in the Outside of the diagrams below. (Pin#), Example: pin number (1, 2, 3, 4,....., 40)
The GPIO.BCM option means that you are referring to the pins by the "Broadcom SOC channel" number, these are the numbers after "GPIO" in the (NAME) Coloumn Example: (GPIO02, GPIO03, GPIO04,....), we take only the number after The "GPIO" Word.
led = 26
We make a variable called (led) to store the GPIO number which we connect the led on it, in our case we connect the led on GPIO26. (pin 37)
GPIO.setup(led, GPIO.OUT)
GPIO.output(led, GPIO.LOW)
In first line: we set the pin number (GPIO26) to output, it tells the RPi to make this pin an OUTPUT Pin that we will write a value on it (HIGH or LOW).
In Second Line: we tell the RPi to Write a Logical value (LOW) which means (0 VOLT) to the (GPIO26) which means that this led on the beggining of the program will be turned OFF.
while True:
Here we are making an infinite loop, that means the block of code in this while loop will be executed until we force stop the whole program.
while True:
    GPIO.output(led, GPIO.HIGH)
    print("the led is turning ON")
    time.sleep(1)
    GPIO.output(led, GPIO.LOW)
    print("the led is turning OFF")
    time.sleep(1)
NOTE: The spaces in the block of code is very importatnt without this spaces the script will not work, to make this space press (tap) button on every line of code under the while Loop, this means that these line belongs to the while loop to write another block doesn't belong to the while loop, easily remove this spaces, its python programming language rules.
In this block of code we tell the led to turn on (3.3 VOLT), then print on the screen "the led is turning ON" then delay 1 sec. then turn the led off, then print on the screen "the led in turning OFF", then delay 1 sec.
After we finish writing the code correctelly we need to close the nano editor, then run the python script:
- press CTNRL +x
- the editor will ask you if you want to save the changes press y
- then press enter
Then run the python script by writting
python3 ledBlinking.py
After running the program you will see that messages printing on the screen:
This block of code will repeat over and over (infinite), only to stop this program we need to press:
CNTRL + c
- Second Example (control Led from a Push Button)
We will work on the same directory on the same ledBlinking.py script, to make this example we need to write different code, we need take an input from a switch, and according to this input we will take an action (turn led ON or OFF), it's a very basic and easy example will teach you how to deal with input and outputs together.
In the previous code we will find small different changes.
button = 19
Here we define a new variable it's name (button) has a value 19, 19 is the GPIO number, we connecting the push button in the GPIO19.
GPIO.setup(button, GPIO.IN)
Here we set the button as INPUT because we want to know if someone press on the button or not, if the button is pressed we will take an input (1 or HIGH) if the button is not pressed we will take an input(0 or LOW) according to this input we can take an action (turn led ON or OFF).
buttonRead = GPIO.input(button)
print(buttonRead)
GPIO.output(led, buttonRead)
- first line: we make a new variable called (buttonread) to store the button reading value (pressed(1), not pressed(0)) if the button is pressed the buttonread Value Will be (1), if button is not pressed the buttonread Value will be (0).
- second line: we will print the value of the buttonread on the screen.
- third line: we will take the action according to the buttonRead Value, if the button is pressed the led will turn on, if button is not pressed the led will turn off.
That's it this few lines will do the work for us :)
Then you need to close the nano editor and run this script(like the previous example) to see the results.
At this point, you now know how to control the RPi GPIO with only Python, how to write outputs and how to take inputs, that's great, this step will ease a lot of things on us atpart two and three and four :)
Part Two (how to make a simple web page using HTML and CSS)HTML and CSS is very very simple languages, these two languages are used to make a front-end web pages.
HTML is the language for describing the structure of Web pages, like adding Headers, Paragraphs, Images, Links, Buttons,...
CSS is the language for describing the presentation of Web pages, including colors, layout, and fonts,.....
In this part we will learn how to use these two languages to make a very simple web page.
First example: we want to make a web page contains a header, links take the user to google web site and an Image. like this web page.
let's get our hands dirty, we will start by the HTML, making the structure of the webpage.
We will make a new folder in the /home/pi/Documents directory called (noNormies) or any other name you prefer :D
Go to the /home/pi/Documents Directory.
cd /home/pi/Documents
Then make a noNorimes folder.
mkdir noNormies
Then go to this (noNormies) folder.
cd noNormies
NOTE: the (noNormies) folder is the workspace for our project.
Then we will make a file using nano it's name index.html
nano index.html
Then we will write our code in this html script.
<html>
</html>
- The
<html>element is the root element of an HTML page
HTML tags are element names surrounded by angle brackets:
<tagName>content goes here..</tagName>
HTML tags normally come in pairs like <p> and </p>
- The first tag in a pair is the start tag, the second tag is the end tag
- The end tag is written like the start tag, but with a forward slash inserted before the tag name
The purpose of a web browser (Chrome, IE, Firefox, Safari) is to read HTML documents and display them.
The browser does not display the HTML tags, but uses them to determine how to display the document:
Note: Only the content inside the <body> section (the white area above) is displayed in a browser.
<title>My Awesome web page</title>
It's the title name which appears in the web browser tab:
<h1> </h1>
It means what written between the opening tag and the closing tag will be the header, there is h1, h2, h3, h4, h5, h6.
EXAMPLE:
<h1>Heading 1</h1>
<h2>Heading 2</h2>
<h3>Heading 3</h3>
<h4>Heading 4</h4>
<h5>Heading 5</h5>
<h6>Heading 6</h6>
<p> </p>
Between the two tags we write any paragraph we want to display on the browser.
<img src="path of the image" width="the width of the image" height="the height of the image"/>
The src, width, height, is called attributes, attributes provide additional information about HTML elements.
- All HTML elements can have attributes
- Attributes provide additional information about an element
- Attributes are always specified in the start tag
- Attributes usually come in name/value pairs like: name="value"
<a href="https://www.google.com.eg"> press here to go to google web site</a>
If we want to put a link we use this tag, and put the attributes like this, when we press on the (press here to go to the google web site) will take us to the Google web site.
Our web page with the HTML code only will be look like this:
The web page doesn't look good! we need to add some colors and organize it, to look more nicer, we will use CSS to make This, here is the CSS code:
We will make a new CSS file in the Same directory (/home/pi/Documents/noNormies/)
nano style.css
Then write this code:
After finishing the CSS code we need to save it, then add this CSS code to our HTML code.
We will open our HTML code again:
nano index.html
To add the CSS code in our HTML page we only need one line of code.
<link rel="stylesheet" href="/home/pi/Documents/noNormies/style.css"/>
Tada! Successfully added our CSS code to the HTML Page.
After adding the CSS code our Web Page Will looks good.
At this point you now know how to make a simple webpage, it's COOL! At the next Part we will Learn How to Use Flask webServer using Python. Let's Rock it!
For more details on how to learn HTML and CSS go to this LINK.
Third Part (RPi as a web server Using Flask and Python)First we need to install Flask On our Raspberry Pi.
What we will makeInstall the lightweight web framework Flask and set up a basic web server with different pages using Python, HTML, and CSS.
What we will learn- How to install software on your Raspberry Pi
- How to Make Python-powered web server
- How to build a basic web app with Flask and run it as a local website on your Raspberry Pi
- How routes are used to map URLs to web pages
- How to configure Flask and make your website accessible to other devices on your local network
First you’re going to install the Flask package. Make sure you are connected to the internet, either by Ethernet cable or WiFi before you start.
Start by opening a Terminal window from the taskbar or applications menu:
Now install Flask by typing:
sudo apt-get update
Wait until finishes the updating, then type:
sudo apt-get install python3-flask
After finishing downloading and installing flask framework, now we are able start the hard work.
What we want to do ?
We need to make the web page that we built, accessible to anyone has internet, anyone can access this web page from anywhere in the world. To do this we need to make a new folder inside the /home/pi/Documents directory called (myFirstApp)
Then we need to go the myFirstApp folder and make a new two subfolders ( templates) and (static):
The final folder "tree", will look like:
/myFirstApp
    /static
    /templates
Inside /home/pi/Documents/myFirstApp we need to make an app.py file using nano editor:
Now enter the following lines into the blank app.py window:
from flask import Flask
app = Flask(__name__)
@app.route('/')
def index():
    return 'Hello world'
if __name__ == '__main__':
    app.run(debug=True, host='0.0.0.0')
First we imported the Flaskclass, Next we create an instance of this class. We then use the route()decorator to tell Flask what URL should trigger our function(index( )), The function is given a name(index) which is also used to generate URLs for that particular function, and returns the message we want to display in the user’s browser..
NOTE: Note here the host='0.0.0.0' means the web app will be accessible to any device on the network.
Just save it as app.py or something similar. Make sure to not call your application flask.py because this would conflict with Flask itself.
Return to the Terminal window and enter python3 app.py to run the web server, If everything has been written correctly, you should see an output similar to this:
* Running on
* Restarting with reloader
Open the Pi’s web browser from the taskbar or application menu and navigate to http://127.0.0.1:5000/. You should see a white screen with the words Hello world:
Note:127.0.0.1means ‘home’ i.e. this computer, and:5000means ‘port 5000’, which is the port the web server is running on
@app.route('/')
def index():
    return 'Hello world'
This route is made up of three parts:
@app.route('/'): this determines the entry point; the/means the root of the website, so justhttp://127.0.0.1:5000/.
def index(): this is the name we give to the route. Here it was calledindexbecause it’s the index of the website.
return 'Hello world': this is the content of the web page, which is returned when the user browses the index of the website.
Create a new route by adding the following lines below the first route:
@app.route('/cakes')
def cakes():
    return 'Yummy cakes!'
Save your code and navigate to your website’s cake page in the browser at 127.0.0.1:5000/cakes. You should see a webpage with the text Yummy cakes! on it:
Next, we will modify your existing routes to return full HTML templates, rather than simple text strings.
Now we will go to the folder we created before (templates) at this directory
/home/pi/Documents/myFirstApp/templates
And create a new HTML file by typing:
nano index.html
This will open the empty nano editor, we will enter our HTML code:
<html>
<body>
<h1>Hello from a template!</h1>
</body>
</html>
Save the file as index.html in the templates directory. Return to your app.py file and modify the first line of your code to import the render_template function as well:
from flask import Flask, render_template
Finally, you’ll need to modify your index view to return the HTML template instead of the normal text. Change the index() function to this:
@app.route('/')
def index():
    return render_template('index.html')
- Flask will look for
index.htmlin a directory calledtemplates, in the same directory as theapp.pyfile.
- Save the file. Make sure your web app is still running. If you stopped it, just run
python3 app.pyfrom yourmyFirstAppdirectory.
- Reload the route in your web browser (go to the base route at
http://127.0.0.1:5000/) to see your new HTML template being displayed.
Cascading Style Sheets (CSS) are rules for how HTML content is displayed by the browser. Now you’ll add some CSS to add colour to your web page.
If you’re in the templates directory, go back up one level with cd ... now u should be at /home/pi/Documents/myFirstApp directory. Go to the static folder which we made before by typing:
cd static
Then make a new file called style.css using the nano editor by typing:
nano style.css
Add the following CSS rules to the file:
body {
    background: red;
    color: yellow;
}
Note: here we’ve used colour names: usually colours are defined by hex codes like #ff0000 (red) but this is a simple example.
Then exit and save this CSS file.
Now modify your HTML template called index.html to include the CSS file, by adding a <head> tag containing a <link> tag with a reference to the stylesheet:
<html>
<head>
<link rel="stylesheet" href='../static/style.css' />
</head>
<body>
<h1>Hello from a template!</h1>
</body>
</html>
Save the HTML file and reload the web server. You should see a colourful version of the web app!
We have so far created a number of files and directories. It is worth just double-checking your myFirstApp project directory.
├──
├── static
│   └──
└── templates
    └── index.html
So far you’ve learned to deliver HTML template through a web server running on your Raspberry Pi. Wouldn’t it be good if you could add some dynamic content to the pages to display different information? Large websites like Facebook, YouTube and BBC News show different content depending on the route you visit, even though the templates are very similar.
Now you’ll create a new route on your website so that when you go to http://127.0.0.1/hello/name, it will say “Hello name!” and replace ‘name’ with whatever you put there; so /hello/Paul/ will display “Hello Paul!”.
- Create a new route in your application like so:
@app.route('/hello/<name>')
def hello(name):
    return render_template('index.html', name=name)
@app.route('/hello/<name>')- the<name>part means it passes the name into thehellofunction as a variable calledname
def hello(name)- this is the function that determines what content is shown - this time it takes the given name as a parameter
return render_template('index.html', name=name)- here we look up the templateindex.htmland pass in the variablenamefrom the URL, so the template can use it
We will modify our index.html file to be like this:
<html>
<body>
<h1>Hello {{name}}</h1>
</body>
</html>
Save the files, reload the web server and visit http://127.0.0.1:5000/hello/paul. It should look like this:
Try It With Different names.
Browsing on other devicesTo browse this web page you need to know what is the IP address of the RPi.
It's something like 192.168.1.3. Open up a web browser on the other device and enter the Raspberry Pi’s IP address into the address bar with :5000 on the end e.g. http://192.168.1.3:5000/:
At this point you now know to use Flask and how to turn your RPi as a local Web Server, and how to render different contents using render_template function, it's a great job, let's dive into our last part and the most important part.
For more information on this part go to this Tutorial.
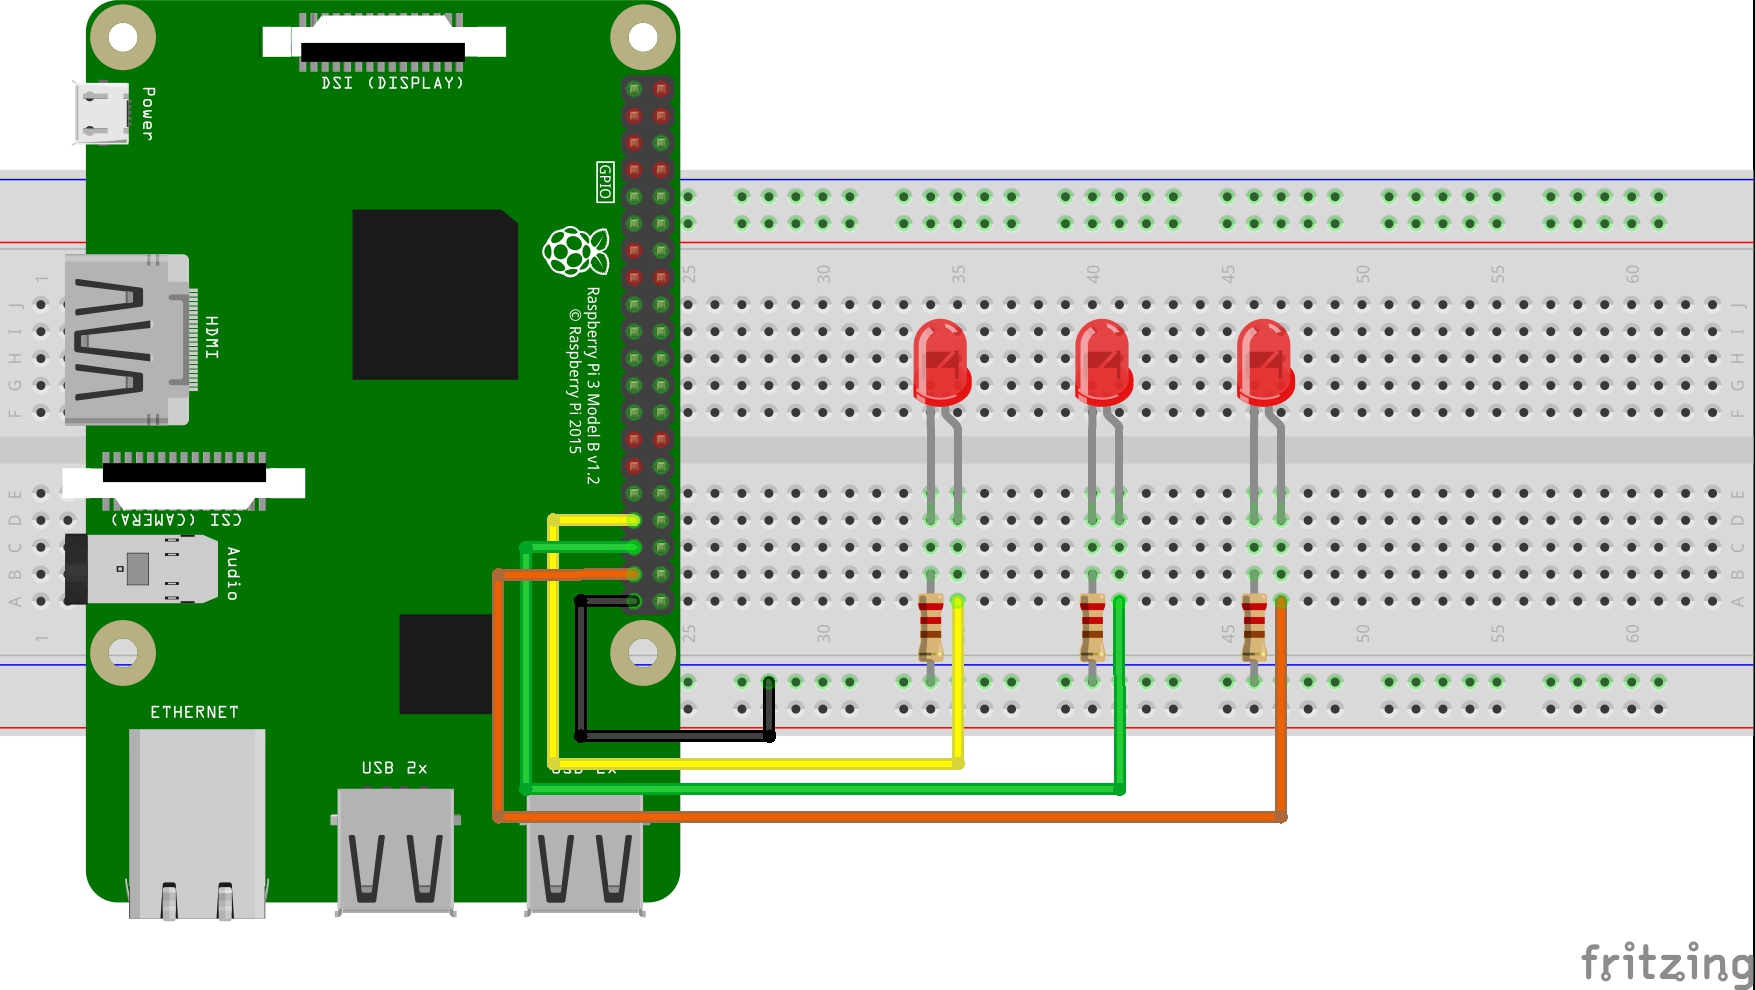
The Fourth Part (How to control RPi GPIO over the internet)What we want to do in this Part ?
We want to control the 3 of the RPi GPIO pins over the internet, by making this 3 pins as an outputs, when the user press on any button from the six buttons it changes the URL we will read the URL and according to it we will take the Action
The Python Script:
# Raspberry Pi 3 GPIO Pins Status And Control Using Flask Web Server and Python
import RPi.GPIO as GPIO
from flask import Flask, render_template, request
app = Flask(__name__)
GPIO.setmode(GPIO.BCM)
GPIO.setwarnings(False)
ledRed = 13
ledYellow= 19
ledGreen= 26
ledRedSts = 0
ledYellowSts = 0
ledGreenSts = 0
GPIO.setup(ledRed, GPIO.OUT)
GPIO.setup(ledYellow,GPIO.OUT)
GPIO.setup(ledGreen, GPIO.OUT)
GPIO.output(ledRed, GPIO.LOW)
GPIO.output(ledYellow, GPIO.LOW)
GPIO.output(ledGreen, GPIO.LOW)
@app.route('/')
def index():
    ledRedSts = GPIO.input(ledRed)
    ledYellowSts = GPIO.input(ledYellow)
    ledGreenSts = GPIO.input(ledGreen)
    templateData = { 'ledRed' : ledRedSts,
    'ledYellow' : ledYellowSts,
    'ledGreen' : ledGreenSts }
    return render_template('index.html', **templateData)
@app.route('/<deviceName>/<action>')
def do(deviceName, action):
    if deviceName == "ledRed":
        actuator = ledRed
    if deviceName == "ledYellow":
        actuator = ledYellow
    if deviceName == "ledGreen":
        actuator = ledGreen
    if action == "on":
        GPIO.output(actuator, GPIO.HIGH)
    if action == "off":
        GPIO.output(actuator, GPIO.LOW)
    ledRedSts = GPIO.input(ledRed)
    ledYellowSts = GPIO.input(ledYellow)
    ledGreenSts = GPIO.input(ledGreen)
    templateData = { 'ledRed' : ledRedSts,
    'ledYellow' : ledYellowSts,
    'ledGreen' : ledGreenSts }
    return render_template('index.html', **templateData )
if __name__ == "__main__":
    app.run(host = '0.0.0.0', debug=True)
The code is straight forward and very simple, according to the previous parts you are now able to read and understand well this code.
- For Example: when the user press on the Turn On Button it generates a URL (http://192.168.1.4:5000/ledRed/on)
- ledRed is the (deviceName)
- on is the (action)
- according to this URL we will take The Action turn on or off the leds
- after this we will check the status of the leds is it ON(1) or OFF(0) and write this status on the page.
The HTML Code:
<!DOCTYPE html>
<html>
<head>
<title> GPIO Control Web App</title>
<link rel="styleSheet" href="/static/style.css"/>
</head>
<body>
<img src="/static/dogMeme.jpg" width="300px" height="300px" alt="Because You Normie"/>
<h1>Actuators</h1><br>
<h2>Status</h2>
<h3> RED LED --> {{ledRed}}</h3>
<h3> YELLOW LED --> {{ledYellow}}</h3>
<h3> GREEN LED --> {{ledGreen}}</h3><br>
<h2>Led Control</h2>
<h3> RED LED CNTRL ==> <a href ="/ledRed/on" class="button">TURN ON</a> <a href="/ledRed/off" class = "button">TURN OFF</a></h3>
<h3> YELLOW LED CNTRL ==> <a href="/ledYellow/on" class="button">TURN ON</a> <a href="/ledYellow/off" class="button">TURN OFF</a></h3>
<h3> GREEN LED CNTRL ==> <a href="/ledGreen/on" class="button">TURN ON</a> <a href="/ledGreen/off" class="button">TURN OFF</a></h3>
</body>
</html>
The CSS Code:
body {
text-align: center;
background: #54ff9f;
color: #fff5ee;
}
.button{
font: bold 16px Arial;
background-color:#EEEEEE;
padding: 1px;
border: 1px solid #CCCCCC;
}
I wish this tutorial is useful and not boring. For any questions please don't hesitate to ask in the comments.
My Email: ahmedebrahemua@yahoo.com
If you reached this line say Wohoo! :D


Comments