


Hardware components | ||||||
 |
| × | 1 | |||
| × | 1 | ||||
 |
| × | 1 | |||
 |
| × | 1 | |||
 |
| × | 1 | |||
 |
| × | 1 | |||
| × | 1 | ||||
 |
| × | 4 | |||
Software apps and online services | ||||||
 |
| |||||
| ||||||
Why not extend the LED IoT tutorial to include more lights and blinking feature?!
This project is based on Windows 10 IoT Core installed on a Raspberry Pi 3 Model B+. Here is a great reference for the installation process by Jiong Shi.
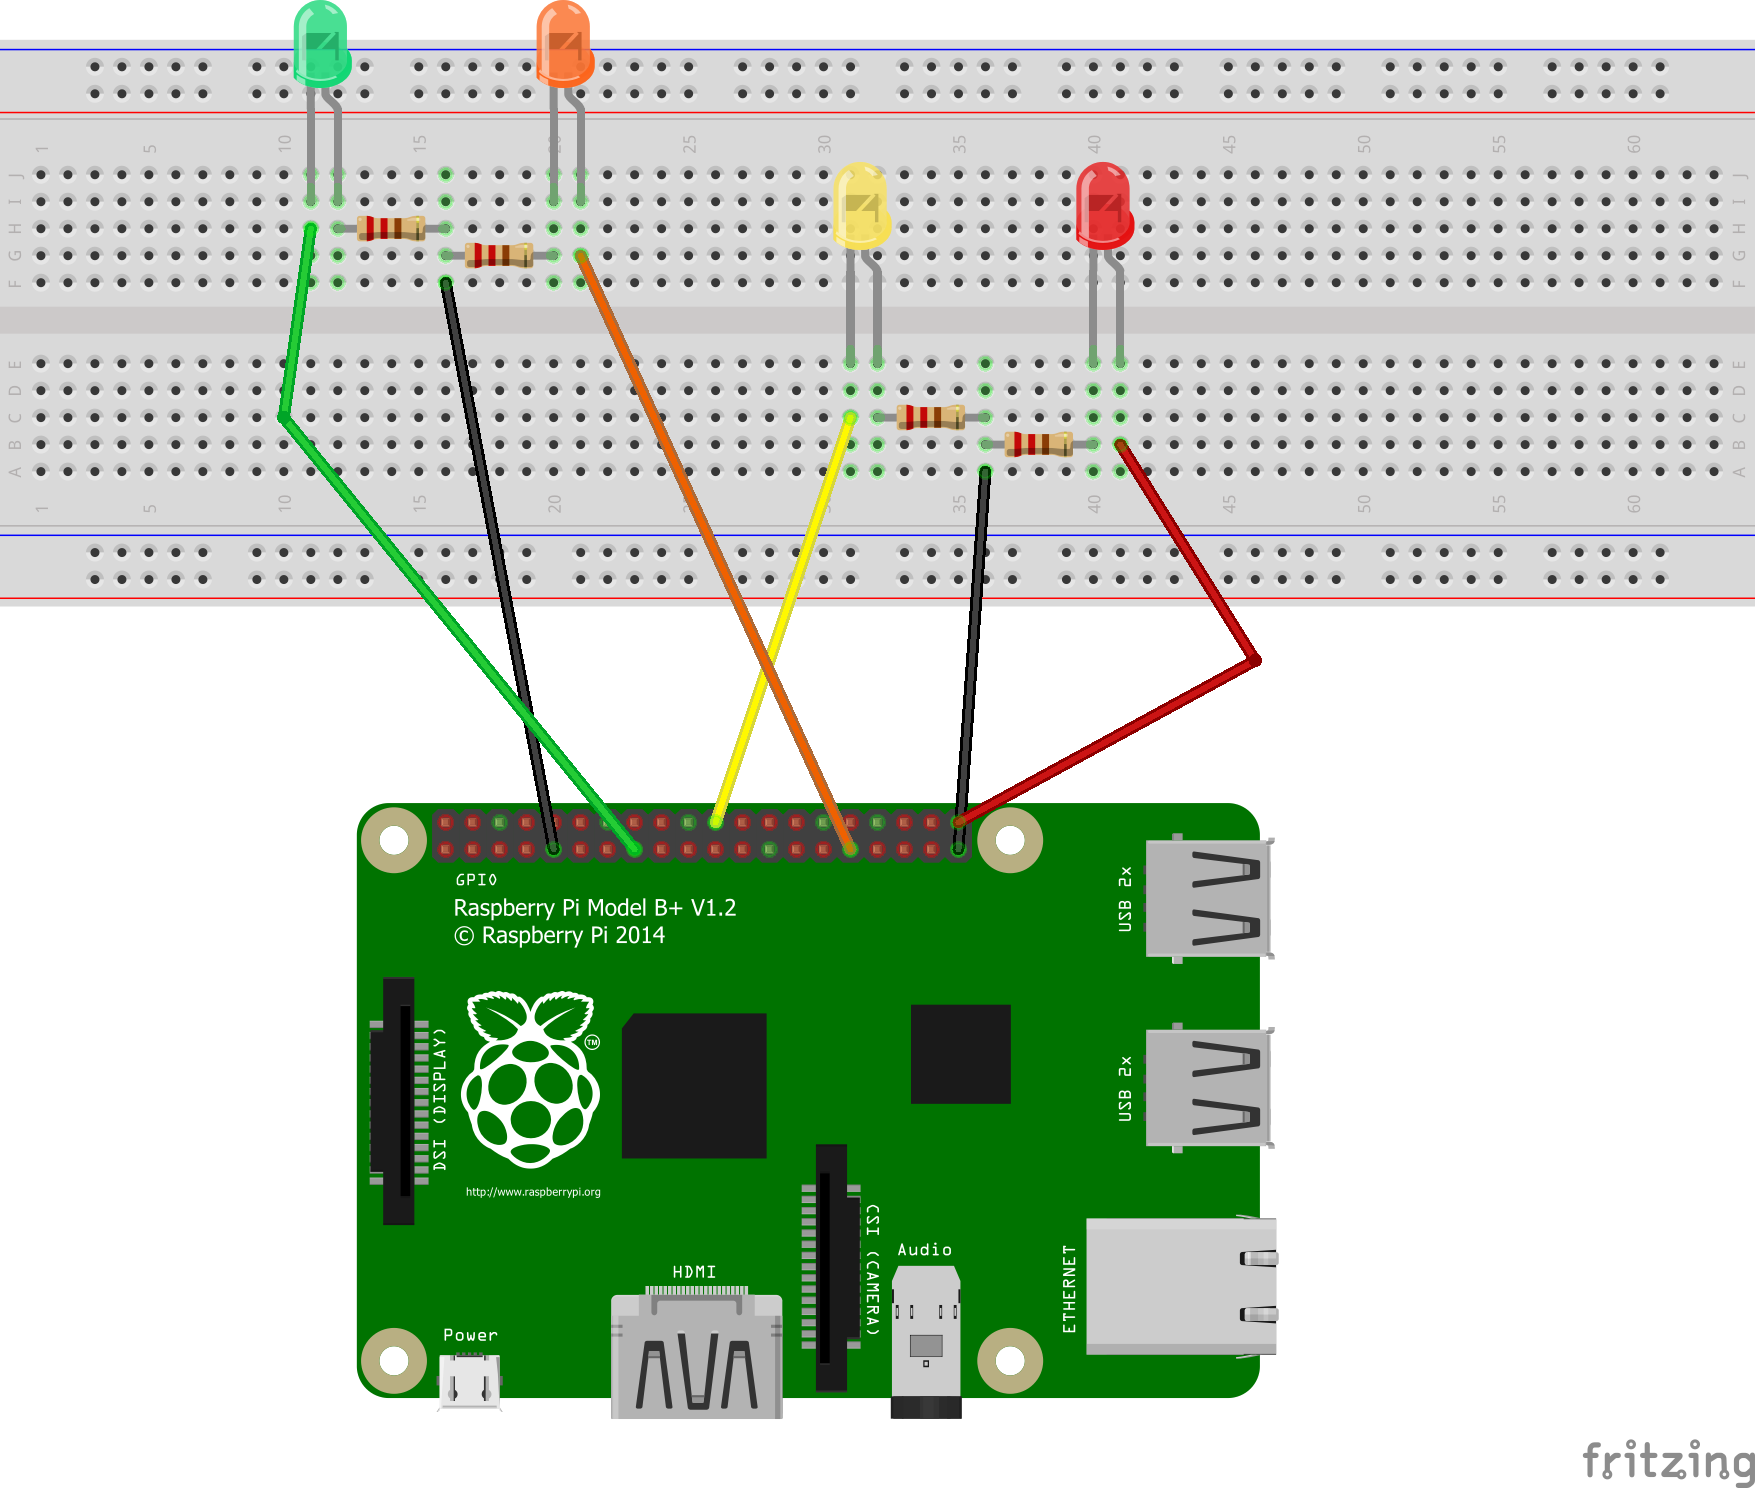
The colors I used in this projects are red, yellow, green, and orange, and it is up to you to change them or even use more or less colors.
Setting Up the Board- Orange: GPIO # 6
- Red: GPIO # 12
- Green: GPIO # 22
- Yellow: GPIO # 25
It is up to you also to change the pin numbers, but make sure they are reflected correctly in the UWP code.
Let the Coding Begin!Project Structure:
- MainPage.xaml: Contains the UI and code developed to run the application.
- Code.Constants: Constant values used across the application.
- GPIOController: Code to handle all GPIO board requests and initailazation.
Step 1: Creating the UWP Application
- Open Visual Studio 2017/2015
- Select Blank App (Universal Windows)
- Enter the project name "LightSelectorApp"
Step 2: Create an Empty Folder and name it "Code"
Step 3: Inside the Code folder, create two classes named Constants and GPIOController
Step 4: Open the Constants.cs file and create the following three structs.
namespace LightSelectorApp.Code
{
   public class Constants
   {
      /// <summary>
      /// Color code constants which is used in UI buttons
      /// </summary>
       public struct ColorConstants
       {
           public const string Red = "RED";
           public const string Orange = "ORANGE";
           public const string Green = "GREEN";
           public const string Yellow = "YELLOW";
           // Switch on all LEDs
           public const string AllOn = "ALLON";
           //Switch off all LEDs
           public const string AllOff = "ALLOFF";
       }
       /// <summary>
       /// GPIO pin number of each color
       /// change them based on your needs
       /// </summary>
       public struct ColorPinNumberConstants
       {
           public const int Red = 12;
           public const int Orange = 6;
           public const int Green = 22;
           public const int Yellow = 25;
       }
       /// <summary>
       /// GPIO pin value, High for on and Low of Off
       /// </summary>
       public struct LedLightStatusConstants
       {
           public const Windows.Devices.Gpio.GpioPinValue On =
               Windows.Devices.Gpio.GpioPinValue.High;
           public const Windows.Devices.Gpio.GpioPinValue Off =
               Windows.Devices.Gpio.GpioPinValue.Low;
       }
   }
}
Step 5: Open the GPIOController.cs file, which is used to send commands to the Pi board and implement the following code:
using System;
using Windows.Devices.Gpio;
using Windows.UI.Xaml;
namespace LightSelectorApp.Code
{
   public class GPIOController
   {
       // The general-purpose I/O (GPIO) pin for each color
       private GpioPin _redGpioPin, _greenGpioPin, _orangeGpioPin, _yellowGpioPin;
       // The default general-purpose I/O (GPIO) controller for the system.
       private GpioController _gpioController;
       // Provides a timer that is integrated into the Dispatcher queue
       // Used to blink the LED's if requested.
       private DispatcherTimer _blinkingTimer;
       // Requested Color from UI
       private string _requestedColor;
       // Led Current light Status
       private bool _ledStatus;

       public GPIOController()
       {
           // Initialize GPIO controller
           InitGPIO();
           // Initialize dispatcher timer
           _blinkingTimer = new DispatcherTimer();
           _blinkingTimer.Interval = TimeSpan.FromMilliseconds(200);
           _blinkingTimer.Tick += _blinkingTimer_Tick;
       }

       private void InitGPIO()
       {
           // Get the default GPIO controller
           _gpioController = GpioController.GetDefault();
           if (_gpioController == null)
           {
               throw new Exception("No Gpio Controller Found.");
           }
           else
           {
               #region Assign each color pin and set the drive mode to output
               _redGpioPin = _gpioController.OpenPin(Constants.ColorPinNumberConstants.Red);
               _redGpioPin.SetDriveMode(GpioPinDriveMode.Output);
               _greenGpioPin = _gpioController.OpenPin(Constants.ColorPinNumberConstants.Green);
               _greenGpioPin.SetDriveMode(GpioPinDriveMode.Output);
               _orangeGpioPin = _gpioController.OpenPin(Constants.ColorPinNumberConstants.Orange);
               _orangeGpioPin.SetDriveMode(GpioPinDriveMode.Output);
               _yellowGpioPin = _gpioController.OpenPin(Constants.ColorPinNumberConstants.Yellow);
               _yellowGpioPin.SetDriveMode(GpioPinDriveMode.Output);
               #endregion
           }
       }
       /// <summary>
       /// Invoked by UI to switch on / of requested color LED
       /// </summary>
       /// <param name="requestedColor">Requested color to be switched on</param>
       /// <param name="isBlinking">LED blinks if true </param>
       public void HandleLightRequest(string requestedColor, bool isBlinking)
       {
           // Switch of all LEDs
           SwitchOffAllLights();
           // Start or Stop dispatch timer based on isBlinking value
           if (isBlinking)
               _blinkingTimer.Start();
           else
               _blinkingTimer.Stop();
           _requestedColor = requestedColor;
           // Switch on requested color
           SwitchOnLight();
       }
       // Switch on the requested color
       private void SwitchOnLight()
       {
           switch (_requestedColor)
           {
               case Code.Constants.ColorConstants.Orange:
                   _orangeGpioPin.Write(Constants.LedLightStatusConstants.On);
                   break;
               case Code.Constants.ColorConstants.Yellow:
                   _yellowGpioPin.Write(Constants.LedLightStatusConstants.On);
                   break;
               case Code.Constants.ColorConstants.Red:
                   _redGpioPin.Write(Constants.LedLightStatusConstants.On);
                   break;
               case Code.Constants.ColorConstants.Green:
                   _greenGpioPin.Write(Constants.LedLightStatusConstants.On);
                   break;
               case Code.Constants.ColorConstants.AllOn:
                   SwitchOnAllLights();
                   break;
           }
       }
       // Switch off all color LED by setting the GpioPinValue to low
       private void SwitchOffAllLights()
       {
           #region Switch off All Colors
           _redGpioPin.Write(Constants.LedLightStatusConstants.Off);
           _yellowGpioPin.Write(Constants.LedLightStatusConstants.Off);
           _orangeGpioPin.Write(Constants.LedLightStatusConstants.Off);
           _greenGpioPin.Write(Constants.LedLightStatusConstants.Off);
           #endregion
       }
       // Switch on all color LED by setting the GpioPinValue to high
       private void SwitchOnAllLights()
       {
           #region Switch on All Colors
           _redGpioPin.Write(Constants.LedLightStatusConstants.On);
           _yellowGpioPin.Write(Constants.LedLightStatusConstants.On);
           _orangeGpioPin.Write(Constants.LedLightStatusConstants.On);
           _greenGpioPin.Write(Constants.LedLightStatusConstants.On);
           #endregion
       }
       // Handle blinking dispatcher timer tick event
       private void _blinkingTimer_Tick(object sender, object e)
       {
           // if _ledStatus is true then all lights will switch on, else they switch off
           if (_ledStatus)
               SwitchOnLight();
           else
               SwitchOffAllLights();
           // invert _ledStatus
           _ledStatus = !_ledStatus;
       }
   }
}
Now after we completed the "Code" folder classes, let's move on to the UI part.
This project has a UI which will be implemented shortly.
Step 6: Open MainPage.xaml page and implement the following XAML design:
<Page
   x:Class="LightSelectorApp.MainPage"
   xmlns="http://schemas.microsoft.com/winfx/2006/xaml/presentation"
   xmlns:x="http://schemas.microsoft.com/winfx/2006/xaml"
   xmlns:local="using:LightSelectorApp"
   xmlns:d="http://schemas.microsoft.com/expression/blend/2008"
   xmlns:mc="http://schemas.openxmlformats.org/markup-compatibility/2006"
   mc:Ignorable="d"
   Background="{ThemeResource ApplicationPageBackgroundThemeBrush}">
   <Grid>
       <StackPanel Orientation="Vertical"
                       HorizontalAlignment="Center"
                       VerticalAlignment="Center">
           <StackPanel Orientation="Horizontal">
               <CheckBox x:Name="chkBlink"
                         Content="Blink"
                         Checked="handleBlinkChange"
                         Unchecked="handleBlinkChange"
                         HorizontalAlignment="Left"
                         VerticalAlignment="Center"
                         Margin="0,0,0,0"
                         Width="68"/>
            </StackPanel>
           <Grid>
               <Grid.RowDefinitions>
                   <RowDefinition />
                   <RowDefinition Height="10"/>
                   <RowDefinition/>
                   <RowDefinition Height="10"/>
                   <RowDefinition/>
                   <RowDefinition Height="10"/>
                   <RowDefinition/>
               </Grid.RowDefinitions>
               <StackPanel Orientation="Horizontal">
                   <Button Content="Red" CommandParameter="RED" Width="100" Click="handleColorRequest"/>
                   <Button Content="Yellow" CommandParameter="YELLOW" Width="100" Margin="10,0,0,0" Click="handleColorRequest"/>
               </StackPanel>
               <StackPanel Orientation="Horizontal"
                           Grid.Row="2">
                   <Button Content="Green" CommandParameter="GREEN" Width="100" Margin="0,0,0,0" Click="handleColorRequest"/>
                   <Button Content="Orange" CommandParameter="ORANGE" Width="100" Margin="10,0,0,0" Click="handleColorRequest"/>
               </StackPanel>
               <StackPanel Orientation="Horizontal"
                           Grid.Row="4">
                   <Button Content="All On" CommandParameter="ALLON" Width="100" Margin="0,0,0,0" Click="handleColorRequest"/>
                   <Button Content="All Off" CommandParameter="ALLOFF" Width="100" Margin="10,0,0,0" Click="handleColorRequest"/>
               </StackPanel>
               <TextBlock Grid.Row="6"
                          HorizontalAlignment="Center"
                          VerticalAlignment="Center"
                          x:Name="lblColor"/>
           </Grid>
       </StackPanel >
   </Grid>
</Page>
The final UI should look like this one:
Step 7: Open MainPage.xaml.cs file and let's implement the UI code:
using Windows.UI.Xaml;
using Windows.UI.Xaml.Controls;
namespace LightSelectorApp
{
   public sealed partial class MainPage : Page
   {
       // GPIOController class refrence
       Code.GPIOController _gpioController;
       private string _requestedColor;
       public MainPage()
       {
           this.InitializeComponent();
           // Instantiate the GPIOController object
           _gpioController = new Code.GPIOController();
           //Start with all LEDs switched off
           _requestedColor = Code.Constants.ColorConstants.AllOff;
           InvokeLEDLight();
       }
       private void handleColorRequest(object sender, RoutedEventArgs e)
       {
           // Get requested color code
           _requestedColor =
               (sender as Button).CommandParameter.ToString();
           InvokeLEDLight();
       }
       private void handleBlinkChange(object sender, RoutedEventArgs e)
       {
           InvokeLEDLight();
       }
       private void InvokeLEDLight()
       {
           if (_requestedColor == Code.Constants.ColorConstants.AllOn)
               lblColor.Text = "You switched on all colors.";
           else if (_requestedColor == Code.Constants.ColorConstants.AllOff)
           {
               chkBlink.IsChecked = false;
               lblColor.Text = "You switched off all colors.";
           }
           else
               lblColor.Text =
                   string.Format("You swtiched on {0} color.",
                   _requestedColor.ToString().ToLower());
           _gpioController.HandleLightRequest(_requestedColor,
                                              chkBlink.IsChecked.Value);
       }
   }
}
Step 8: So, what about deploying the app to your Pi device?
Now you are done. Simply run the project and wait until the application is deployed... and hope it works!


Comments