

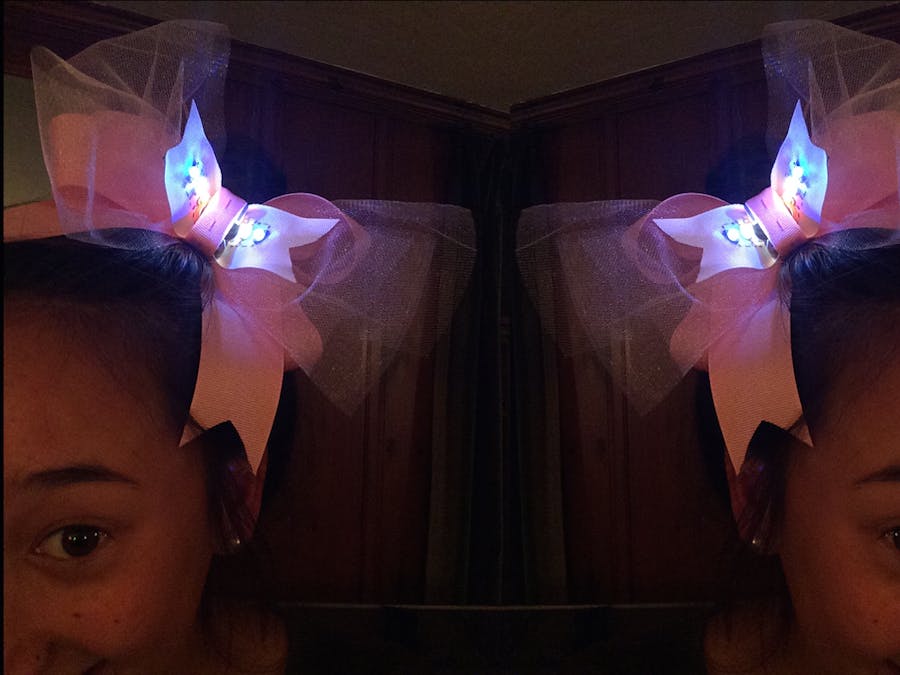
Sewable projects with sparkling lights powered by coin batteries and conductive threads are really beautiful and a great way to learn about circuitry. The problem with sewable projects, though, is that you need to sometimes wash them. This project creates a detachable, modular sewable decoration that can be attached to any part of your outfit, like a belt, wristlet, choker, or collar, making it very versatile. My daughter loves ribbon hair bows, so I created a big, fancy pink bow that lights up beautifully. The images don't do it justice, it looks phenomenal from a distance as the LEDs are really bright.
You need (to make this hair bow):
- sharp scissors
- 3 inch piece white grosgrain ribbon
- matches or lighter to seal the ribbon ends
- 6 LED sequins (Adafruit has good ones)
- conductive thread (also from Adafruit)
- hot glue gun
- fine needle
- clear nail polish
- regular sewing thread in matching color for your ribbon
- 1.5 yard colored ribbon of your choice
- 1 yard tulle ribbon (optional but pretty)
- coin battery
- snaps
- sewable coin battery holder (Adafruit as well)
Things we'll learn: ThingLearn Essential - what is a circuit?
Step 1: Draw your circuit
Before we start, it's good to draw out the circuit you are going to create. This is a parallel circuit, which means we are going to line up our sequins almost like a ladder, and one conductive thread will travel from one side of the battery up through the negative ends of the sequins, and another conductive thread (a.k.a. a 'trace') will go up the other side. The LEDs will complete the circuit, and it's cool to watch them light up as you sew.
Step 2: Prepare the ribbon and get ready to sew!
Cut the ends of the ribbon and seal the ends with a match or lighter, done quickly so as not to singe the ribbon. Place the coin battery in the holder and put it in the middle of the ribbon. Cut about 2 feet from the conductive thread and tie an overhand knot at the end. Starting from the back, wrap the thread around the pins of the battery holder, or sew through the loops of the sewable battery holder, depending on the type of battery holder you have (the sewable ones with the loop is a lot easier to handle).
Step 3: Start sewing!
Following your circuit pattern, use a running stitch to sew three sequins in a row from the negative end of the battery holder to each negative end of the LED sequin, indicated by a tiny '-' sign. It takes a steady hand to hold everything in place, but be patient. Tie off the end of the conductive thread at the end of the last LED, with the thread ending on the back. Cut the thread short and seal it with a drop of clear nail polish or fray check.
Step 4: Complete the circuit
Starting at the battery holder's other end, secure the thread to the positive end of the battery holder and stitch the positive ends of the LEDs down, tying off again on the back at the last LED and sealing the thread in the back. It should look nice and neat on both sides.
Step 5: Cover the battery holder
The battery isn't very pretty, so we are going to cover it with a ribbon that will also have snaps so that you can remove this lightable module. Cut a 4-inch piece of the colored ribbon and sew it in to a narrow tube (or use narrow ribbon). Seal the ends with heat, and sew snaps onto its ends so it will close in a loop shape. Stitch the ribbon to one side of the white base ribbon. The new ribbon will cross over and snap around so that you can attach it to a belt or the hair bow we'll create next.
Step 6: Create the hair bow
Now you can get creative. I learned how to create a 'boutique hair bow' by following a bunch of YouTube videos, like this one. Create a big bow out of the colored grosgrain ribbon. Seal the ends as usual and attach a tulle pouf to the top. Use the hot glue to add a hair tie to the back so it can be worn. Now all you have to do is attach the LED module to the top and snap it around the bow. You will look utterly fabulous!


Comments