

Hardware components | ||||||
_ztBMuBhMHo.jpg?auto=compress%2Cformat&w=48&h=48&fit=fill&bg=ffffff) |
| × | 1 | |||
 |
| × | 1 | |||
 |
| × | 1 | |||
 |
| × | 1 | |||
 |
| × | 1 | |||
 |
| × | 1 | |||
 |
| × | 1 | |||
Software apps and online services | ||||||
 |
| |||||
Hand tools and fabrication machines | ||||||
| ||||||
| ||||||
Connect me on Youtube
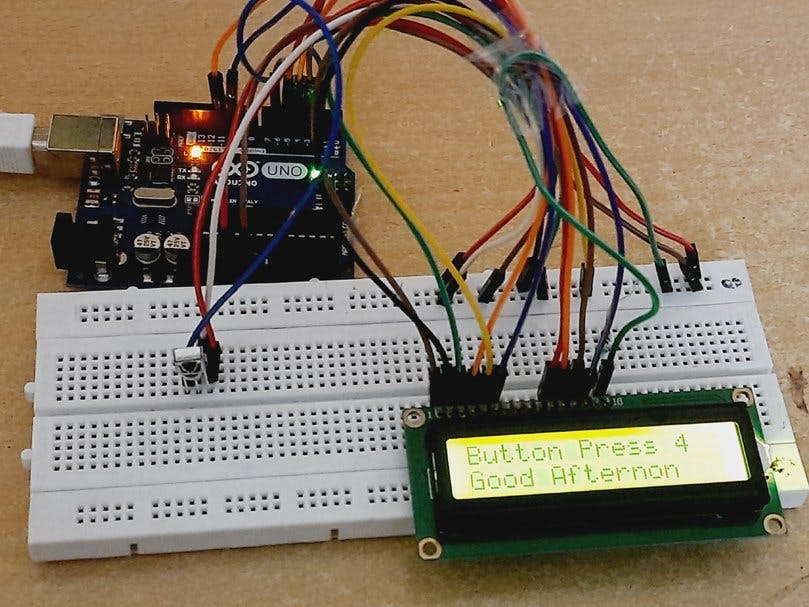
IntroductionIn this project I will show you how to Decode IR Remote Control Signals' of any Remote using Arduino and Display Code on LCD.
You can assign different-different remote button and show different-different character on LCD
The remotes which we use in our home are basically made of IR transmissions for example TV remote, DVD remote, Sound System remote etc. But these signals never interfere with each other because every key in the remote control has unique operation code in Hexadecimal format. By decoding these signals we can know what is the unique code of the key. By knowing the codes we can implement several applications where we can control with same remote.
Working On BasicsIR remote has a button and a microcontroller with IR LED attached. When a button is pressed, a microcontroller identified the button and sends the corresponding modulated signals (codes) to the IR LED. Then, the IR LED sends it to the IR receiver in the appliance.
System in the appliance demodulate the signals(codes) and the checks the function corresponding to it and executes it. Each function has a different code.
Every IR operated appliance has different codes for different function.
UsageThere are Multiple use of the Project:-
- You can display IR Remote signal and Decode and display it on LCD if it is not assigned in the Program
- When you press serval button you can show any character on LCD using different button's.
- You can also run multiple function by assigning in Program.
Follow the Steps:-
Connection of TSOP1738
- Connect the First pin from the left of TSOP1738 (OUT pin) with pin 6 of Arduino.
- Hook the Middle pin (GND pin) with the GND pin of Arduino.
- Connect the third and the last pin (VCC pin) with 5V pin of Arduino.
Connection of LCD
- Connect the First pin from the left of LCD (GND pin) with GNDpin of Arduino.
- Connect the Second pin from the left of LCD (VCC pin) with VCCpin of Arduino.
- Connect the Third pin from the left of LCD (V0 pin) with GNDpin of Arduino.
- Connect the Fourth pin from the left of LCD (RS pin) with 11pin of Arduino.
- Connect the Fifth pin from the left of LCD (R/W pin) with GNDpin of Arduino.
- Connect the Sixth pin from the left of LCD (E pin) with 10pin of Arduino.
- Connect the Eleventh pin from the left of LCD (D4 pin) with 5pin of Arduino.
- Connect the Twelveth pin from the left of LCD (D5 pin) with 4pin of Arduino.
- Connect the Thirteen pin from the left of LCD (D6 pin) with 3pin of Arduino.
- Connect the Fourteenth pin from the left of LCD (D7 pin) with 2pin of Arduino.
- Connect the Fifteenth pin from the left of LCD (5V pin) with 1 K Resistor with 2pin of Arduino.
- Connect the Last pin from the left of LCD (GND pin) with GND pin of Arduino.
Remember to install the IRremote.h library from Here and LiquidCrystal.h library from Here
- Copy or download the code attached with the project.
- Hit upload and look into LCD.
- Take any remote you want to use or you want the codes off it and press any button.
- Now, see in the LCD. You will see a code of the corresponding button you pressed.
- You can also assign function to display on LCD using Remote.
- Note the codes on a paper or copy them in a document file on PC
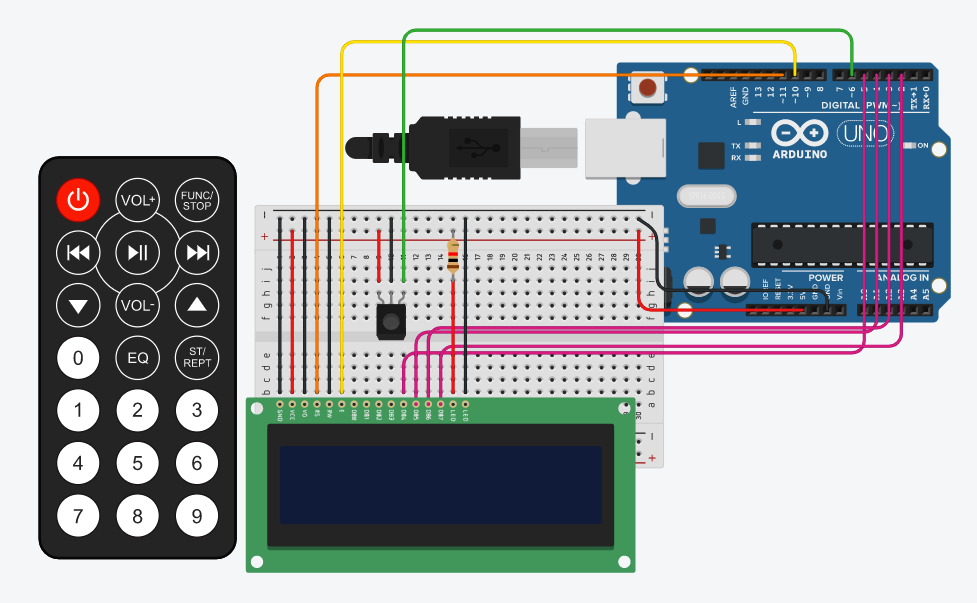
Circuit Diagram
Connect the First pin from the left of TSOP1738 (OUT pin) with pin 6 of Arduino.
Hook the Middle pin (GND pin) with the GND pin of Arduino.
Connect the third and the last pin (VCC pin) with 5V pin of Arduino.
Connection of LCD
Connect the First pin from the left of LCD (GND pin) with GND pin of Arduino.
Connect the Second pin from the left of LCD (VCC pin) with VCC pin of Arduino.
Connect the Third pin from the left of LCD (V0 pin) with GND pin of Arduino.
Connect the Fourth pin from the left of LCD (RS pin) with 11 pin of Arduino.
Connect the Fifth pin from the left of LCD (R/W pin) with GND pin of Arduino.
Connect the Sixth pin from the left of LCD (E pin) with 10 pin of Arduino.
Connect the Eleventh pin from the left of LCD (D4 pin) with 5 pin of Arduino.
Connect the Twelveth pin from the left of LCD (D5 pin) with 4 pin of Arduino.
Connect the Thirteen pin from the left of LCD (D6 pin) with 3 pin of Arduino.
Connect the Fourteenth pin from the left of LCD (D7 pin) with 2 pin of Arduino.
Connect the Fifteenth pin from the left of LCD (5V pin) with 1 K Resistor with 2 pin of Arduino.
Connect the Last pin from the left of LCD (GND pin) with GND pin of Arduino.


Comments