
Hardware components | ||||||
 |
| × | 1 | |||
 |
| × | 1 | |||
 |
| × | 1 | |||
 |
| × | 1 | |||
Software apps and online services | ||||||
| ||||||
 |
| |||||
| ||||||
| ||||||
1. Note your Bolt IOT Device API key and BOLT Device ID
2. Hardware Setup
3. Creating Applets in IFTTT (If This Then That)
Each step is further explained in detail.
PROCEDUREYou must have the necessary components and software installed, a stable internet connection for atleast 30 mins. And an account on the bolt cloud.
STEP 1- Obtaining Bolt IOT Device API key and BOLT Device ID
Make sure your Bolt module is connected to the wifi. This can be done by reading the light indicators on the wifi module. If the blue light (indicating Wifi) and green light (indication cloud) are on and stable then you are good to go. Otherwise, set up your bolt wifi module.- Sign-in to your bolt cloud account
- Note down the Device ID, mentioned on the homepage.
- On the left panel click on API and copy this unique API key and paste it on word/notepad/sticky notes.
Know more about the bolt IOT Wifi Module.
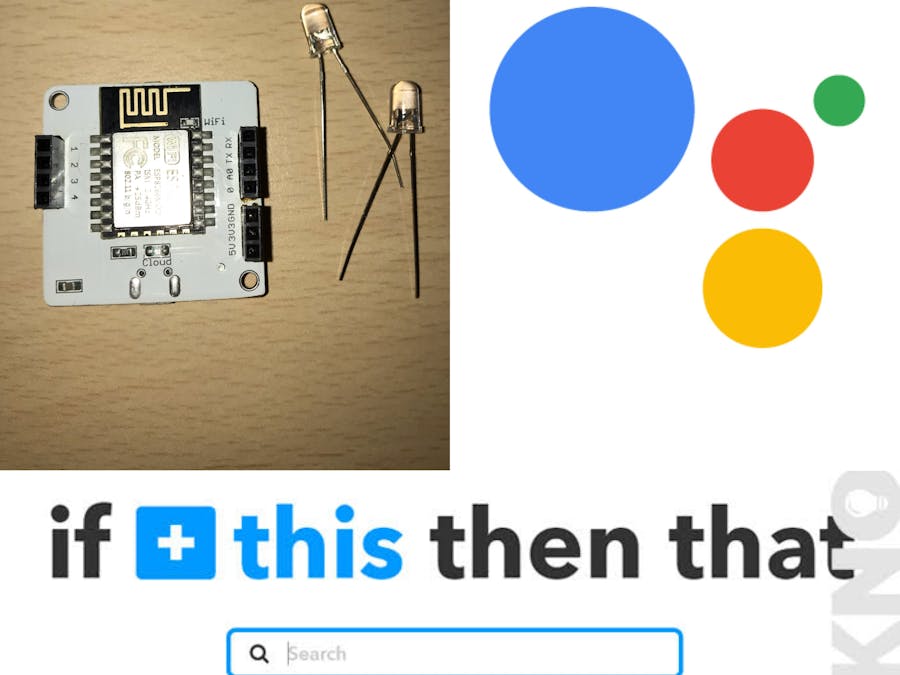
STEP 2- Hardware Setup
I have used two leds instead of one, to use multiple commands on them. Once you understand the working, you can perform it with as many GPIO (General Purpose Input Output) pins, your module contains. Normally the wifi module contains 5 GPIO pins. (0, 1, 2, 3, 4). This means that you can have a maximum on 5 leds connected.
WHAT ARE GPIO Pins?
As the name itself suggests, these are the pins where you can attach your input & output devices. Eg. Input Device- Sensor, LDR, etc ; Output Device- LED, Buzzer, etc
This experiment can be performed without the use of male-female wires, I have used them to for better connectivity.
Here is a picture of the setup.
Pins Used - GND, 0, 4
LED 1 : +ve to 0 & -ve to GND
LED 2: +ve to 4 & -ve to GND
Step 3- Creating Applets in IFTTT (If This Then That)
IFTTT is a freeware web-based service that gives you the facility to connect a trigger/action (in our case: Voice Over) to web services (Bolt IOT Module)This is done by creating a chain of If then conditional statements called Applets.Know more about IFTTT
So as to understand the concept:IF (this) : will be our voice over (eg. Saying "Turn on the lights" on Google Assistant)THAT: The LED light turning on, on the Wifi module.
STEPS- Visit the IFTTT site - IFTTT.com
- Click on "Continue with google" to Sign-in to IFTTT website (You should use the same google account that you will be using for you Google Assistant)
- Click on the '+This' keyword to create and service and search Google Assistant (the services are arranged alphabetically)
This is the most crucial step, where you use your API_KEY and Device ID. The action of turning the light on depends on the URL.
The URL mentioned looks like this: https://cloud.boltiot.com/remote/0be93a6f-60a9-4199-b593-2a7b374b3/digitalWrite?pin=0&state=HIGH&deviceName=BOLT3848344
The Basic Syntax of this URL is:
https://cloud.boltiot.com/remote/API-KEY/digitalWrite?pin=0/1/2/3/4&state=HIGH/LOW&deviceName=BOLT-DEVICE-IDThe URL is case sensitive.
API-KEY & DEVICE ID- Noted in Step 1Pin=0/1/2/3/4 - GPIO Pins on the module on which you have connected your LED(+ve)State- HIGH- light on ; LOW-light off digitalWrite- command to write digital value (HIGH or LOW)
The URL for turning the light off is the same except for state - LOW
Uptil now, we have seen how to connect one led to GPIO 0. And its states HIGH and LOW using digital write.
Similarly, we can create applets for any GPIO pin.
We used the command "digitalWrite" to write on the LED the states we wanted.What if we want to decrease the intensity/brightness of the LED. This can be done using the "analogWrite" command.
URL for changing the intensity of LED1:
https://cloud.boltiot.com/remote/API-KEY/analogWrite?pin=1&value=100&deviceName=BOLT-DEVICE-ID
You can also have two LEDs turning on and off together by using digitalMultiWrite" command
URL for the same is:
To read more about : DigitalWriteAnalogWrite
Thus, various combinations of LEDs can be used by creating multiple applets
Here is a list of applets I created:
You can edit or disconnect your applets here
RESULTCases which I tried are:1. Turn on/off both LEDs simultaneously.
2. Dim LED1
3. Turn ON/OFF individually
Voice Controlling Lighting System created successfully using Bolt IOT Wifi Module


Comments