

Hardware components | ||||||
 |
| × | 1 | |||
 |
| × | 1 | |||
Software apps and online services | ||||||
 |
| |||||
 |
| |||||
In this tutorial, we'll show you how to trigger an event with the Texas Instruments LaunchPad & the IFTTT Maker Channel.
We will trigger an event using a push-button that is available on the LaunchPad kit. However, an IFTTT channel can be triggered from various inputs, such as temperature sensors, accelerometers & more.
Here's a quick video of it all in action!
Hardware
In this tutorial, we are using the MSP-EXP432P401R LaunchPad and CC3100 Wi-Fi BoosterPack from Texas Instruments. However, almost any LaunchPad can be used for this demo when paired with the WiFi BoosterPack. In addition, the CC3200 Wi-Fi LaunchPad can also be used!
In this tutorial, we're simply using the on-board button of the MSP432 LaunchPad to trigger the event in the IFTTT Maker Channel, so no additional hardware is required!
Setting up your IFTTT Maker Channel
Now that our hardware is ready to go, let's go to IFTTT to configure our Maker Channel!
- First, go to www.ifttt.com
- Next, create an account, or sign in to an existing one if you already have one.
- Click on the "channels" tab & search for "Maker". Once you find it, click on the icon!
Now, we can configure our IFTTT Maker Channel!
- Click on the big "Connect" button
- This will give us a alphanumeric "key" - NOTE: We'll need this when we start writing our code for our LaunchPad.
- If you click on the key, it will show you the format for the appropriate HTTP GET/POST request for triggering an event. We will use Energia to interact using this RESTful interface!
- Note that you can also send up to 3 values by sending a key:value pair in JSON format in the body of your POST request.
- Here's what you should see when you click on they key:
Notice that within the RESTful API, there is an opportunity for us to name a unique "event". In the code below, we'll be able to select an event name, which we can trigger against.
Let's build our recipe!
- Click on the "My Recipes" tab at the top of the page
- Click on the "Create a Recipe" button
- Click on "this" & search for the Maker Channel, then select it.
- Click on "Receive a web request"
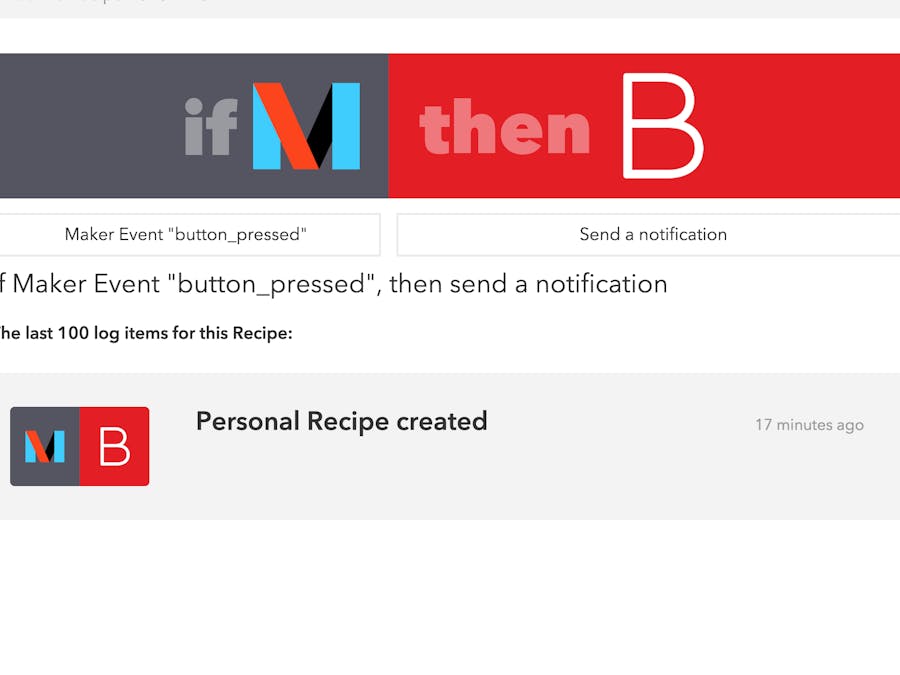
- IFTTT will then ask for an "Event Name". Let's use "button_pressed", then click "Create Trigger"
- Next, click on "that"
- At this point, you can select your desired "action" when the button of the LaunchPad is pressed. For this tutorial, we are using an app called Boxcar 2, which is a simple app for enabling Push notifications on an iOS or Android device. They offer a free tier for up to 100 free push notifications per month, with a paid option for more.
- Install the Boxcar 2 app! You will need to download & install the Boxcar 2 app on your phone. Once installed & a BoxCar app has been created, click on "Settings" within the Boxcar app.
- Get your Boxcar 2 access token! You will see an "Access token". You will need this to configure the Boxcar 2 channel in IFTTT!
- Since we'll need to enter the Boxcar Access Token into IFTTT, copy & paste it, or email it to yourself. This way you can simply copy & paste it into IFTTT at a later step!
- Back to IFTTT... Select Boxcar 2 as your recipe's "Action" & click "Connect"
- A pop up should appear asking for your Boxcar Access Token. This is what we got in step 3. Go ahead and enter your Boxcar Access Token in the field & click "Authorize". Click on "Done"
- Now that the Boxcar channel has been setup in IFTTT, we can select the desired "Action". Select "Send a notification"
- We can keep everything default for now! A fun parameter to change is the "Alert sound" which allows you to select the noise your phone makes when this action is triggered!
- Once an "Alert Sound" is selected, go ahead & click "Create Action"
- Give your new "Recipe" a name, then click on "Create Recipe"!
- At this point, your Recipe is ready to go & is simply waiting for your LaunchPad to trigger the event!!!
Software
Now that our hardware & IFTTT recipe is all set up, let's switch our attention to software. We will be using a tool called Energia to program our LaunchPad. If you are familiar with Arduino or Wiring, Energia will be immediately familiar to you. Energia is an open source project that is a fork of the Arduino IDE, which means a lot of the same libraries & code examples will work on the TI LaunchPad when using Energia.
You can learn more about Energia at www.energia.nu
The complete code example is available below in the code section. In Energia, be sure to select the correct LaunchPad you are using by selecting the appropriate board in Tools > Board > [Select Board name]
I am using the "LaunchPad w/msp432 EMT". You'll also want to select the appropriate Serial Port by going to Tools > Serial Port > [Select COM port].
Now, go ahead & copy & paste the code below into your Energia window!
NOTE there are a few modifications required in the code!
- Change the SSID & Password to the appropriate Wi-Fi credentials of your network
- Change the IFTTT_KEY to your key
- Change the IFTTT_EVENT to your desired event name. In this tutorial, we called it "button_pressed"
- OPTIONAL: You can change the values in the "PostData" String, which will be the body of our HTTP Post. This allows our LaunchPad to send additional data to the IFTTT cloud. In this tutorial, we'll see these values appear within the Boxcar notification!
That's it! Go ahead & program your LaunchPad & click on PUSH2 of your LaunchPad (typically the button on the bottom-right corner of your LaunchPad).


Comments