
Hardware components | ||||||
| × | 1 | ||||
 |
| × | 1 | |||
 |
| × | 1 | |||
Software apps and online services | ||||||
| ||||||
| ||||||
Ever heard of MQTT? It's the über-lightweight messaging protocol that was invented at IBM in the '90s and, in the last few years, has taken the IoT world by storm. (For a deeper dive into the what/how/why of MQTT, check out this post I wrote to go along with this project). To learn about MQTT and its different open source implementations, I decided to do a quick knock-off of one of MQTT's most famous applications - Facebook Messenger!
The BasicsMQTT is what's called a pub/sub communication protocol, meaning that devices can either publish or subscribe to a topic (or both! and don't worry, we'll cover topics in a second). The devices doing the publishing and subscribing are called clients in MQTT-speak - those are what we'll be working with first. Collecting and distributing messages between the clients is the broker. To start, we'll use a public broker to handle all that, so that we can just focus on the clients. Eventually, we'll implement our own broker!
First things first, what are we trying to make here? We want a simple chat client that'll run in the terminal and support both one-on-one and group chats. Luckily, the pub/sub protocol is perfect for those needs (which is one of many reasons why FB Messenger uses MQTT). We'll accomplish this by using MQTT topics to our advantage.
To choose what chat we're sending messages to, we'll change the publish topic; for an individual chat, I could publish to "/chat/adam", while for the group chat at work I could publish to "/chat/andium". To choose what chats we're receiving messages from, we change our subscribe topics; for my chat with Brian, I would subscribe to "/chat/brian", and for the group chat I would subscribe to "/chat/andium". MQTT topics are structured in trees and work with wildcard values; if we wanted to listen to every channel on the "/chat/" tree all at once (a little creepy, I know), we could subscribe to "/chat/#".
Getting Started with PahoLuckily for us, MQTT has been implemented in a bunch of different programming languages under Eclipse's open-source Paho project. I'm most comfortable with Python, but you could pick your language of choice! (Note: I'm using Python 3 here, so a few things will change if you're using Python 2. One annoying one to debug is input() vs raw_input() - watch out!)
We want to create an MQTT client that will allow us to publish and subscribe to channels that we choose. As with any project in Python, our first step is going to be importing the libraries we'll need.
import paho.mqtt.client as mqtt
import time
Next, we want to define the MQTT callback functions. These functions are run when the MQTT broker sends information to the client or confirms that it has received information the client sent it! Luckily, they're named in a pretty straightforward way in the Paho libraries.
def on_connect(client, userdata, flags, rc):
   print("Connected - rc:", rc)
def on_message(client, userdata, message):
   if str(message.topic) != pubtop:
       print(str(message.topic), str(message.payload.decode("utf-8")))
def on_subscribe(client, userdata, mid, granted_qos):
   print("Subscribed:", str(mid), str(granted_qos))
def on_unsubscribe(client, userdata, mid):
   print("Unsubscribed:", str(mid))
def on_disconnect(client, userdata, rc):
   if rc != 0:
       print("Unexpected disconnection.")
The on_connect
callback function is run when our client connects to the MQTT broker; when it does so, this function will show us the returned result (rc) or the connection attempt - a successful connection has rc=0
. on_disconnect
is similar; if the client disconnects from the broker with any returned result other than 0, which would indicate a purposeful and successful disconnection, we'll get a message. The functions for subscribing and unsubscribing are borrowed directly from Paho's documentation. on_message
might be a bit confusing; why do we compare the message topic to pubtop? You'll see later on that pubtop is the topic to which we're publishing. This if-statement prevents the client from printing messages that it has sent, in case it's subscribed to a topic (say "/chat/#") that would include them. (Note: Make sure you decode your message payload! Different clients might encode the text in different ways, so watch out.)
To connect to the broker, we're going to need a port and an address. We'll be using the publicly accessible sandbox server at iot.eclipse.org to start, which we'll access on port 1883.
broker_address = "iot.eclipse.org"
port = 1883
And with that, we'll create our MQTT client, set the callback functions we defined, and connect it up!
client = mqtt.Client()
client.on_subscribe = on_subscribe
client.on_unsubscribe = on_unsubscribe
client.on_connect = on_connect
client.on_message = on_message
time.sleep(1) # Sleep for a beat to ensure things occur in order
client.connect(broker_address, port)
This gets our client connected to the broker. Now we want to set up a loop where the client will listen to the topics it's subscribed to and, given input, publish to it's publish topics! We'll need to set up the MQTT client loop, then subscribe to our topics, then start the actual Python loop - the order is important here!
pubtop = '/chat/adam'
subtop = '/chat/brian'
client.loop_start()
client.subscribe(subtop)
# Chat loop
while True:
   chat = input()
   if chat == 'QUIT':
       break
   else:
       client.publish(pubtop, chat)
# Disconnect and stop the loop!
client.disconnect()
client.loop_stop()
For the chat loop that we've set up, we wait for user input in the terminal, which we publish to pubtop
once the user presses enter. The on_message
callback we wrote earlier handles all incoming messages for us! We also gave ourselves a way to end the chat session and break out of the while loop. It's important to cleanly disconnect from the MQTT broker, so we have the disconnect()
and loop_stop()
commands there at the end.
And that would do it! Another user could run the same program, changing only pubtop
and subtop
, and we could chat! If you're following along, this is a good place to test things out. I'm a fan of over-engineering though, so next we'll be...
What if we want to choose what topics to publish and subscribe to? What if we want to change them in a chat session? What if we want to subscribe to multiple topics? Luckily, that's all easy with Paho. Letting the user interactively set their topics is as simple as changing the declarations of pubtop
and subtop
to this:
pubtop = input('Publish topic: ')
subtop = input('Subscribe topic: ')
And by adding a few conditions to the while-loop, we can add subscribing, unsubscribing, and changing publish topic functionalities with only a couple lines of code:
# Updated chat loop
while True:
   chat = input()
   if chat == 'QUIT':
       break
   elif chat == 'SUBSCRIBE':
       new_subtop = input('Subscribe to topic: ')
       client.subscribe(new_subtop)
   elif chat == 'UNSUBSCRIBE':
       unsubtop = input('Unsubscribe from topic: ')
       client.unsubscribe(unsubtop)
   elif chat == 'PUBLISH':
       pubtop = input('Publish to new topic: ')
   else:
       client.publish(pubtop, chat)
Awesome! Now we can interactively subscribe to topics (or more importantly, unsubscribe from really active topics when we want a break from messages!)
Creating Your Own BrokerSo far, things are all well and good... but you probably don't want to be messaging any private or embarrassing information across a publicly accessible server, right? How about we make our own? With a Raspberry Pi and Mosquitto, it's easy to set up a private MQTT broker.
We'll assume you've already got your Pi set up with WiFi connection (if not, a quick Google search will get you where you need to go). The next step is to give the Pi a static IP address, rather than a dynamic one that is chosen whenever the Pi connects to your router. We need a static IP address so that our MQTT clients can always connect to the Pi without having to check the Pi's current dynamic IP address. For a step-by-step tutorial on setting a static IP address, check this out.
Next up, we want to download Mosquitto and create our own local MQTT broker on the Pi. Many other people have created pretty helpful guides for this, so I'll link you to a few; explore and look at different ones until you feel comfortable that you've got Mosquitto set up! (To start, look at Mosquitto's official site and remember to download for Raspbian Jessie - then move on to other guides like this and this). My mosquitto.conf
configuration file is below, for reference!
connection_messages true
log_dest stderr
log_dest topic
log_type error
log_type warning
log_type notice
log_type information
log_type all
log_type debug
log_timestamp true
persistence true
persistence_file mosquitto.db
retained_persistence true
# Plain MQTT protocol configuration
listener 1883 <your static ip here>
log_type error
log_type warning
log_type notice
log_type information
# end plain config
allow_anonymous false
password_file /etc/mosquitto/pwfile
I added username/password authentication using mosquitto_passwd
for some added security and disallowed anonymous users. For more security, you could configure TLS following one of the many guides online!
For our Paho-based chat client to work with this new local broker, we only have to change a few lines of Python. First, instead of a public MQTT broker like the one at iot.eclipse.org, the broker address will be your static IP address:
broker_address = <your static IP address>
You'll also need to add in username/password functionality with a few input functions and a Paho function, like so:
user = input('Username: ')
pw = input('Password: ')
client.username_pw_set(user, pw)
client.connect(broker_address, port)
And there we have it! A fully functional MQTT chat client hosted on a local MQTT broker running on Raspberry Pi!
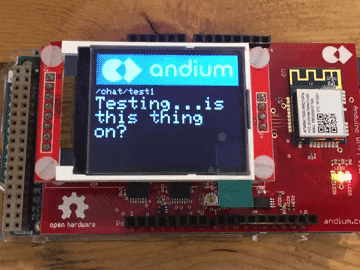
Bonus: Arduino Message DisplayDid you think we'd leave it there? With a bunch of Arduinos and AnduinoWiFi shields laying around the office, we had to include an Arduino component to this project! Rather than walk through the code step-by-step, we've included it in this project - look through it and figure out what's going on! If you want a more detailed walk-through of connecting things up and using the AnduinoWiFi shield, check out our Anduino Speaks Adafruit project!
If you have any questions or comments, bring 'em on! Happy hacking :)


Comments