

Hardware components | ||||||
 |
| × | 1 | |||
| × | 1 | ||||
| × | 1 | ||||
| × | 1 | ||||
| × | 1 | ||||
| × | 1 | ||||
Hand tools and fabrication machines | ||||||
 |
| |||||
| ||||||
| ||||||
***** This project is WIP *****
*****NEW*****
With the acquisition of a PiZero today, the project will now focus around using that. It's more or less the same spec as the A+ but half the size and with double the RAM (YAY!) There are a few extra things to think about now, mainly that the Zero has no native audio out, so I'll have to either pull it off the GPIO, or use an HDMI audio spitter.
About
The GameMamePiBoy is inspired by the Adafruit PiGrrl project which has a printable Gameboy style case which holds a raspberry pi model b (the original) and uses a very nice 320x240 TFT screen. this was the project that I wanted to do when I first discovered the Southampton maker/hackerspace So Make It. However when it came time to start getting the required parts, I decided to make the parts work in an actual O.G. gameboy case, just like the one I had as a kid, playing endless rounds of tetris and Super Mario Land on.
Case Parts
Not wanting to desecrate a perfectly good working gameboy, I went on the hunt for a broken gameboy to act as a donor, and as luck would have it, a member of one of the retro buy and sell groups on facebook was selling 2 broken units, so thinking I'd be able to salvage at least one good one and use the other as basis for this conversion, I snapped them up.
Unfortunately, the screens in both are toast and the only way to repair a screen is from another unit as there are no more screens available, which means the second may be a candidate for GameMamePiBoy 2 ;)
Screen
So one of the annoyances of the RPi B is that the USB ports hang over the side of the board by a fair amount. The B is already the perfect size for fitting into a gameboy but for these ports. The B+ and B 2 are better candidates, but it's still a tight fit, so given that with this project I'd only want to play games up to the level of SNES, a RPi A+ seems a perfect candidate as it gives me more freedom to align the Pi.
In order for the PiTFT to fit in, a lot of internal screw posts have to be removed and some internal easing with a dremel. the view port aperture also needs opening up to get it to be visible as the 2.8" screen is a bit bigger than the original.
It became apparent that all but two of the screen area screw posts would have to be cut down and a custom mount for the screen made up. This was done in tinkercad and 3D printed at So Make It, taking 6 print attempts so far to get the model just right. Print 1 was done on So Make It's PLA Cerberus delta printer but the printer isn't currently printing dimensionally accurately, though the print finish was very good. So Make It also has a Lulzbot TAZ which has just been upgraded with an E3D hot end. The second attempt was made on the TAZ but this highlighted errors in the model. After a couple more iterations, the final model has produced a print which fits perfectly. To make everything fit now, the header pins will need to be de-soldered from both the Pi and the TFT.
The GPIO pins on the TFT and Pi were de-soldered* along with the USB socket, HDMI socket and Display/Camera ribbon connectors.
*well... de-soldered is a bit optimistic, partly de-soldered, partly ripped off with some pads coming off at the same time. These connectors won't be going back on, so no great loss...
Now that the Pi and PiTFT are stripped of all superfluous componentry, the test fitting can begin.
Control Panel
For the control panel, the original PCB was going to be used, to keep the screw and locating pin holes intact and just wire up points from that PCB to the GPIO pins to connect the buttons. The lower section was cut off and some PCB traces exposed and tinned to solder on wires to GPIO pins. since I plan on having 4 main buttons on the front (a la SNES,) and that the existing PCB traces are ultra fine, I've decided to fab an all new PCB instead, which will give me better control over the placement of the 2 extra buttons and landing zones, rather than the previous plan of cutting a segment of an existing repro SNES controller PCB and grafting it onto the original PCB.
TODO:
- design/make new control panel PCB to fit in place of old one.
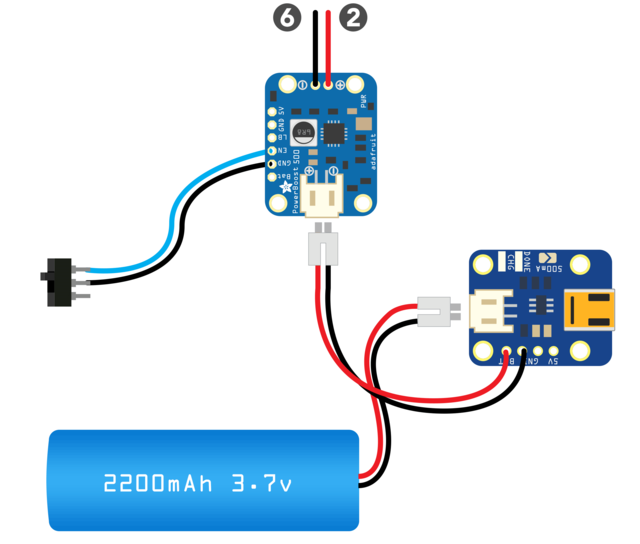
- Sound
- USB port stealthing
- Hooking it all up
- Filling/spraying the case


Comments