

_dBZY2R9o7O.png?auto=compress%2Cformat&w=900&h=675&fit=min)
Hardware components | ||||||
 |
| × | 1 | |||
| × | 1 | ||||
| × | 1 | ||||
 |
| × | 1 | |||
 |
| × | 1 | |||
 |
| × | 1 | |||
Software apps and online services | ||||||
 |
| |||||
| ||||||
Ever wondered how cool it could be, if you could design your own weather station. Well stop thinking and start getting your hand dirty, because this tutorial covers all about it.
We'll be designing our own weather station using the Adafruit's BMP180 pressure and temperature sensor interfaced through the I2C protocol in the ESP8266 NodeMCU board. In addition to that we'll be using a LDR to get data's for ambient light interfaced through the analog pins of the nodemcu board.
To make things more exciting we'll be using the thingsai.io online platform to build it as an IoT project and use it for visualizing the data over the cloud services, with real time stamps.
Hardware Pictures:NodeMCU is a LUA-based interactive firmware for Espressif ESP8622 Wi-Fi SoC, as well as an open source hardware board that contrary to the $3 ESP8266 Wi-Fi modules includes a CP2102 TTL to USB chip for programming and debugging, is breadboard-friendly, and can simply be powered via its micro USB port.
Power: 5V via micro USB port
The pinout for the esp8266 nodemcu board is displayed below:
Link to download the Adafruit's library to setup the bmp_180 Sensor :
https://learn.adafruit.com/bmp085/using-the-bmp085
Here's a video to help you understand what I2C protocol basically is:
Here's a video to understand how an LDR works:
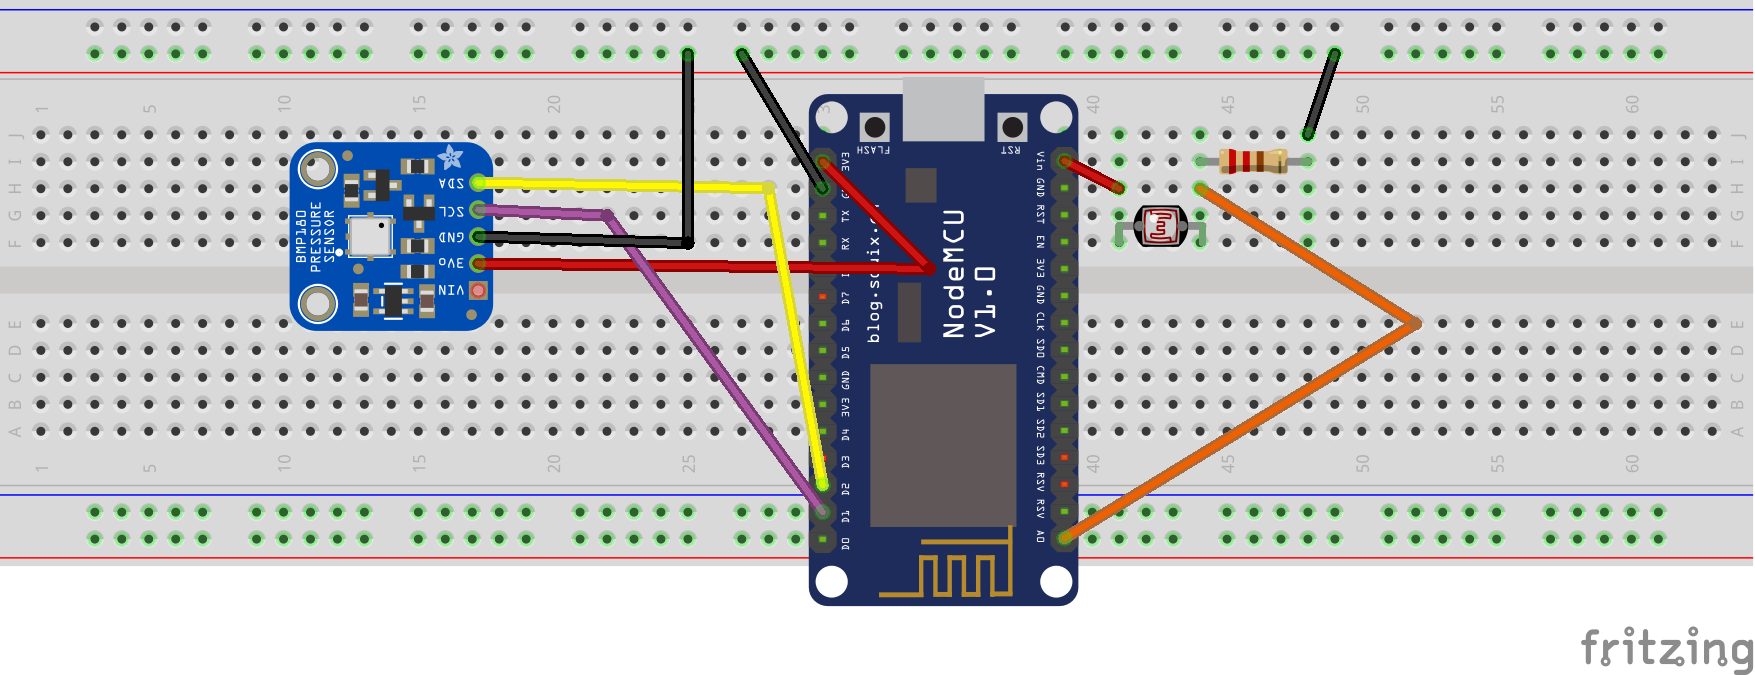
How to ConnectESP8266 pins---------------------------------------------> bmp180 pins
3.3 V ---------------------------------------------------------> Vin
Gnd------------------------------------------------------------->Gnd
D1----------------------------------------------------------------->SCL
D2----------------------------------------------------------------->SDA
Follow the video tutorial to help you setting up the IoT cloud for real time data visualization:
Comments