


Hardware components | ||||||
 |
| × | 1 | |||
 |
| × | 1 | |||
 |
| × | 1 | |||
 |
| × | 1 | |||
 |
| × | 1 | |||
Software apps and online services | ||||||
 |
| |||||
About: Hello, the author of the project is an Application Engineer of Seeed Studio. It's great to share this project with the Hackster maker community. I hope you like Seeed Studio, a hardware enabler for IoT applications, which provides services that enable IoT developers to quickly prototype... More information about Seeed Studio »
Life needs something beautiful, and I wanted to create something beautiful ~
Here share my latest project, a programmable solar noctilucent forest.
This monitor stand featured with:
- Use Grove - Joint inside, so you can program it by Arduino IDE.
- Use laser cutter to machined acrylic and mooden.
- Can use both solar power and USB power.
- Automatic photosensitive, just light on the led in dark.
- Rich layering of the deep forest, very beautiful! Even without lights~~
Add TipAsk QuestionCommentDownload
Step 1: What Do We NeedElectronic modules
- Grove - Joint
- Lipo Rider v1.3
- Grove - light sensor(P)
- Battery 1050mAh 3.7V
- 3W Solar Panel 138X160
- WS2812B RGB LED Strip
- Grove Cable
- Micro USB Cable - 2pcs
Other:
- 3mm Acrylic
- 3mm Mooden
- M3* 5 Nylon rivet
If you can't find a laser cutter, you can make a wooden version or, try the Laser Cutter Service supply by Seeed.
Add TipAsk QuestionCommentDownload
Step 2: Laser Cut the Acrylic and MoodenDownload the file and laser cut it.
Here's we use 3mm acrylic and 3mm wooden.
Step 3: Solar Panel AssemblyFixed back plane by double-sided adhesive.(Image 1)
Add the double-sided adhesive in frame, then fixed the solar panel.(Image 2\3)
Please note pass through the solar panel cable into the hole.(Image 4)
Add TipAsk QuestionCommentDownload
Step 4: LEDs AssemblyRewelding the LED strip as 5 groups, each group have 5 LEDs.(Image1)
Fixed the LED into wooden with nylon rivet.(Image 2/3)
Add TipAsk QuestionCommentDownload
Step 5: Box Assenmbly2 More Images
Fixed the wooden, do not forget put one Micro USB Cable into the small rectangular hole. (Image 1)
Fixed the Acrylic panels. (Image 2)
Fixed the wooden. (Image 3/4)
Fixed the forest, please note the order before and after. Now don't put it in the box. (Image 5)
Add TipAsk QuestionCommentDownload
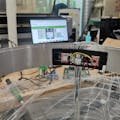
Step 6: Hardware Connection, Software Works and Test3 More Images
For now, connect Grove - joint and PC with Micro USB Cable, connect Grove - joint and Grove - Light sensor(p) at input interface, connect Grove - joint and LED strip at output interface.
Download the code.
Unzip the file you had downloaded just now, you will get a folder named Light box.
Open your Arduino IDE, click File > Preferences > Sketchbook Location, browse to the folder we had mentioned above - ArduinoDesk-master. Then click OK to save it.
Close and re-open Arduino IDE, click File > Sketchbook > demo, then the main code of the desk is open.
Choose the right board(Arduino Pro or Por Mini 3.3v 8MHz) and port to upload the code.
All the steps please refer to the image above.
Then you can see when the light sensor feel the light, the LED strip will turn off, if the you give light sensor a dark, you will see the LED light on.
Now, you need reconnect the hardware, connect the battery and solar panel into Lipo Rider, please note the interface, Solar panel -> Solar interface, Lipo battery -> battery interface. then connect Lipo Rider and USB power with one Micro USB Cable, connect Lipo Rider and Grove - joint with other Micro USB Cable.
Step 7: Put the Forest Into the BoxPut the forest we just did into the box, Done~
Now you can put it somewhere have sun shine, then ignore it during the day, but night it will give you beautiful light~
Thank you~~
Comments