*This project is featured in DFRobot's blog. Please refer their blog here.
*This project is nominated in Postscapes IoT Awards under category Best IoT DIY Project.
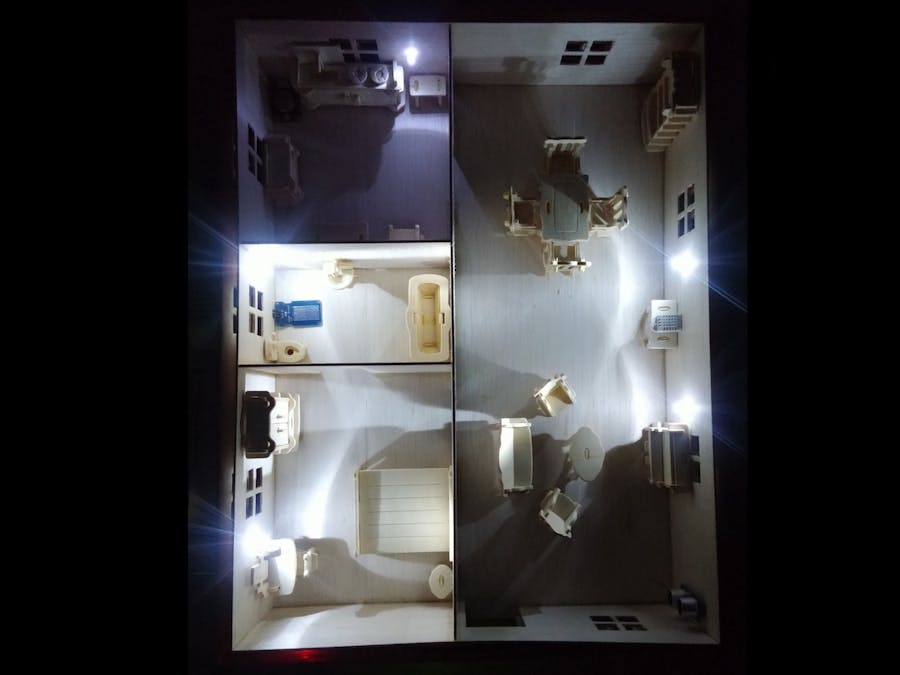
IoT Home Security Model can be remotely accessed by using any smart device and PC to monitor the security status within the house through the data collected from sensors through the Internet.
Promo VideoWhen security mode is turned on, any recognized harmful activities that occurred within the house will be detected through installed sensors and automatically forward the alert message to the homeowner through the internet. The data from sensors will constantly be stored in the cloud storage and interact with the custom web-based application that enables it to display the data in a website, and this allows the homeowner to have an advantage to monitor any potential harmful activity that might occur within the house in real-time. Another additional feature of security in this project is Access Control Technology, this system uses the (NFC) "Near Field Communication" approach to provide access to the recognized individuals (guests or family members) with the rights to enter the house.
Full Demonstration VideoOriginThis project originally titled "Android WiFi and Web Based Application for Home Security System" and is my final year project submission during my last year of engineering in University. At that time, this project is still full of bugs and not as real-time as it should be ( data-latency could more than 2 seconds! ).
Now I took some of my free time to refurbish this project and make it much closer to real-time, and the result is quite satisfying.
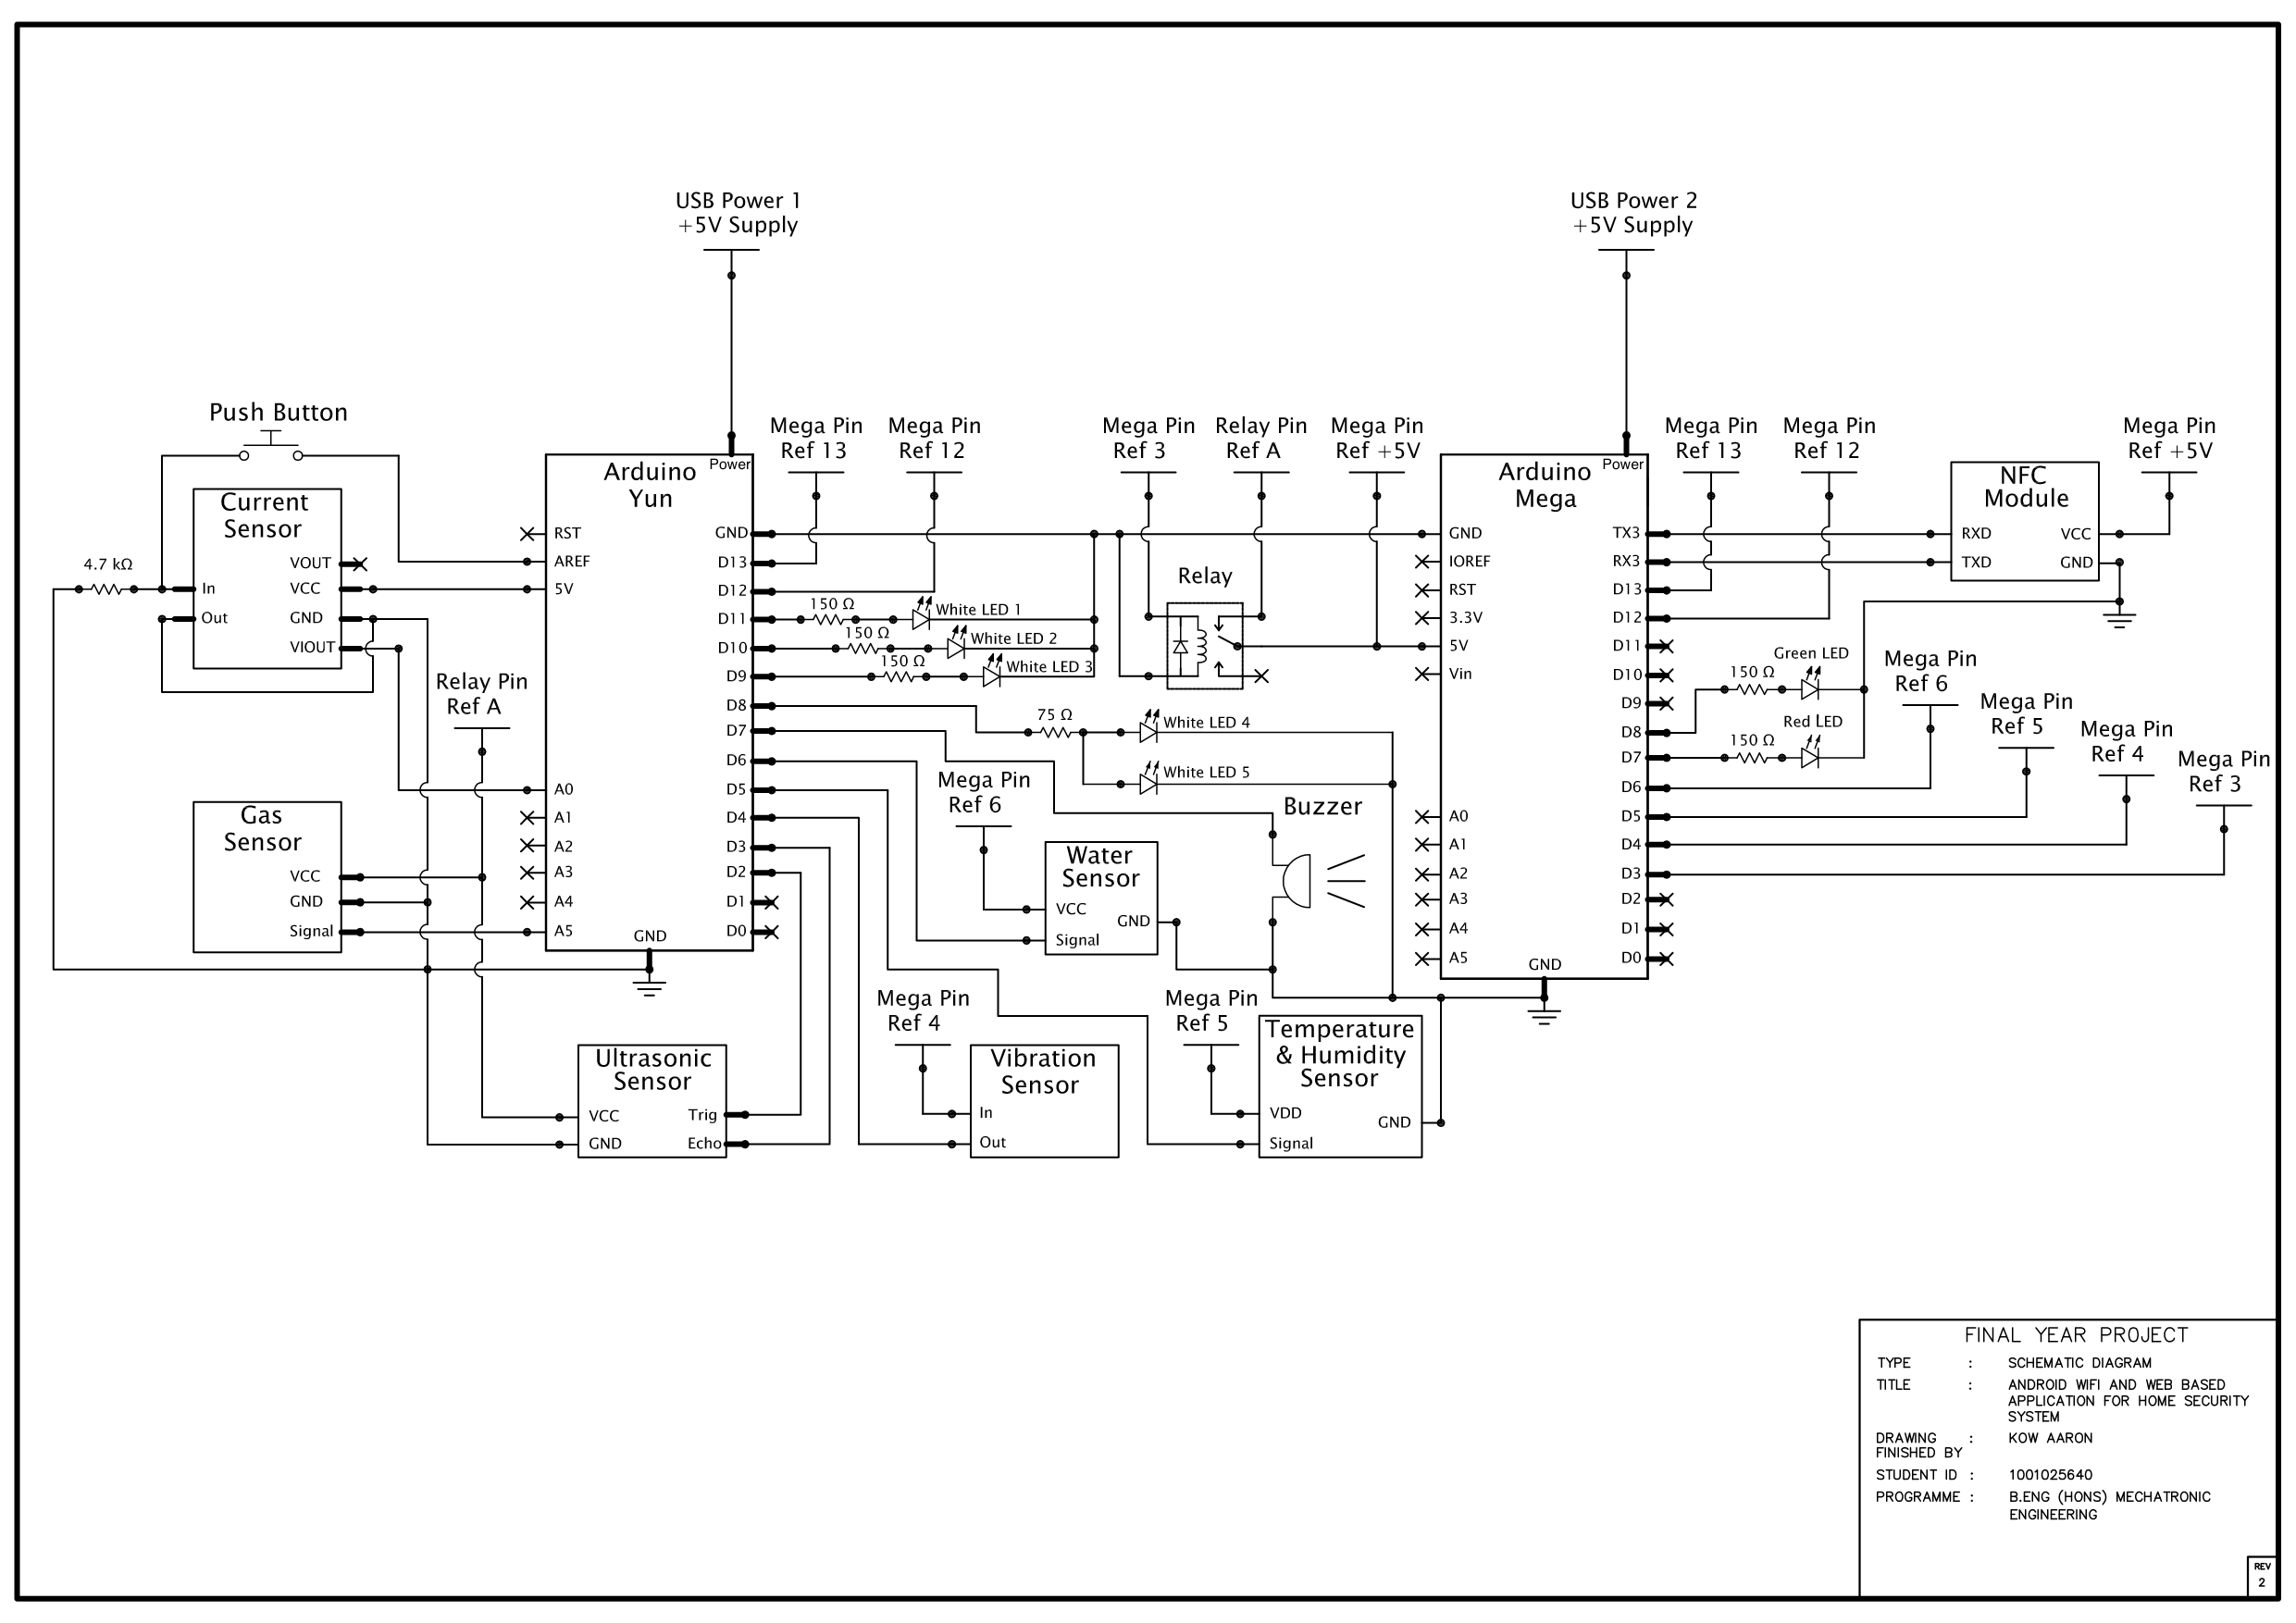
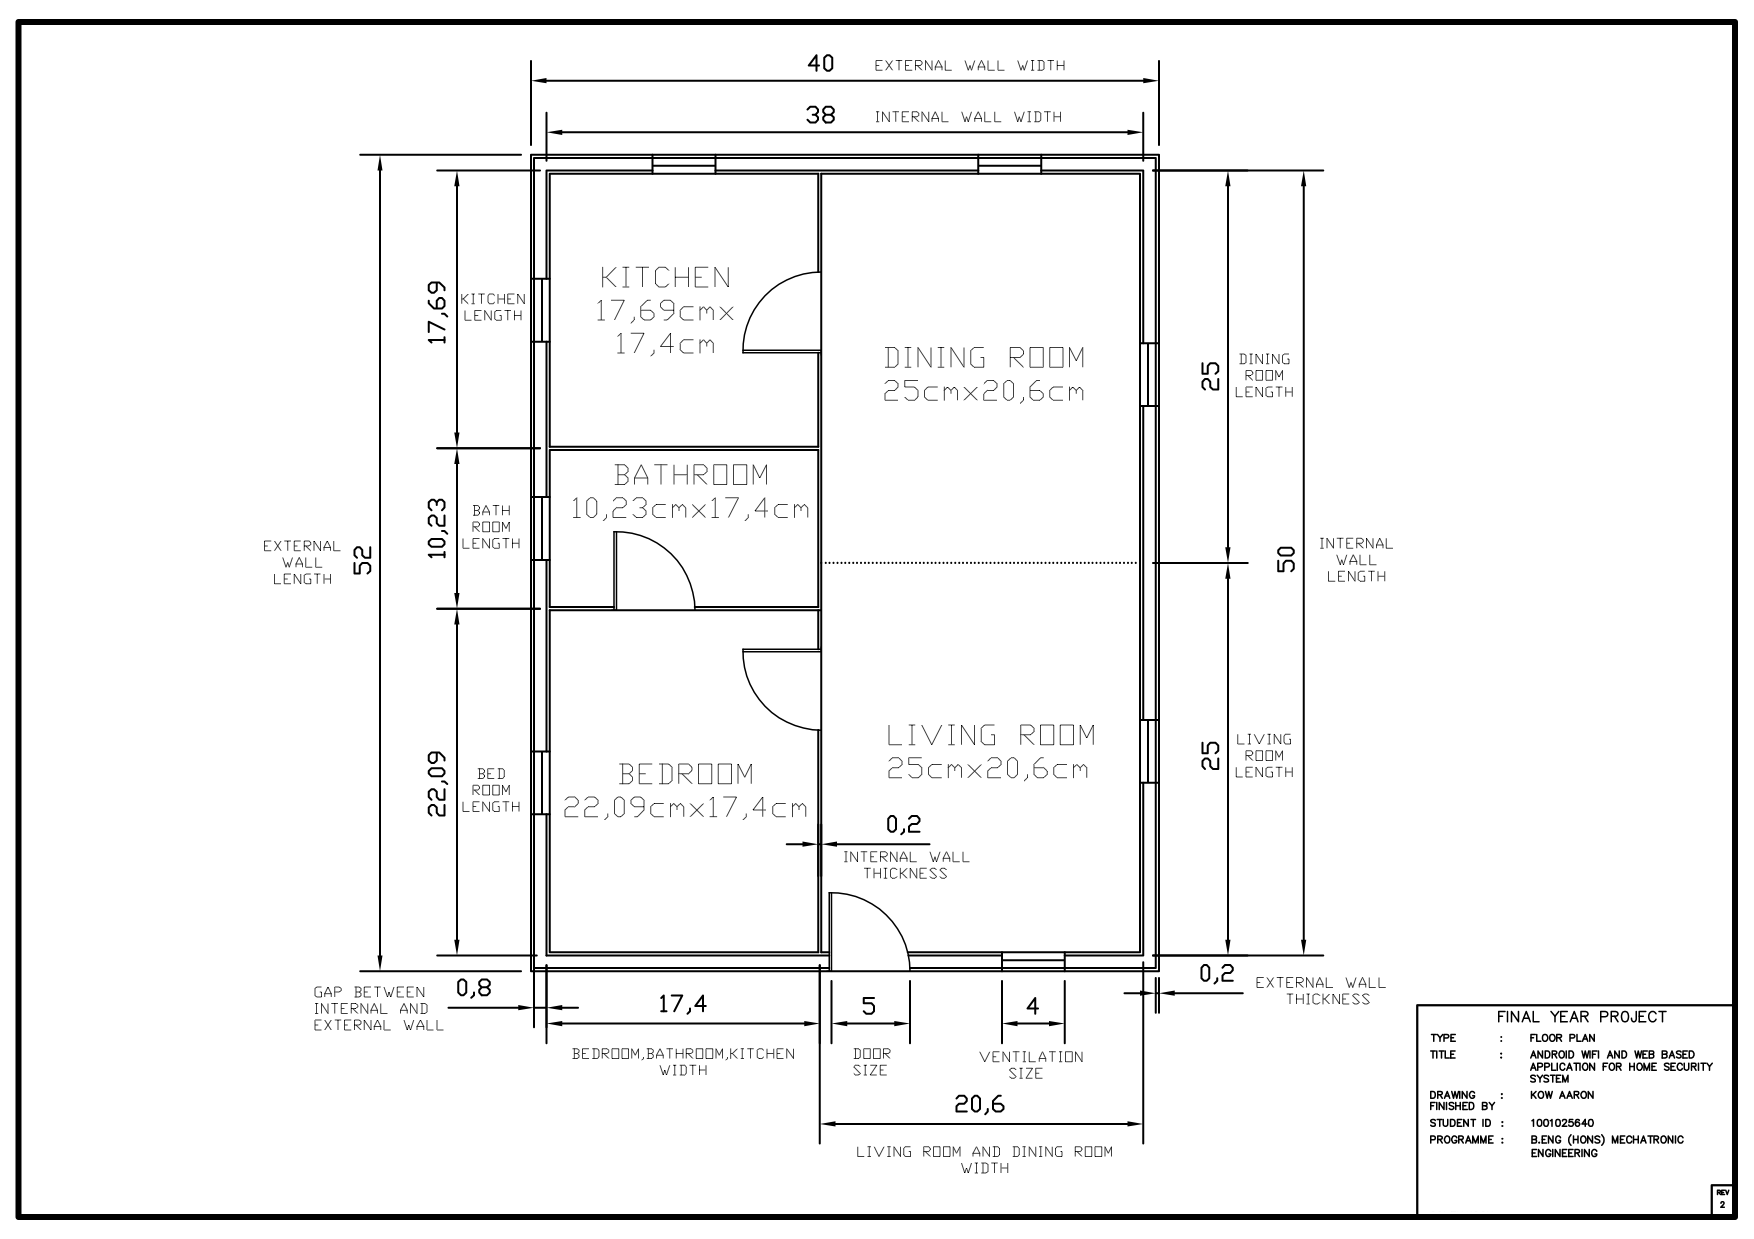
Structure for this projectThe structure of this model is build according to the floor plan layout as shown in schematics section. The materials that used are plywood with size 64.5cm (L) x 61.5cm (W) x 0.8cm (H) as the ground, craft plywood sheets for building the walls and main electronic components consist of 6 sensors, 1 NFC Reader and 2 microcontrollers, other minor components can refer to my components list.
Thus, the finishing product is almost 85% covered by plywood materials. Similar as building the real house with concrete, the concept of building this house is entirely depend on the strong adhesive class of reactive prepolymers and polymers that known as polyepoxides or epoxy.
System Design for this ModelThe design of this system is very straight-forward, which works in a two-way flow. First flow started from the data provided by the sensors through mircocontroller and to the cloud through the internet and retrieved by any smart devices. Second flow is the response flow from user to the microcontroller installed at home through internet connection and to the responding mechanisms ( LED on/off, servo-motor, water pump, so on... ) to react. Just like the IoT layer model, I designed my own a simple layer of hierarchy for this home model.
The IoT web-service is custom made by myself. The features of this web-service includes real-time capability to fetch and monitoring sensors data, dashboard for home status, system warning message, storage for sensors data, full data logging and safety benchmark configuration. I'm not fully open-source the code yet, but will do it in the coming future, mark my words. (At the time of this writing, there's still a lot of flaw about the web-service I wrote). But disappoint not, because I do find out there are some of other IoT web-services out there like Samsung's SAMI and Freeboard.io (probably more out there, but currently, I only knew these). I would like to share more details with picture about the service I wrote:
- Picture 1: Connected Dashboard with Home Model
- Picture 2: Safety Benchmark Configuration
- Picture 3: Data Logging Graph
- Picture 4: Example of 10 minutes Data Graph
- Picture 5: Example of Full Data Logging
- Picture 6: Example of System Warning Message
- Picture 7: Example of Security is turned OFF using NFC
- Picture 8: Example of Current Spike Condition
- Picture 9: Vibration Sensor in Real-Time
- Picture 10: Water Sensor in Real-Time
- Picture 11: Gas Sensor in Real-Time
- Picture 12: Temperature Sensor in Real-Time
- Picture 13: Humidity Sensor in Real-Time
- Picture 14: NFC Reader Data in Real-Time
*For higher resolution of these pictures, you can view it in my Dropbox, here.
Building Process:a - Planning and Designing the House PlanBefore the house plan is being drawn, the original draft of the house plan is based on the arrangement of the sensors and furniture that being setup at the first place. The initiative involved the measurement and scaling of the arrangement for the furniture being recorded and taken account for the next proceeding step for designing the house plan. The actual presentation of the arrangement for the furniture is shown in picture below. On the left side of the figure is the breadboard with the configuration of the microcontroller and the power distribution.
The materials involved here is by meant of custom preparation for the house model. The materials preparation involved of plywood doors crafting, windows crafting and framework of the walls. The tasks of these preparation are shown below.
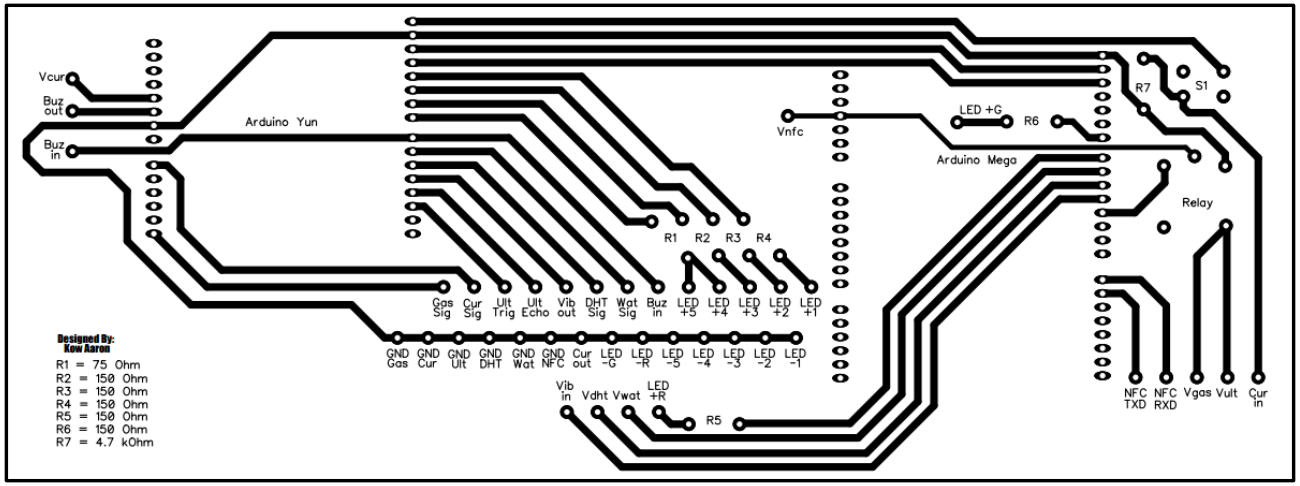
Another preparation is the circuit board for the system. I have made my own circuit board using positive acting presensitized printed circuit board. The method is very straight-forward and you can follow the full tutorial here. My printed circuit board can be seen below.
This phase, the term "site" here means for the field or ground that lay before the foundation. The ground that refer here is made from the plywood with dimensions of 64.5cm (L) x 61.5cm (W) x 0.8cm (H).
While for the foundation of the house is built from the combination of 4 pieces of craft plywood sheets that having the area of 52cm (L) x 40cm (W). With this foundation where the wall framework will be built upon in the next coming phase. The preparation of the site and foundation is shown in picture below.
This phase is very essential for the overall structure of the house because it deals with the collectively known shell or skeleton of the house which is the floor systems and walls systems. For both of these systems will be completed in this phase. Similar as the concept of building a real house, the floors and walls are cemented properly to hold firmly between the properties and protect against external force exerted on it. In this project house model, the floors and walls are finished using a strong adhesive solution known as epoxy. The finished floor systems and walls system is shown in picture below.
In this phase, all the sensors and NFC module are being installed in the planned position. Then, the wiring process able to be proceed. In the meantime, during the wiring process, the connectivity of the circuit is tested from time to time to prevent any wiring misplaced to improper connection.
During the wiring process, there are total number up to 38 pin points that required to be completed in this task. For all the connection cables are properly categorized with accordance to the walls system which contains 4 segments that known as wall 1-cables, wall 2-cables, wall 3-cables and wall 4-cables ( all total of four main walls ). Lastly, these cables are framed to the walls within the house with strong adhesive epoxy. The examples of wiring works are shown below.
Only after all the previous phases completed, the internal wall of the framework is able to be built. Internal wall of this house is based on the house plan designed in step(a) and the completed work is shown below.
Finally, the wall framework is completed, then the furniture can be brought in. To make it stable and unmovable, I used strong adhesive solution, eproxy to stick those furnitures on top of the foundation.
I've decided to use this project to works using AWS IoT. Instead of using "HTTP" in as the original protocol, I've modified the data communication protocol using MQTT with secure connection from AWS IoT. And the result working very well, let me show the video demonstration below:
The great about AWS IoT model is its emphasis on security in the cloud and cover strong authentication, for each of IoT device to be connected require credentials (X.509 certificate and AWS credential) to access the message broker. TLS is used to encrypts the connection between the device and the broker and this create an end-to-end secure communication.
[UPDATED]: Source code is available in my GitHub Repo, here
Although it is great about using this communication protocol compared to "HTTP", but there is a drawback when using this approach in this project. My original source code for Arduino Yun seems not working well with Yun-Sdk from AWS IoT, the "HTTP" LED controlling becomes obsolete. I think I will open this issue soon and takes some time to solve this issue. Overall, all sensors data working fine.
But overall, the data message works pretty well, and compared to my original "HTTP" approach, I will definitely go for "MQTT" with AWS IoT. Not only because of security, "MQTT" provide benefits such as low power usage, minimised data packets, and efficient distribution of information.
Important remarks in the source code:
/*
       Example of Publishing a Topic in AWS IoT Home Security Model
               (Code can be found in IoTHome-Yun.ino)
*/
   char userid[] = "your-user-id-here";     // line 57
   setTopic("IoTHome/nfc/");                // line 377
   aws_iot.data(arrayTopic, value0);        // line 378
   void setTopic(char* topic){              // line 383
     *arrayTopic = 0;                       // line 384
     strcat(arrayTopic, topic);             // line 385
     strcat(arrayTopic, userid);            // line 386
   }                                        // line 387
/*
       Example of Output Topic (Code can be found in iot_config.cpp)
*/
   Serial.print(topic);    // line 106
                           // will output "IoTHome/nfc/your-user-id-here"
                           // userid is used for authentication in Web App
The coding for this project is open-source, please refer to the Code Section for my Github repo with name "AWS-IoT-Home-Security-Model-HW".
Future ImprovementHome Security System is one of the significant parts for the building blocks for a smart home. Thus, my consideration is to include as many sensors as possible and make good use of the data collected are the keys to making the home more “smarter”, in my opinion, collectively will linked to the improvement of security for a house.
Problems | Questions | Comments | SuggestionProbably, there is some technical problem in this project that I'm not aware of, you can leave a comment or private message me, your feedback is highly valued!
Any questions regarding this project also can contact me.
All sorts of comments and suggestions are welcome.


_wzec989qrF.jpg?auto=compress%2Cformat&w=48&h=48&fit=fill&bg=ffffff)


Comments