
Hardware components | ||||||
| × | 1 | ||||
 |
| × | 1 | |||
 |
| × | 1 | |||
 |
| × | 1 | |||
Software apps and online services | ||||||
 |
| |||||
 |
| |||||
 |
| |||||
 |
| |||||
I'm sure I did, yet I don’t specifically remember turning it off, but I'm pretty sure I would have, right? As I keep driving the voice keeps occupying more of my consciousness asking the “What ifs?”, “What if I come back and my apartment is a smoldering ruin?”. Usually, I decide it better to turn around and just make certain I turned it off, rather than having a building anxiety spoiling the relaxing weekend.
Every single time, the stove is turned off, as I thought, I just couldn’t remember explicitly doing it. Now we are behind schedule and most likely won’t arrive at the campsite until it’s already dark.
Build time:Hardware build time: 25 min initial setup(Up to an hour to wire up the 4 wires so the pi can be above the stove)nio Service build time: 10 minUI build time: 20 minTotal = approx. 2 hours
Benefits:- No electrical work or wire cutting
- Cheap Solution – < $40
- Easy to setup / maintain
Find a sensor that meets your requirements. I put together a list of sensors I thought would fit the bill:
The Infrared Thermometer looks to be a winner in the cost department, but will it do what we need?
Since they’re so cheap I figured why not buy one and give it a shot.
In order to get the Thermometer reading temperature data we need:
- A Raspberry Pi
- A breadboard
- Wires
This is the Infrared Thermometer’s datasheet. This is needed in order to know how to connect it to the pi. Page 5 has a pin definition in order to see which 2 of the 4 connections are for power and which 2 are for reading data. There is a tiny bump on the sensor which tells us how to align it to read this diagram. Here you see the bump faces to the right. VSS is the ground connection and VDD is the input from the power supply. The PWM / SDA pin is the important one for reading temperature data. Reading from the RaspPi pin diagram we can see where to connect wires.
- VDD to the 3v3 power input
- VSS to a GND
- SCL / Vz to the SCL1 (pin 05)
After setting this up the next step is to try and get a temperature reading in the console. From the datasheet, we see that the address we need to read from is 0x07 (Tobj1) – the Temperature of the Object
In bash we need to run
i2cdetect -y 0
to get the Address of the i2c Bus. In my case, it was 0x5a. We can then read the Raw temperature data in python with:
import smbusbus = smbus.SMBus(1)word = bus.read_word_data(0x5a, 0x07)
The number we are receiving is text data, and we need to convert it to Fahrenheit, this is how I did that:
kelvin = word * 0.02
celcius = kelvin - 273
fahrenheit = (9 / 5 * celcius) + 32
Awesome! Running this program gives us a Fahrenheit temperature reading and it is room temperature! The next thing I did was to make a hot cup of tea and hold it over the temperature sensor and take another reading. It should be much greater than room temperature if everything is setup correctly!
Step 3Our next step is to design a system using nio that will take a reading every 5 seconds and publish that data to a socket server.
In order to do this we need to create a simple Infrared Thermometer block. The first step is to clone down the nio Block Template, I named mine irthermometer_block. The next step is to use the commands we wrote above in order to get the temperature and pass that signal on.
Once that block is installed we can simply import it into nio and process a signal every 5 seconds and publish that to a socket server.
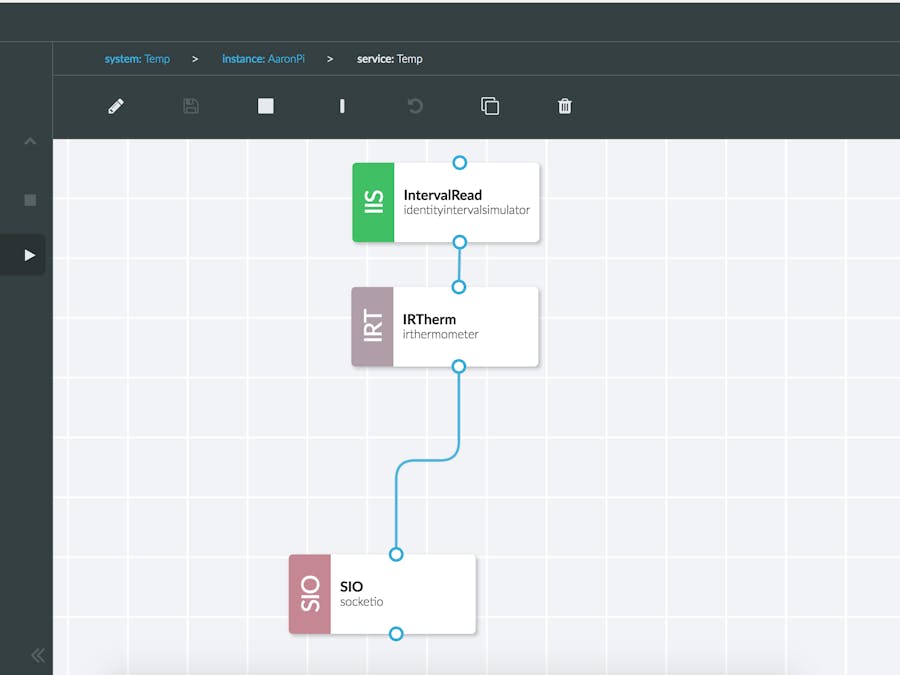
The nio serviceThe full service using three blocks: IdentityIntervalSimulator, Irthermometer (custom block built for this project), and Socketio (custom block built for this project).
The next piece is to install the actual temperature sensor on the stove! We need to have it connected to the RaspPi still so the best solution I found was to extend the 4 wires and have just the sensor hang over the stove while the electronics sit above the kitchen cabinets, far away from the electronic damaging steam that comes from the stove.
The InstallThe last step is to setup our socket server and output data to a url! For this project I setup a subdomain stove.aaronranard.com. I created and styled a small socket.io server to capture the data and display the UI.
For this implementation, we need to store previous temperature readings so we can know if it is going up, down, or staying relatively even.
The biggest use-case for this service is about 5 – 10 minutes after you’ve left home. In this situation, the stove might still be hot, BUT it should be cooling down.
So we need to show more than the exact temperature reading because if I were to view it right after I left and it said 130 I may think I left it on, whereas, in reality, it is just cooling down.
Code:const halfLength = valuesToStore / 2;const oldData = previous.slice(0, halfLength);const newData = previous.slice(halfLength);
const oldAvg = oldData.reduce((total, data) => { return total + parseFloat(data.fahrenheit) }, 0) / halfLength;const newAvg = newData.reduce((total, data) => { return total + parseFloat(data.fahrenheit) }, 0) / halfLength;
A history of recent temperatures is stored and a diff on the delta of the more recent ones (newAvg) vs the older ones (oldAvg) will tell us if it is warming up or cooling down.
On the front-end we need 3 things:
- A switch to tell us if the stove is on or off
- The current temperature reading
- A color display if the stove is cool, warming, hot or cooling
To see more blogs by Aaron check out his personal blog at: https://aaronranard.com/blog/
Aaron Ranard
 Drew Noolas


Comments